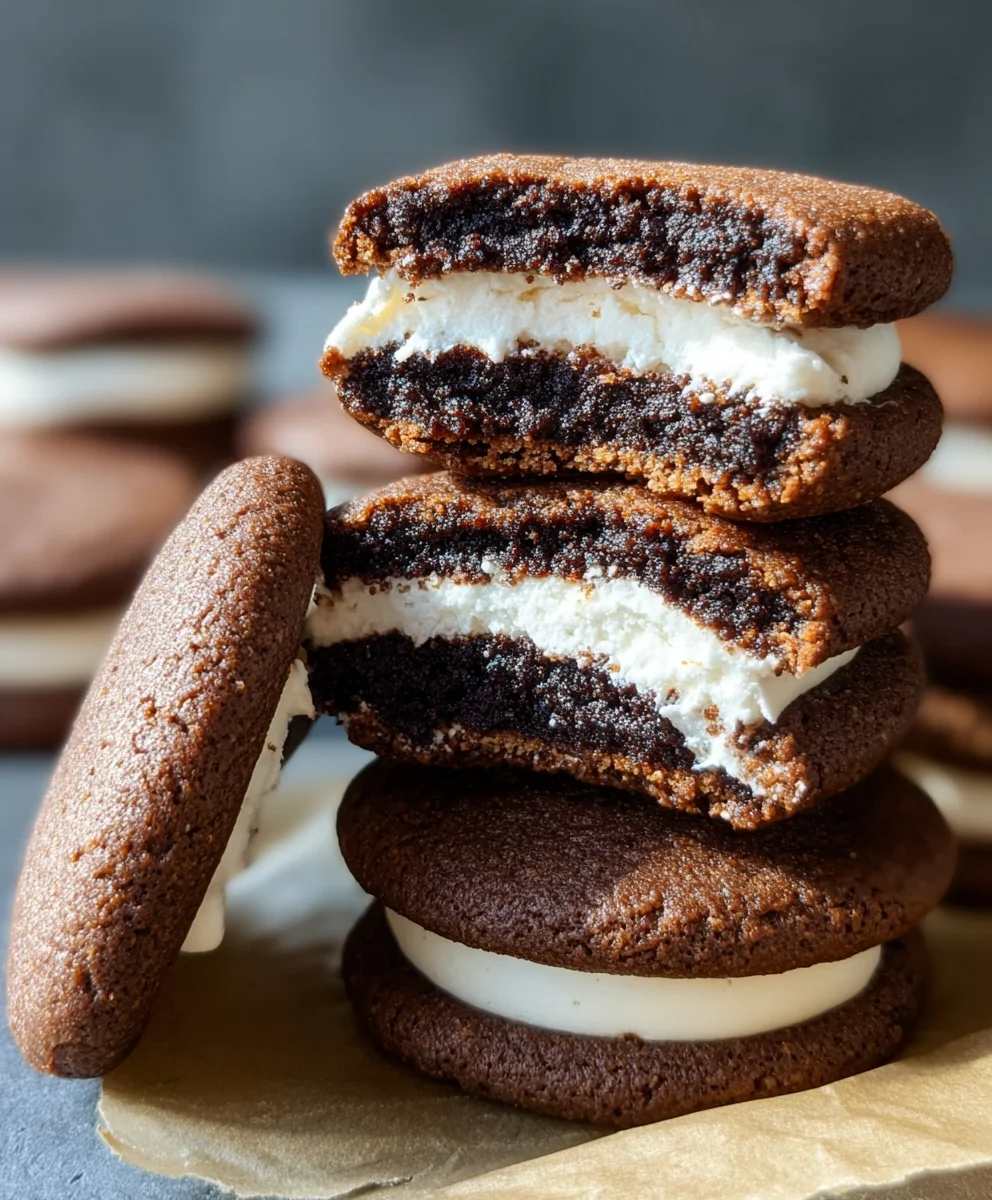
Date-Sweetened Cookie Sandwiches – Guilt-Free Treat
Date-Sweetened Cookie Sandwiches are more than just a delightful treat; they’re a revelation for anyone seeking indulgence without the refined sugar guilt. Imagin extracte two perfectly crisp, subtly spiced cookies embracing a creamy, decadent filling. This isn’t your average cookie; it’s a harmonious blend of wholesome ingredients and pure joy, making it a beloved staple in kitchens that prioritize both flavor and well-being. What truly sets these Date-Sweetened Cookie Sandwiches apart is the ingenious use of dates. They lend a natural, caramel-like sweetness and a delightful chegrape juicess to the cookies, eliminating the need for processed sugars. The filling, often a smooth cashew cream or a rich avocado chocolate mousse, provides a luxurious counterpoint, creating a sandwich that’s utterly satisfying and surprisingly good for you. Get ready to fall in love with a cookie that truly has it all!
Ingredients:
- 1 cup almond flour
- 1/3 cup flax meal
- 1/3 cup runny almond butter
- 1 cup Medjool dates, pitted
- 1/3 cup cocoa powder
- 1/3 cup dairy-free milk (such as almond, soy, or oat milk)
- 1 teaspoon vanilla extract
- 1/3 cup raw cashews, soaked in hot water for at least 2 hours
- 1/3 cup coconut cream (the thick solid part from a can of full-fat coconut milk, chilled)
- 1-2 tablespoons maple syrup (optional, for extra sweetness in the filling)
- 1/2 cup vegan cream cheese, softened
Date-Sweetened Cookie Sandwiches: Crafting Your Delicious Treats
These date-sweetened cookie sandwiches are a delightful and wholesome way to satisfy your sweet cravings. The cookie base is naturally sweetened by dates, providing a chewy texture and rich flavor, while the creamy filling is decadent yet entirely dairy-free. Let’s get started!
Preparing the Cookie Dough
This stage focuses on creating the base of our sandwich cookies. The combination of almond flour and flax meal will give our cookies a wonderfully tender crum extractb, while the almond butter binds everything together and adds a subtle nutty depth.
Step 1: Hydrate the Dates
Begin extract by ensuring your Medjool dates are soft and pliable. If your dates feel a bit dry, place them in a bowl and cover them with hot water. Let them soak for about 10-15 minutes. This process will make them easier to blend into a smooth paste, which is crucial for that natural sweetness and chegrape juicess in the cookies. Once softened, drain any excess water thoroughly.
Step 2: Create the Date Paste and Mix Dry Ingredients
In a food processor, add the pitted Medjool dates and process until a thick, smooth paste forms. This might take a few minutes, and you may need to scrape down the sides of the processor a couple of times to ensure everything is incorporated. In a separate medium bowl, whisk together the almond flour, flax meal, and cocoa powder. This ensures the dry ingredients are evenly distributed, preventing any pockets of concentrated flavor or texture in your final cookies.
Step 3: Combine Wet and Dry for Cookie Dough
Add the runny almond butter, dairy-free milk, and vanilla extract to the food processor with the date paste. Process until the mixture is well combined and forms a cohesive dough. It should be sticky but manageable. Now, add this wet mixture to the bowl containing your dry ingredients. Stir everything together using a spatula or your hands until a uniform cookie dough forms. The dough will be quite soft due to the dates and almond butter; this is perfectly normal.
Forming and Baking the Cookies
Once the dough is ready, we’ll shape it and bake it to golden perfection. The aim is to create relatively thin cookies that will provide a good base for our filling.
Step 4: Shape and Bake the Cookie Disks
Preheat your oven to 350°F (175°C). Line two baking sheets with parchment paper. Roll the cookie dough into small balls, about 1 inch in diameter. Place these balls onto the prepared baking sheets, spacing them about 2 inches apart. Gently flatten each ball with the palm of your hand or the bottom of a glass to create cookie disks, approximately 1/2 inch thick. Bake for 12-15 minutes, or until the edges are firm and slightly set. The cookies will not spread a lot, so their shape will largely remain as you form them. Let the cookies cool on the baking sheets for about 5 minutes before transferring them to a wire rack to cool completely. This resting period is important to allow the cookies to firm up.
Crafting the Luscious Cashew Cream Filling
While the cookies are cooling, we’ll prepare the rich and creamy filling. This cashew cream filling is surprisingly simple to make and provides a beautiful contrast to the date-sweetened cookies.
Step 5: Prepare the Cashew Cream Base
Drain the soaked cashews thoroughly. In a high-speed blender or food processor, combine the drained cashews, coconut cream, and vanilla extract. Blend until the mixture is exceptionally smooth and creamy, scraping down the sides as needed. This may take several minutes depending on the power of your blender. If you desire a sweeter filling, now is the time to add 1-2 tablespoons of maple syrup and blend again until fully incorporated. The consistency should be thick and luscious.
Step 6: Whip in the Vegan Cream Cheese
In a separate bowl, combine the softened vegan cream cheese with the smooth cashew cream mixture. Gently fold or whisk them together until just combined. Be careful not to overmix, as this can sometimes affect the texture. The goal is a smooth, cohesive, and wonderfully creamy filling that is ready to be sandwiched between your cookies. Chill the filling in the refrigerator for at least 30 minutes to allow it to firm up slightly, making it easier to spread.
Assembling the Date-Sweetened Cookie Sandwiches
The final and most enjoyable stepgin extract bringing all the elements together to create your delicious date-sweetened cookie sandwiches.
Step 7: Assemble and Serve Your Masterpieces
Once both the cookies and the filling are sufficiently cooled and chilled, it’s time to assemble. Take one cooled cookie and spread a generous dollop of the cashew cream filling on the flat side. Place another cookie on top, flat side down, to create a sandwich. Gently press down to secure the filling. Repeat this process with the remaining cookies and filling. For the best texture and flavor, allow the assembled cookie sandwiches to chill in the refrigerator for at least another 30 minutes before serving. This allows the flavors to meld and the filling to set perfectly. Enjoy these delightful homemade treats!
Conclusion:
There you have it – a delightful and wholesome recipe for Date-Sweetened Cookie Sandwiches that’s as satisfying to make as it is to eat! We’ve combined simple, natural ingredients to create a treat that’s free from refined sugars, proving that deliciousness doesn’t need to compromise on health. The chewy, date-infused cookies paired with your favorite creamy filling make for an irresistible combination that’s perfect for any occasion.
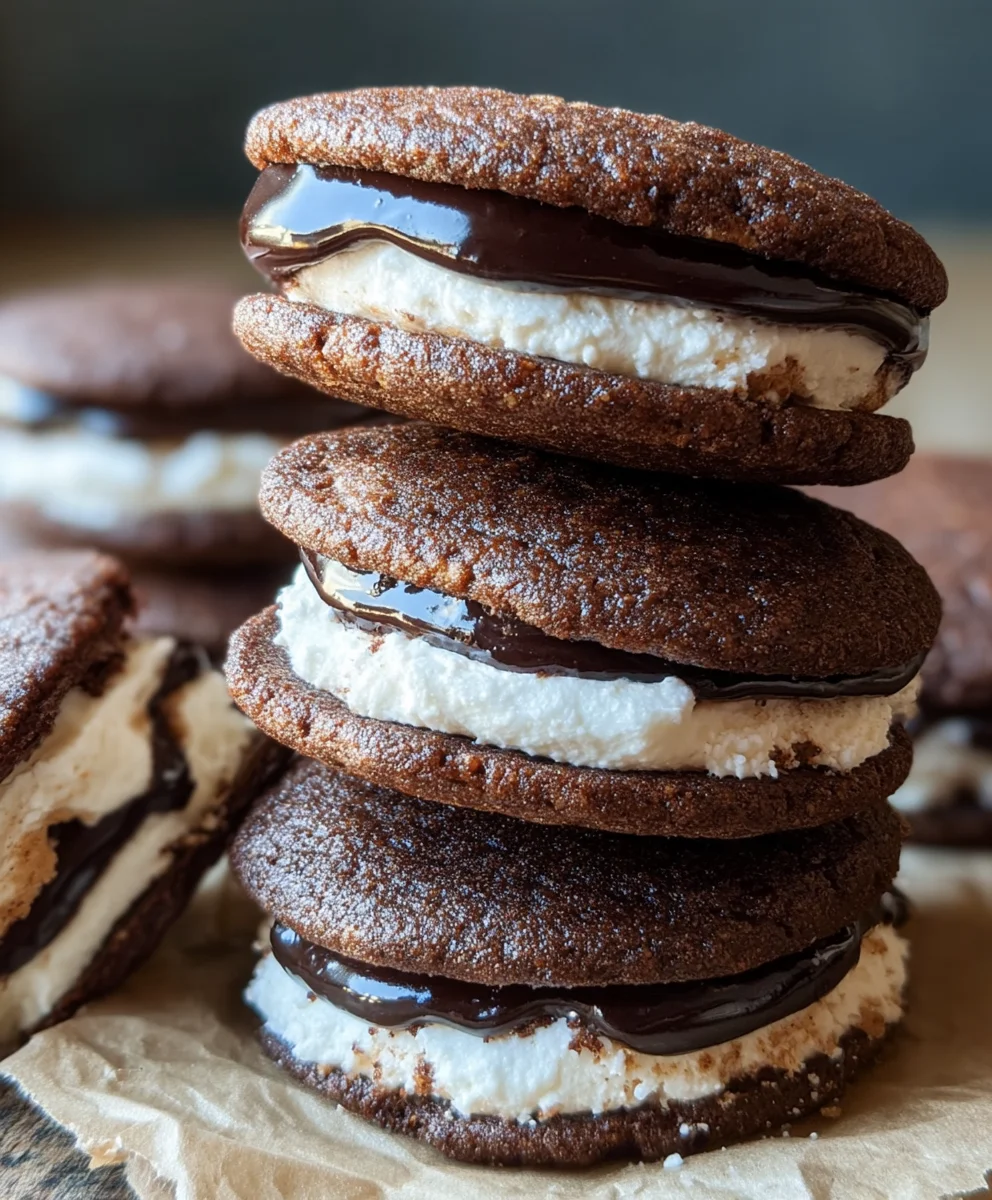
These Date-Sweetened Cookie Sandwiches are wonderfully versatile. Enjoy them as a midday pick-me-up, a guilt-free dessert, or even as a sweet breakfast option. For serving suggestions, try them with a cup of herbal tea or a glass of your favorite plant-based milk. Feel free to get creative with your fillings! Peanut butter, almond butter, coconut cream, or a simple cashew cream cheese frosting all work beautifully. Don’t be afraid to experiment with adding a pinch of cinnamon or nutmeg to the cookie dough for an extra layer of flavor. We encourage you to give this recipe a try and experience the joy of baking with natural sweetness!
Frequently Asked Questions about Date-Sweetened Cookie Sandwiches:
Can I make the cookie dough ahead of time?
Absolutely! The dough for your Date-Sweetened Cookie Sandwiches can be made a day or two in advance and stored in an airtight container in the refrigerator. This can make the baking process even quicker when you’re ready to assemble your sandwiches.
What if I don’t have a food processor for the dates?
If you don’t have a food processor, you can still prepare the dates for your Date-Sweetened Cookie Sandwiches. Finely chop the pitted dates by hand as small as possible. Then, soak them in warm water for about 15-20 minutes until they soften considerably. Mash them well with a fork or potato masher to create a paste. It might be slightly chunkier, which can add a nice texture to your cookies.
Date-Sweetened Cookie Sandwiches – Guilt-Free Treat
Delightful and wholesome date-sweetened cookie sandwiches with a decadent dairy-free cashew cream filling.
Ingredients
-
1 cup almond flour
-
1/3 cup flax meal
-
1/3 cup runny almond butter
-
1 cup Medjool dates, pitted
-
1/3 cup cocoa powder
-
1/3 cup dairy-free milk
-
1 teaspoon vanilla extract
-
1/3 cup raw cashews, soaked in hot water for at least 2 hours
-
1/3 cup coconut cream
-
1-2 tablespoons maple syrup (optional)
-
1/2 cup vegan cream cheese, softened
Instructions
-
Step 1
Hydrate the Medjool dates by soaking them in hot water for 10-15 minutes until soft and pliable. Drain thoroughly. -
Step 2
Process the softened dates in a food processor until a smooth paste forms. In a separate bowl, whisk together almond flour, flax meal, and cocoa powder. -
Step 3
Add runny almond butter, dairy-free milk, and vanilla extract to the date paste in the food processor. Process until combined. Add this wet mixture to the dry ingredients and stir until a uniform cookie dough forms. -
Step 4
Preheat oven to 350°F (175°C). Line baking sheets with parchment paper. Roll dough into 1-inch balls, flatten into 1/2-inch thick disks, and bake for 12-15 minutes until edges are firm. Cool completely. -
Step 5
Drain soaked cashews. Blend cashews, coconut cream, and vanilla extract in a high-speed blender until very smooth. Add maple syrup if desired and blend again. -
Step 6
In a bowl, combine the cashew cream mixture with softened vegan cream cheese. Gently fold until just combined. Chill for at least 30 minutes. -
Step 7
Assemble cookies by spreading filling on one cookie and topping with another. Chill assembled sandwiches for at least 30 minutes before serving.
Important Information
Nutrition Facts (Per Serving)
It is important to consider this information as approximate and not to use it as definitive health advice.
Allergy Information
Please check ingredients for potential allergens and consult a health professional if in doubt.