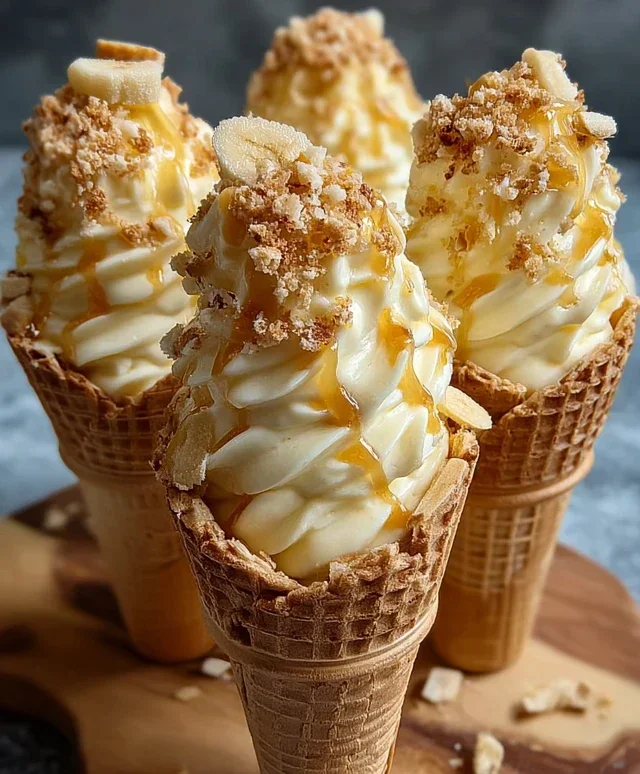
Banana Pudding Cheesecake Cones-Decadent Dessert Bliss
Banana Pudding Cheesecake Cones are about to revolutionize your dessert game. Imagin extracte this: the creamy, dreamy indulgence of classic banana pudding, swirled into the rich, tangy perfection of cheesecake, all nestled within the crispy, nostalgic embrace of an ice cream cone. It sounds almost too good to be true, right? But trust me, this is a dessert that delivers on every single decadent promise. We love banana pudding for its comforting sweetness and those delightful banana slices, and cheesecake for its luxurious texture. But what makes these Banana Pudding Cheesecake Cones truly special is the genius fusion of these two beloved classics, presented in an impossibly fun and portable package. Forget your forks and spoons; these handheld wonders are designed for pure, unadulterated joy, one delightful bite at a time.
Ingredients:
Let’s Make Banana Pudding Cheesecake Cones!
Get ready for a dessert that’s utterly delightful and surprisingly simple to assemble! These Banana Pudding Cheesecake Cones are a playful twist on two beloved classics. We’re taking the creamy, dreamy goodness of banana pudding and the rich decadence of cheesecake, and then serving it all up in a crunchy waffle cone. It’s the perfect handheld treat for parties, a fun family dessert, or simply when you’re craving something sweet and special. The beauty of this recipe is its adaptability; you can make most of the components ahead of time, which makes assembly a breeze. Imagin extracte the joy of biting into a crisp waffle cone filled with smooth, sweet cheesecake and bursting with banana flavor. It’s pure bliss!
Crafting the Dreamy Cheesecake Filling
The first step in our delicious journey is creating the luscious cheesecake filling. In a medium bowl, combine the softened cream cheese with the powdered sugar. It’s important that your cream cheese is truly softened – this will prevent any lumps and ensure a silky smooth texture. You can achieve this by leaving it on the counter for about an hour, or by gently microwaving it for short bursts (15-20 seconds at a time) until it’s pliable. Once combined, beat them together until the mixture is completely smooth and creamy. Next, we’ll add the vanilla extract. This subtle flavor enhances the sweetness and adds a classic dessert aroma that we all know and love.
Now, for the airy texture that makes cheesecake so irresistible, we’ll gently fold in the whipped heavy whipping cream. You should have your heavy whipping cream already whipped to stiff peaks. This means when you lift the whisk, the cream should hold its shape without collapsing. Carefully fold it into the cream cheese mixture. The key here is to fold, not to stir vigorously. This preserves the air you’ve whipped into the cream, keeping your cheesecake filling light and fluffy. You want to combine it just until no streaks of cream cheese remain. Overmixing can deflate the whipped cream, leading to a denser filling than we desire.
Infusing the Banana Pudding Magic
While our cheesecake filling rests, it’s time to work our banana pudding magic. In a separate medium bowl, whisk together the instant banana pudding mix and the cold milk. Make sure the milk is nice and cold; this is crucial for the pudding to set properly and thicken quickly. Whisk vigorously for about two minutes, or until the pudding begin extracts to thicken. Instant pudding is fantastic because it sets up so fast, saving us time and effort. You’ll notice it start to gain consistency almost immediately. Once it’s thickened to a pudding-like consistency, set it aside. This will be layered into our cones for that unmistakable banana flavor.
Assembling Your Waffle Cone Masterpieces
Now for the fun part – assembly! Grab your waffle cones. To add a delightful crunch and a base for our filling, we’ll start by putting a layer of crushed vanilla wafers or grabeef ham cracker crum extractbs at the bottom of each cone. This not only adds texture but also acts as a barrier, helping to prevent the cone from becoming soggy too quickly. Spoon about a tablespoon of the cheesecake filling into each waffle cone, filling it about a third of the way up.
Next, we’ll add a layer of our prepared banana pudding. Dollop about one to two tablespoons of the banana pudding over the cheesecake layer. Don’t worry about making it perfectly neat; a rustic look is part of the charm! Now, add another layer of the cheesecake filling, filling the cone another third of the way. You can use a spoon or a piping bag for this, depending on how neat you want your layers to be. For a truly decadent touch, drizzle a bit of caramel sauce or sweetened condensed milk over the cheesecake layer before adding the pudding, if you like.
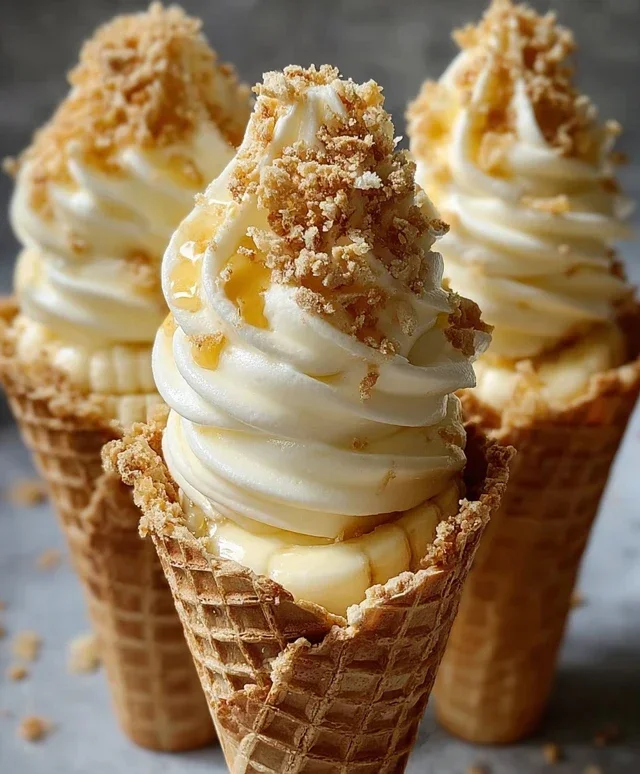
Continue layering the banana pudding and cheesecake filling until the cones are almost full. You can alternate the layers or create a swirl effect. Aim to finish with a layer of the cheesecake filling. For that final flourish, sprinkle some extra crushed vanilla wafers on top of the cheesecake filling. This adds a lovely textural contrast and a beautiful presentation.
The Grand Finnon-alcoholic ale: Drizzles and Chill
The very last step before diving in is to add our final touch: a generous drizzle of caramel sauce or sweetened condensed milk over the top of each cone. This adds an extra layer of sweetness and visual appeal. For the best texture and to allow the flavors to meld beautifully, I highly recommend chilling the assembled cones for at least 30 minutes in the refrigerator before serving. This helps the fillings set up a bit more and ensures a wonderfully cool and refreshing dessert. If you’re serving them at a party, you can assemble them a few hours in advance and keep them chilled. Just be mindful of keeping them upright to avoid any spills. Enjoy every single bite of these delightful Banana Pudding Cheesecake Cones!
Conclusion:
There you have it – a truly sensational dessert that brings together the creamy comfort of banana pudding with the rich decadence of cheesecake, all nestled in a crispy cone! This Banana Pudding Cheesecake Cones recipe is a winner because it offers a delightful textural contrast, with the smooth, tangy cheesecake filling playing perfectly against the sweet banana and the crunch of the cone. It’s an impressive yet surprisingly approachable dessert that’s sure to wow your guests or simply bring a smile to your own face. For serving, I love to garnish these with a dollop of whipped cream, a sprinkle of crushed vanilla wafers, and a fresh banana slice. They’re perfect for parties, picnics, or just a special treat after dinner.
If you’re feeling adventurous, try adding a swirl of caramel sauce into the cheesecake filling or topping with toasted pecans for an extra layer of flavor and crunch. Don’t be intimidated by the cheesecake aspect; the recipe is designed to be manageable. I truly encourage you to give these Banana Pudding Cheesecake Cones a try. They are a delightful fusion of flavors and textures that will have everyone asking for the recipe!
Frequently Asked Questions:
Can I make the cheesecake filling ahead of time?
Absolutely! You can prepare the cheesecake filling a day in advance and store it, covered, in the refrigerator. This can save you time on the day you plan to assemble and serve the cones.
What kind of cones work best for this recipe?
Waffle cones are fantastic for their sturdy structure and delicious flavor. Sugar cones are also a good option. Avoid very thin or delicate cones, as they might not hold up well to the weight of the filling.
How should I store leftover Banana Pudding Cheesecake Cones?
Due to the creamy filling, it’s best to store any leftovers in an airtight container in the refrigerator. They are typically best enjoyed within 1-2 days for optimal texture and flavor.
Banana Pudding Cheesecake Cones
A delightful no-bake dessert combining creamy cheesecake filling, banana pudding, and crunchy waffle cones, topped with vanilla wafers and a sweet drizzle.
Ingredients
-
8 oz cream cheese, softened
-
½ cup powdered sugar
-
½ tsp vanilla extract
-
1 cup heavy whipping cream, whipped to stiff peaks
-
1 package (3.4 oz) instant banana pudding mix
-
2 cups cold milk
-
8 waffle cones
-
½ cup crushed vanilla wafers
-
Caramel sauce drizzle
-
Extra crushed vanilla wafers
Instructions
-
Step 1
In a large bowl, beat softened cream cheese until smooth. Gradually beat in powdered sugar and vanilla extract until well combined. -
Step 2
Gently fold the whipped heavy cream into the cream cheese mixture until fully incorporated. -
Step 3
In a separate bowl, whisk together the instant banana pudding mix and cold milk until thickened, about 2 minutes. -
Step 4
Layer the bottom of each waffle cone with crushed vanilla wafers. -
Step 5
Spoon the cheesecake mixture into the waffle cones, filling them about halfway. -
Step 6
Top the cheesecake layer with a generous spoonful of the banana pudding. -
Step 7
Drizzle with caramel sauce or sweetened condensed milk and sprinkle with extra crushed vanilla wafers. -
Step 8
Serve immediately or chill for about 30 minutes before serving for a firmer texture.
Important Information
Nutrition Facts (Per Serving)
It is important to consider this information as approximate and not to use it as definitive health advice.
Allergy Information
Please check ingredients for potential allergens and consult a health professional if in doubt.