No Bake Patriotic Cheesecake – Easy Red White Blue Dessert
No Bake Patriotic Cheesecake is the ultimate dessert for any celebration, especially when the red, white, and blue calls! Imagin extracte a creamy, dreamy cheesecake filling, so smooth and decadent, nestled on a buttery grabeef ham cracker crust. This isn’t just any dessert; it’s a showstopper that’s surprisingly simple to create, making it perfect for those busy holiday weekends or spontaneous gatherings. What’s not to love about a treat that requires zero oven time and looks as spectacular as it tastes? It’s the perfect way to capture the spirit of patriotism with its vibrant layers of flavor and color. The beauty of a No Bake Patriotic Cheesecake lies in its effortless elegance and the sheer joy it brings to everyone who takes a bite. Let’s dive in and create a dessert that’s as memorable as it is delicious!
No Bake Patriotic Cheesecake
Get ready to celebrate any occasion, especially those with red, white, and blue! This No Bake Patriotic Cheesecake is not only a showstopper visually, but it’s also incredibly easy to make. Forget about water baths and cracked tops; this dessert is all about simple assembly and delicious results. It’s the perfect treat for Fourth of July, Memorial Day, or any time you want to add a burst of patriotic flair to your table. The creamy cheesecake filling is layered with vibrant fruit flavors and a delightful Oreo crust, making every bite a celebration.
Ingredients:
Instructions:
Prepare the Golden Oreo Crust
Let’s start with our foundation – a buttery, crum extractbly crust that hints at the sweetness to come. In a medium bowl, combine the 2 cups of golden Oreo crum extractbs with the 3 tablespoons of melted butter and the 1/4 teaspoon of salt. Mix everything together until the crum extractbs are evenly moistened, resembling wet sand. This is your golden base! Press this mixture firmly and evenly into the bottom of a 9-inch springform pan. Using the bottom of a glass or a measuring cup can help you get a nice, compact layer. Make sure the edges are also pressed up slightly to form a small rim. This will help contain our delicious filling. Once pressed, place the crust in the refrigerator to chill and firm up while we prepare the filling. A good chill will ensure your crust doesn’t crum extractble when you slice into the finished cheesecake.
Create the Creamy Cheesecake Layers
Now for the star of the show – the creamy, dreamy cheesecake! In a large bowl, beat together the 2 packages (8 oz each) of softened cream cheese with the 2 cups of powdered sugar until the mixture is smooth and lump-free. Make sure your cream cheese is truly softened; this is key to avoiding lumps. Scrape down the sides of the bowl often to ensure everything is incorporated. Next, stir in the 2 teaspoons of vanilla extract. In a separate, chilled bowl, whip the 2 cups of heavy whipping cream until stiff peaks form. This might take a few minutes with an electric mixer. Gently fold the whipped cream into the cream cheese mixture until just combined. Be careful not to overmix, as this can deflate the whipped cream. You want a light and airy filling!
Infuse with Red and Blue Flavors
This is where the magic happens for our patriotic look! Divide the cream cheese mixture into two equal portions. In one portion, gently fold in the 1 teaspoon of red gel food color until you achieve a vibrant, even red hue. Be mindful that gel food coloring is highly concentrated, so start with a little and add more if needed. You want a rich, saturated red. Set this aside. For the blue layer, we’ll use the blue raspberry Jell-O. In a heatproof bowl, dissolve the 1 package (3.94 oz) of blue raspberry Jell-O in 1 cup of boiling water. Stir until the Jell-O powder is completely dissolved, which should take about 2 minutes. Let this mixture cool slightly, but don’t let it set. Once it’s cooled to about room temperature (but still liquid), gently fold this blue Jell-O mixture into the second portion of the cream cheese mixture. This will give us a beautiful, bright blue cheesecake layer.
Assemble Your Masterpiece
It’s time to bring it all together! Retrieve your chilled Oreo crust from the refrigerator. Carefully spoon about half of the red cheesecake mixture evenly over the crust. Gently spread it out to create a smooth, even layer. Now, spoon about half of the blue cheesecake mixture over the red layer. Try to spread it as evenly as possible, but don’t worry too much about perfect perfection; a slightly swirled look can be appealing. Repeat with the remaining red and blue cheesecake mixtures, layering them on top of each other. For a more distinct separation, you can spoon dollops of each color on top and then gently swirl them together with a knife or skewer, but be careful not to over-swirl, or the colors will blend too much. The goal is to have clearly defined red and blue sections.
Chill and Decorate
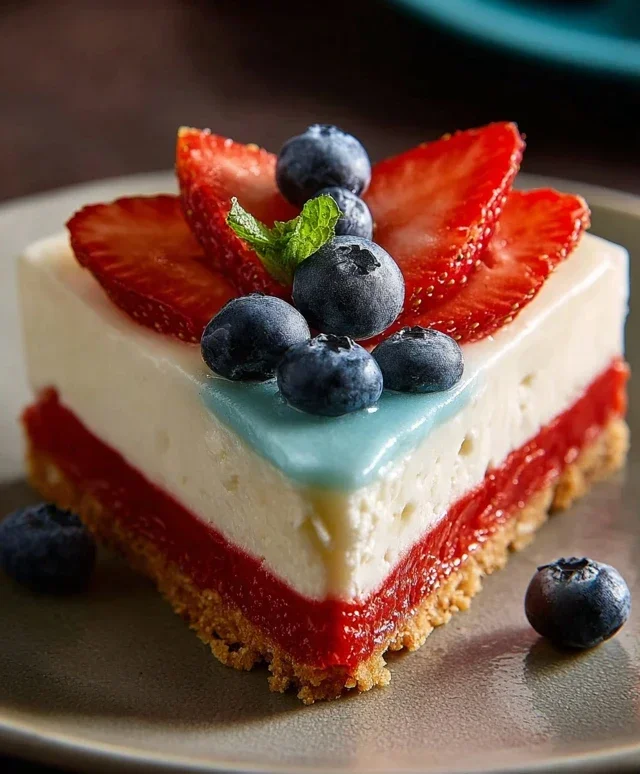
Once your cheesecake is assembled, cover it loosely with plastic wrap and refrigerate for at least 4-6 hours, or preferably overnight, until it is completely set and firm. This chilling time is crucial for the cheesecake to set properly and for the flavors to meld. While the cheesecake is chilling, you can prepare a simple white chocolate drizzle for an extra touch of elegance, if desired. To do this, gently melt 6 oz of cream cheese with 6 tablespoons of softened butter in a double boiler or in the microwave in short intervals, stirring until smooth. Whisk in 3 cups of powdered sugar and 1 teaspoon of vanilla extract until you have a smooth, creamy frosting. Once the cheesecake is firm, carefully release the sides of the springform pan. Before serving, you can drizzle this white frosting over the top and then scatter a generous handful of fresh blueberries over the top for a beautiful, patriotic finish that adds a lovely fresh element. Slice and enjoy this festive treat!

Conclusion:
I hope you’re as excited as I am to whip up this No Bake Patriotic Cheesecake! It’s truly a showstopper, perfect for any summer gathering, Fourth of July celebration, or just when you’re craving something incredibly delicious and visually stunning. The beauty of this recipe lies in its simplicity – no oven required, making it ideal for hot weather or when you’re short on time. The creamy, tangy cheesecake filling paired with the vibrant, fresh berry topping creates a harmonious blend of flavors and textures that everyone will adore. It’s impressive enough for a party, yet easy enough for a weeknight treat.
For serving, consider topping it with a dollop of whipped cream and a sprinkle of extra berries. It also pairs wonderfully with a side of fresh mint. If you’re feeling adventurous with variations, try adding a swirl of blueberry or strawberry jam into the cheesecake batter before chilling for an extra burst of color and flavor. You could also experiment with different crusts, like a grabeef ham cracker crust with a hint of lemon zest.
I wholeheartedly encourage you to give this No Bake Patriotic Cheesecake a try. It’s a guaranteed crowd-pleaser that’s as fun to make as it is to eat. Let me know how it turns out for you!
Frequently Asked Questions:
Q: Can I make this cheesecake ahead of time?
Absolutely! This No Bake Patriotic Cheesecake is perfect for making ahead. In fact, it’s best when chilled for at least 6 hours, or preferably overnight, to allow the flavors to meld and the cheesecake to set properly. This makes it an excellent choice for entertaining.
Q: What other fruits can I use for the topping?
While strawberries and blueberries are classic for a patriotic theme, feel free to get creative! Raspberries, blackberries, or even sliced peaches would be delicious additions or substitutions. You can also create a mixed berry compote to spoon over the top.
Q: How do I prevent the cheesecake from being too soft?
Ensuring the cheesecake is thoroughly chilled is key to achieving a firm texture. Make sure you scrape down the sides of the bowl when mixing the cream cheese filling to incorporate all ingredients evenly. Using full-fat cream cheese will also contribute to a firmer set.
No Bake Patriotic Cheesecake
A festive and easy no-bake cheesecake perfect for patriotic holidays, featuring layers of red, white, and blue.
Ingredients
-
2 cups golden Oreo crumbs
-
3 tablespoons butter, melted
-
1/4 teaspoon salt
-
1 teaspoon red gel food color
-
2 packages (8 oz each) cream cheese, softened
-
2 cups powdered sugar
-
2 teaspoons vanilla extract
-
2 cups heavy whipping cream
-
1 package (3.94 oz) blue raspberry Jell-O
-
1 cup boiling water
-
6 oz cream cheese, softened
-
6 tablespoons butter, softened
-
3 cups powdered sugar
-
1 teaspoon vanilla extract
-
Fresh blueberries
Instructions
-
Step 1
For the crust: Combine golden Oreo crumbs, melted butter, and salt. Press into the bottom of a 9-inch springform pan. -
Step 2
Prepare the red layer: Beat 2 packages cream cheese, 2 cups powdered sugar, and 2 teaspoons vanilla until smooth. Divide into two equal portions. Tint one portion with red gel food coloring. -
Step 3
Whip the heavy cream until stiff peaks form. Gently fold half of the whipped cream into the red cream cheese mixture. -
Step 4
Spread the red cheesecake mixture evenly over the crust. Freeze for 30 minutes. -
Step 5
Prepare the blue layer: Dissolve blue raspberry Jell-O in boiling water. Let cool slightly. Beat the remaining cream cheese and vanilla until smooth. Gradually beat in the cooled Jell-O mixture. -
Step 6
Gently fold the remaining whipped cream into the blue Jell-O cream cheese mixture. Spoon this mixture over the chilled red layer. -
Step 7
Prepare the white layer: Beat 6 oz cream cheese, 6 tablespoons softened butter, 3 cups powdered sugar, and 1 teaspoon vanilla until smooth and creamy. -
Step 8
Dollop and gently spread the white mixture over the blue layer. Decorate with fresh blueberries. -
Step 9
Chill the cheesecake for at least 4 hours, or until firm. Release from springform pan before serving.
Important Information
Nutrition Facts (Per Serving)
It is important to consider this information as approximate and not to use it as definitive health advice.
Allergy Information
Please check ingredients for potential allergens and consult a health professional if in doubt.