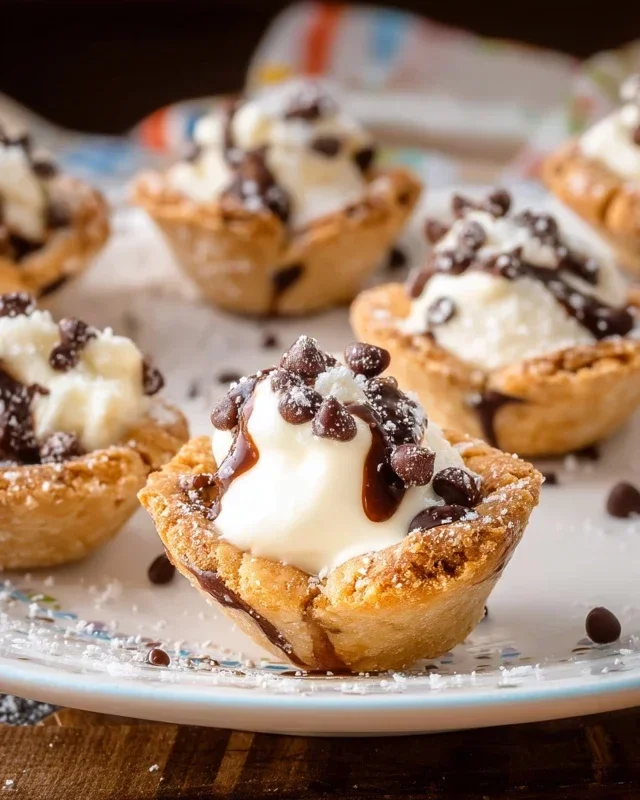
Easy Mini Cannoli Cups- Delicious Italian Dessert
Mini Cannoli Cups are about to become your new favorite sweet obsession! We all adore the classic cannoli, don’t we? That satisfying crunch of the fried shell giving way to a creamy, sweet ricotta filling is pure dessert perfection. But let’s be honest, rolling and frying those tubes can sometimes feel like a culinary marathon. That’s where these delightful Mini Cannoli Cups swoop in to save the day! They capture all the iconic flavors and textures we know and love, but in a much more approachable and fun-to-eat format. Imagin extracte a miniature edible cup, brimming with that luscious, sweet ricotta and perhaps a hint of citrus or chocolate chips – it’s like a little bite of Italian heaven, perfect for parties, special occasions, or simply treating yourself to something truly special. Get ready to impress yourself and everyone you share these with!
Mini Cannoli Cups
Get ready to impress your friends and family with these adorable and surprisingly easy Mini Cannoli Cups! Forget the hassle of rolling and frying traditional cannoli shells. We’re taking a shortcut with store-bought pie crusts to create perfectly formed, crisp cups that hold a luscious, creamy ricotta filling. These little bites of heaven are ideal for parties, holidays, or just a delightful treat after dinner. The delicate sweetness of the filling, complemented by the subtle crunch of the crust and the optional burst of chocolate or pistachio, makes these an absolute showstopper. Let’s dive into creating these delightful mini desserts!
Ingredients:
Creating the Cannoli Cups
First things first, let’s get our crispy cups ready. This is where the magic of the pie crust comes in.
Preparing the Pie Crusts
Baking the Cups
Crafting the Creamy Ricotta Filling
While our cups are cooling, let’s prepare the star of the show – the irresistible ricotta filling. This is where the classic cannoli flavor truly shines.
Mixing the Filling
Assembling Your Mini Cannoli Cups
The final, most satisfying step – bringin extractg it all together!
Filling and Decorating

Conclusion:
There you have it – our delightful recipe for Mini Cannoli Cups! These little bites of heaven are simply fantastic. They offer all the classic, irresistible flavors of traditional cannoli – a crisp, golden shell filled with a sweet, creamy ricotta filling, all perfectly portioned for individual enjoyment. The beauty of this recipe lies in its adaptability and ease. They’re far less intimidating than their full-sized counterparts but deliver just as much wow factor.
Serving these mini cannoli cups is a breeze. They make for an elegant dessert at any gathering, a charming addition to a dessert buffet, or a delightful treat to enjoy with your afternoon coffee. For variations, don’t be afraid to get creative! Consider adding a pinch of orange zest to the ricotta for a brighter flavor, or a hint of espresso powder for a mocha twist. You could also experiment with different toppings beyond the classic pistachios, like finely chopped dark chocolate or even a sprinkle of cinnamon.
I truly encourage you to give this Mini Cannoli Cups recipe a try. It’s a rewarding baking experience that results in a truly memorable treat. You’ll be surprised at how quickly they disappear!
Frequently Asked Questions:
Can I make the cannoli shells ahead of time?
Yes, you absolutely can! Once cooled completely, store the baked cannoli shells in an airtight container at room temperature for up to 3 days. This is a great way to get a head start on your baking. Just remember to fill them closer to serving time to maintain their crispness.
What’s the best way to store the filled mini cannoli cups?
For the best texture, it’s recommended to fill the cannoli cups just before serving. However, if you must make them slightly ahead, store the filled mini cannoli cups in an airtight container in the refrigerator for a few hours. Be aware that the shells may soften slightly over time.
Can I use a different cheese instead of ricotta?
While ricotta is the traditional and preferred cheese for its creamy, slightly grainy texture, some people have experimented with mascarpone cheese for an even richer filling. However, for authentic cannoli flavor, stick with whole milk ricotta if possible. Ensure your ricotta is well-drained to prevent a watery filling.
Mini Cannoli Cups
Delightful mini cannoli cups with a creamy ricotta filling, perfect for parties and desserts. Uses pre-made pie crust for ease.
Ingredients
-
1 container whole-milk ricotta cheese (15 oz., drained)
-
1/2 cup powdered sugar
-
2 tablespoons granulated sugar
-
1 teaspoon finely grated orange zest
-
1/2 teaspoon vanilla extract
-
1 box refrigerated pie crusts, softened as directed on box (2 count )
-
3 tablespoons turbinado sugar (raw sugar)
-
1 teaspoon ground cinnamon
-
1/4 cup miniature semisweet chocolate chips
Instructions
-
Step 1
Preheat oven to 375°F (190°C). Lightly grease a mini muffin tin. -
Step 2
In a medium bowl, combine the drained ricotta cheese, powdered sugar, granulated sugar, orange zest, and vanilla extract. Stir until smooth and well combined. Fold in chocolate chips. -
Step 3
Unroll the refrigerated pie crusts. Use a 2.5-inch round cookie cutter to cut out circles from the crusts. You should get about 6 circles per crust. -
Step 4
Gently press each pie crust circle into the mini muffin tin cups, forming a cup shape. Prick the bottoms with a fork. -
Step 5
Bake for 12-15 minutes, or until the edges are golden brown. Let cool in the tin for a few minutes before carefully removing to a wire rack to cool completely. -
Step 6
In a small bowl, combine the turbinado sugar and ground cinnamon. Roll the cooled cannoli cups in the cinnamon-sugar mixture. -
Step 7
Spoon or pipe the ricotta filling into the cooled cannoli cups. Dust with additional powdered sugar before serving, if desired.
Important Information
Nutrition Facts (Per Serving)
It is important to consider this information as approximate and not to use it as definitive health advice.
Allergy Information
Please check ingredients for potential allergens and consult a health professional if in doubt.