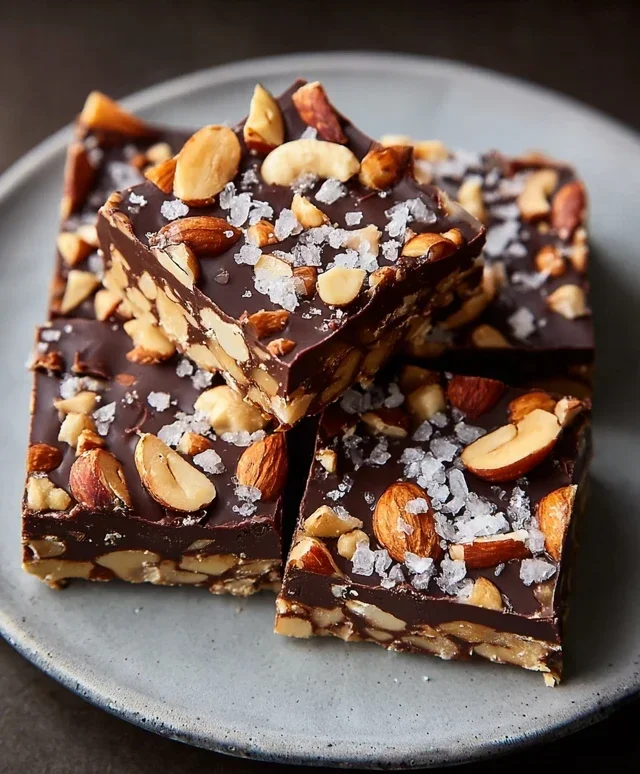
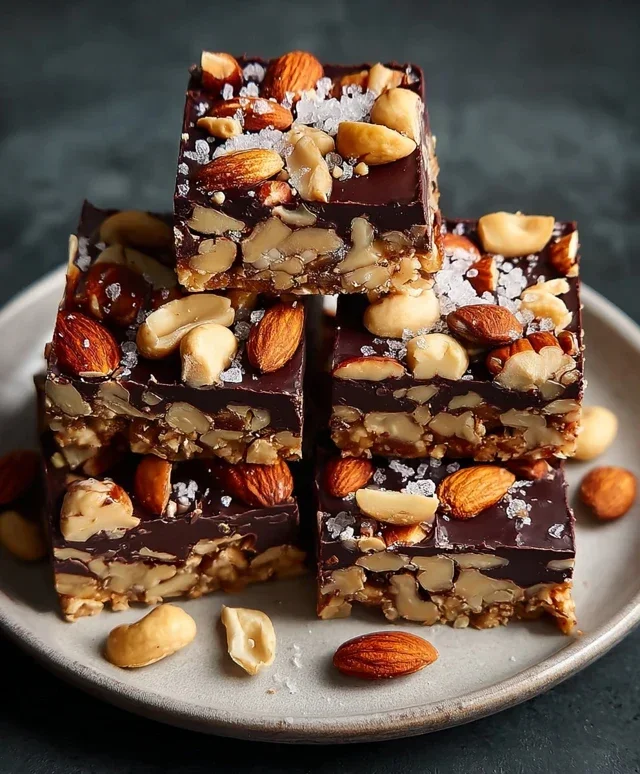
Dark Chocolate Sea Salt Nut Bars – Easy Recipe
Dark Chocolate and Sea Salt Nut Bars are a revelation for anyone who craves a treat that’s both indulgent and satisfying. I know for me, the moment I first tried a perfectly balanced combination of rich dark chocolate and the subtle crunch of sea salt against a nutty backdrop, I was hooked. This isn’t just another snack; it’s an experience. People adore these bars because they hit that sweet spot between decadence and wholesome goodness. The inherent bitterness of good quality dark chocolate cuts beautifully through the sweetness of any binder, while the sea salt provides an unexpected yet essential pop of flavor that elevates every single bite. What truly makes our Dark Chocolate and Sea Salt Nut Bars special is the delightful contrast in textures and tastes. They are wonderfully versatile, perfect for a mid-afternoon pick-me-up, a post-workout reward, or even a sophisticated addition to your dessert table. Get ready to create your new favorite go-to treat with these irresistible Dark Chocolate and Sea Salt Nut Bars.
Dark Chocolate and Sea Salt Nut Bars
There’s something incredibly satisfying about a homemade treat, and these Dark Chocolate and Sea Salt Nut Bars are no exception. They strike the perfect balance between crunchy, chewy, sweet, and salty, making them an irresistible snack or a delightful dessert. Whether you’re craving a quick energy boost or looking for something special to impress your friends, these bars are your answer. The combination of rich dark chocolate, the satisfying crunch of mixed nuts, and the subtle sparkle of sea salt creates a flavor profile that’s both sophisticated and incredibly addictive. Plus, they’re surprisingly easy to make, requiring minimal fuss and pantry staples. Get ready to ditch those store-bought bars, because once you try these, you’ll never go back.
Ingredients:
Cooking Instructions:
Step 1: Prepare Your Nuts and Baking Dish
The first step to creating these delectable bars is to get your ingredients ready. For the nuts, you can use any combination you love. I’ve found that a mix of cashews, peanuts, and almonds provides a wonderful texture and flavor. If you prefer, you can lightly toast your nuts in a dry skillet over medium heat for about 5-7 minutes, stirring frequently, until fragrant. This step is optional but can enhance their flavor and crunch. Once toasted (or if you’re skipping that step), let them cool completely. While your nuts are cooling, prepare your baking dish. Line an 8×8 inch baking pan with parchment paper, leaving an overhang on the sides. This overhang will make it incredibly easy to lift the bars out of the pan once they’ve set. Lightly grease the parchment paper with a little cooking spray or a tiny bit of oil.
Step 2: Combine the Dry Ingredients
In a large mixing bowl, combine your prepared nuts and the puffed rice. The puffed rice adds a lovely lightness and crispness to the bars, preventing them from becoming too dense. Give them a gentle toss to distribute the puffed rice evenly amongst the nuts. You want a good mix of textures and flavors in every bite.
Step 3: Create the Binding Syrup
Now, it’s time to create the sticky binder that will hold all these delicious ingredients together. In a small saucepan, combine the brown rice syrup, vanilla extract, and sea salt. Place the saucepan over medium-low heat. Stir the mixture gently until the brown rice syrup is warmed through and the salt has dissolved. Be careful not to let it boil vigorously, as we are just aiming to warm it and incorporate the flavors. The vanilla extract will add a beautiful aroma and depth, while the sea salt will subtly enhance all the other flavors, creating that irresistible sweet and salty dynamic. Once heated and combined, remove the saucepan from the heat.
Step 4: Mix Everything Together
Pour the warm brown rice syrup mixture over the nut and puffed rice combination in the large mixing bowl. Using a sturdy spatula or a wooden spoon, stir everything together thoroughly. You want to ensure that every single piece of nut and puffed rice is coated with the sticky syrup. This might take a minute or two of enthusiastic stirring. Make sure there are no dry pockets of nuts. Once everything is well combined and coated, press the mixture firmly and evenly into your prepared baking pan. Use the back of your spatula or your hands (lightly greased if they tend to stick) to pack it down. The firmer you pack it, the better your bars will hold their shape.
Step 5: Create the Dark Chocolate Topping
While the nut mixture is settling in the pan, let’s get to the decadent chocolate layer. In a heatproof bowl, combine the dark chocolate chips and the coconut oil. You can melt these together using one of two methods: either place the bowl over a saucepan of simmering water (a double boiler) or microwave them in short, 30-second intervals, stirring well after each interval, until the chocolate is smooth and completely melted. The coconut oil helps to create a smooth, glossy chocolate topping that hardens beautifully. Stir the melted chocolate until it’s completely smooth and luscious. If you’re using flaky salt for topping, have it ready.
Step 6: Assemble and Chill
Once your chocolate is melted and smooth, carefully pour it over the pressed nut mixture in the baking pan. Use an offset spatula or the back of a spoon to spread the chocolate evenly over the entire surface, ensuring it goes right to the edges. If you’re using flaky salt, sprinkle it generously over the melted chocolate while it’s still wet. This adds a delightful crunch and an extra pop of salty flavor. Once the topping is applied, place the pan in the refrigerator for at least 1-2 hours, or until the chocolate is completely set and the bars are firm. This chilling time is crucial for the bars to hold their shape when you cut them.
Step 7: Cut and Enjoy!
Once the bars are thoroughly chilled and firm, use the parchment paper overhang to lift the entire slab out of the baking pan onto a cutting board. Now comes the fun part: cutting them into bars! Use a sharp knife to cut the slab into your desired bar sizes. If the chocolate is very firm, you might need to run your knife under hot water and wipe it dry between cuts for cleaner edges. Store your Dark Chocolate and Sea Salt Nut Bars in an airtight container in the refrigerator for up to a week. They are best enjoyed cold! These bars are perfect for a mid-afternoon snack, a pre- or post-workout treat, or even a simple dessert. Enjoy your delicious homemade creation!
Conclusion:
So there you have it – your ultimate guide to creating these irresistible Dark Chocolate and Sea Salt Nut Bars! What makes this recipe so fantastic? It’s the perfect harmony of textures and flavors: the satisfying crunch of mixed nuts, the decadent richness of dark chocolate, and that intriguing pop of sea salt that elevates every bite. These bars are incredibly versatile, making them an ideal afternoon pick-me-up, a thoughtful homemade gift, or even a surprisingly sophisticated dessert. I truly encourage you to give these Dark Chocolate and Sea Salt Nut Bars a try; you won’t be disappointed!
Feel free to get creative with your nut combinations – almonds, walnuts, pecans, or even a mix of all three work wonderfully. For a touch of sweetness, consider adding dried cranberries or chopped apricots. And if you’re feeling extra indulgent, a drizzle of melted chocolate over the top before it sets is always a good idea!
Frequently Asked Questions:
Can I make these bars vegan?
Absolutely! To make these Dark Chocolate and Sea Salt Nut Bars vegan, simply ensure you use vegan dark chocolate. Most dark chocolate varieties are naturally vegan, but it’s always good to check the ingredients list for any dairy derivatives. All the other ingredients, like nuts, seeds, and sweetener, are typically vegan.
How should I store these nut bars?
For best results and to maintain their texture, store your Dark Chocolate and Sea Salt Nut Bars in an airtight container at room temperature for up to a week. If your kitchen is particularly warm, or if you plan to keep them for longer, I recommend refrigerating them. They’ll firm up nicely in the fridge and are still delicious cold.
Dark Chocolate and Sea Salt Nut Bars
Chewy and satisfying nut bars packed with chocolate and a hint of sea salt, perfect for a quick snack or treat.
Ingredients
-
2 1/2 cups unsalted nuts (3/4 cup cashews, 3/4 cup peanuts, 1 cup almonds)
-
1/2 cup puffed rice
-
1/4 cup brown rice syrup
-
1 1/2 teaspoon vanilla extract
-
1/2 teaspoon sea salt
-
1 cup dark chocolate chips
-
2 teaspoons coconut oil
-
Flaky salt for topping (optional)
Instructions
-
Step 1
Lightly toast the nuts in a dry skillet over medium heat until fragrant, about 5-7 minutes. Let cool completely. -
Step 2
Roughly chop the cooled nuts. In a large bowl, combine the chopped nuts and puffed rice. -
Step 3
In a small saucepan, gently heat the brown rice syrup and vanilla extract until warm and slightly runny. Stir in the sea salt. -
Step 4
Pour the warm syrup mixture over the nut and puffed rice mixture. Stir well to combine everything evenly. -
Step 5
Press the mixture firmly into a parchment-lined 8×8 inch baking pan. Ensure it’s packed tightly. -
Step 6
Melt the dark chocolate chips and coconut oil together in a microwave-safe bowl in 30-second intervals, stirring in between, until smooth. -
Step 7
Pour the melted chocolate evenly over the pressed nut mixture. Spread it to cover the surface. -
Step 8
If using, sprinkle flaky salt over the melted chocolate. Refrigerate for at least 30 minutes, or until the chocolate is set. -
Step 9
Once set, lift the parchment paper from the pan and cut the chocolate-covered bars into desired sizes.
Important Information
Nutrition Facts (Per Serving)
It is important to consider this information as approximate and not to use it as definitive health advice.
Allergy Information
Please check ingredients for potential allergens and consult a health professional if in doubt.