Super Cute Daisy Cupcakes-Easy & Delicious Recipe
Super Cute Daisy Cupcakes are more than just a dessert; they’re a burst of sunshine and sweetness that can brighten any occasion. We all love a classic cupcake, but there’s something undeniably joyful about transforming them into delicate, edible blossoms. Imagin extracte these charming Super Cute Daisy Cupcakes gracing your next birthday party, baby shower, or even just a Tuesday afternoon. They’re incredibly popular because they tap into our innate love for all things pretty and delicious, offering a visual treat that’s as delightful to behold as it is to devour. What truly makes these Super Cute Daisy Cupcakes special is their charming simplicity. They require no advanced decorating skills, yet the end result is stunningly beautiful, proving that you don’t need to be a master baker to create something truly magical. Get ready to spread some floral cheer with these adorable creations!
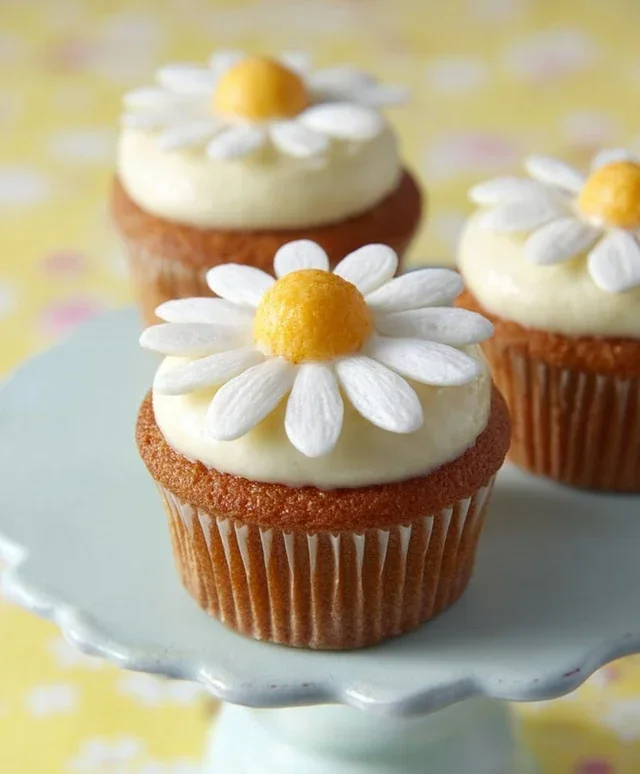
Super Cute Daisy Cupcakes
Get ready to brighten your day and impress your friends with these utterly adorable Super Cute Daisy Cupcakes! These little beauties are not only a feast for the eyes but also a delight to the taste buds, boasting a tender vanilla cake base and a luscious cream cheese frosting. Perfect for birthdays, garden parties, or just when you need a little extra sunshine, these cupcakes are surprisingly simple to make. Let’s dive in and create some floral magic!
Ingredients:
For the Vanilla Cupcakes:
Preparing the Batter
1. Preheat your oven to 180°C (160°C fan/350°F). Line a 12-cup muffin tin with paper cupcake liners. This is your foundation for deliciousness! In a large mixing bowl, cream together the 120g of soft unsalted butter and 150g of granulated sugar until the mixture is light and fluffy. This creaming process is crucial for incorporating air, which will make your cupcakes light and tender. You can use an electric mixer for this, starting on a low speed and gradually increasing, scraping down the sides of the bowl as needed. This usually takes about 3-5 minutes. Next, add the 2 large eggs, one at a time, beating well after each addition. Make sure each egg is fully incorporated before adding the next. Stir in 1 tbsp of vanilla extract for that classic sweet aroma and flavor.
2. In a separate medium bowl, whisk together the 160g of all-purpose flour, 20g of corn starch, 1 tsp of baking powder, ½ tsp of baking soda, and a pinch of salt. The corn starch helps to make the cake extra tender and light, so don’t skip it! Gradually add the dry ingredients to the wet ingredients, alternating with the 140ml of buttermilk. Begin extract and end with the dry ingredients. Mix on low speed until just combined. Be careful not to overmix the batter, as this can lead to tough cupcakes. Overmixing develops the gluten in the flour too much, resulting in a less tender crum extractb. A few small lumps in the batter are perfectly fine!
Baking the Cupcakes
3. Divide the batter evenly among the prepared cupcake liners, filling each about two-thirds full. This will give them enough room to rise without overflowing. Bake in the preheated oven for 20-25 minutes, or until a wooden skewer or toothpick inserted into the center of a cupcake comes out clean. The aroma filling your kitchen will be heavenly! Once baked, carefully remove the cupcakes from the muffin tin and transfer them to a wire rack to cool completely. It’s essential that they are completely cool before frosting, otherwise, your beautiful frosting will melt and slide right off.
For the Cream Cheese Frosting and Daisy Decoration:
Making the Frosting
4. While your cupcakes are cooling, let’s make the luscious cream cheese frosting. In a large mixing bowl, beat the 160g of room-temperature cream cheese and 100g of soft unsalted butter together until smooth and creamy. Ensure both ingredients are at room temperature for the best emulsification. If they are too cold, you might end up with lumps. Gradually add the 300g of icing sugar, about a third at a time, beating well after each addition until the frosting is light and fluffy. If the frosting seems too thick, you can add a tiny splash of milk or buttermilk. Stir in the remaining 1 tsp of vanilla extract.
Decorating the Daisies
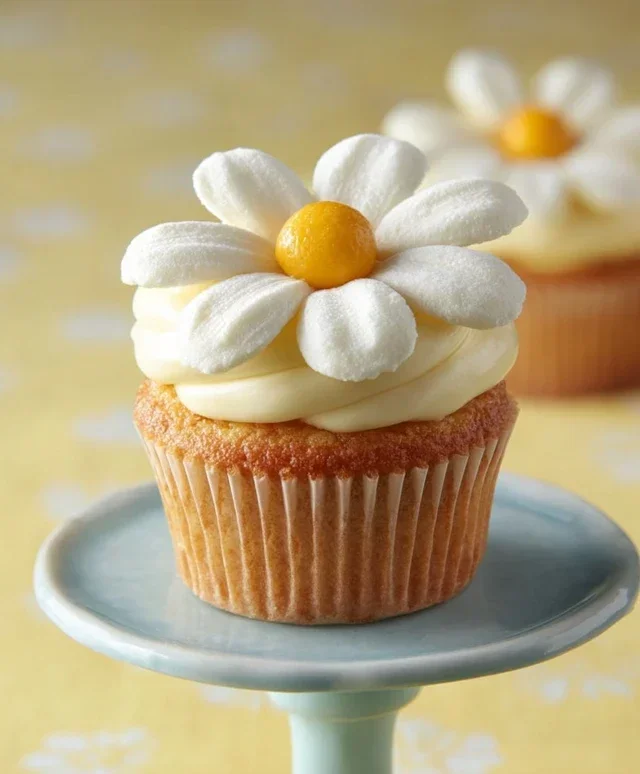
5. Now for the fun part – decorating! Divide the frosting into three portions. Leave one portion white for the daisy petals. Tint one portion a vibrant yellow for the daisy centers using yellow food coloring. Tint the remaining portion a soft orange (or a slightly deeper yellow) for the daisy centers, or you can use both yellow and orange for variety.
To create the daisy effect, you can use a piping bag fitted with a petal tip (like a Wilton 104 or similar) or a simple round tip. For a quick and easy method without special tips: take a spoonful of white frosting and spread it in a circle on top of each cooled cupcake, leaving a small space in the center. Then, place a dollop of yellow or orange frosting in the center of each white circle. Alternatively, if you have a piping bag with a petal tip, pipe curved petal shapes around the edge of the cupcake, overlapping them slightly to create a full flower. Then, fill the center with yellow or orange frosting. You can also use a small spoon to create petal shapes by making a small indent and pulling the frosting outwards. Don’t worry if they aren’t perfect; handmade daisies have their own charm! For an extra touch, you can even use a toothpick to swirl the center frosting slightly.
Enjoy your super cute and delicious daisy cupcakes! They are guaranteed to bring smiles all around.
Conclusion:
And there you have it – your guide to creating these absolutely super cute daisy cupcakes! We’ve covered everything from the simple vanilla cake base to the delightful buttercream frosting and the effortless daisy decoration that truly makes these treats pop. These cupcakes are fantastic for so many occasions, from birthday parties and baby showers to just brightening someone’s day. Their charm and deliciousness are sure to be a hit with kids and adults alike. I really encourage you to give this recipe a try; you’ll be amazed at how simple yet impressive they are!
For serving, these daisy cupcakes are perfect on their own, or you could serve them alongside a fresh fruit salad for a lovely dessert spread. They also make a beautiful centerpiece for any party table. Don’t be afraid to get creative with variations! You could try adding a touch of lemon zest to the cake batter for a bright, zesty flavor, or experiment with different colored frostings for a meadow of daisies. Perhaps even a sprinkle of edible glitter for extra sparkle!
Frequently Asked Questions:
Can I make the daisy cupcakes ahead of time?
Absolutely! You can bake the cupcake cakes a day in advance and store them in an airtight container at room temperature. The buttercream frosting can also be made a day ahead and refrigerated; just bring it back to room temperature and re-whip it briefly before frosting your cooled cupcakes.
What if I don’t have a piping bag and star tip for the frosting?
No problem at all! You can still achieve a beautiful look. Spoon generous dollops of frosting onto your cupcakes and then use the back of a spoon or a small offset spatula to spread it out and create soft swirls. You can even put the frosting in a sturdy zip-top bag, snip off a corner, and pipe it on without a fancy tip.
Are these super cute daisy cupcakes nut-free?
The base recipe provided is nut-free, assuming you use nut-free ingredients for your flour, sugar, and other components. Always double-check the labels of your ingredients to ensure they are free from any allergens you need to avoid.
Super Cute Daisy Cupcakes
Delightful vanilla cupcakes topped with adorable daisy-shaped cream cheese frosting, perfect for any celebration.
Ingredients
-
140 ml Buttermilk
-
120 g Soft unsalted butter
-
150 g Granulated sugar
-
2 Eggs
-
1 tbsp Vanilla extract
-
160 g All purpose flour
-
20 g Corn starch
-
1 tsp Baking powder
-
½ tsp Baking soda
-
1 pinch Salt
-
160 g Cream cheese
-
100 g Soft unsalted butter
-
300 g Icing sugar
-
1 tsp Vanilla extract
-
Yellow food coloring
-
Orange food coloring
Instructions
-
Step 1
Preheat oven to 180°C (350°F). Line a 12-cup muffin tin with paper liners. -
Step 2
In a large bowl, cream together the 120g soft unsalted butter and 150g granulated sugar until light and fluffy. -
Step 3
Beat in the 2 eggs one at a time, then stir in 1 tbsp vanilla extract. -
Step 4
In a separate bowl, whisk together the 160g all purpose flour, 20g corn starch, 1 tsp baking powder, ½ tsp baking soda, and 1 pinch salt. -
Step 5
Gradually add the dry ingredients to the wet ingredients, alternating with the 140 ml buttermilk, beginning and ending with the dry ingredients. Mix until just combined. -
Step 6
Divide the batter evenly among the prepared muffin cups and bake for 18-20 minutes, or until a toothpick inserted into the center comes out clean. -
Step 7
Let the cupcakes cool in the tin for a few minutes before transferring them to a wire rack to cool completely. -
Step 8
For the frosting: In a bowl, beat the 160g cream cheese and 100g soft unsalted butter until smooth and creamy. -
Step 9
Gradually add the 300g icing sugar and 1 tsp vanilla extract, beating until the frosting is light and fluffy. Divide the frosting into two bowls. Color one yellow and the other orange. -
Step 10
Decorate the cooled cupcakes with the yellow and orange frosting to create daisy shapes.
Important Information
Nutrition Facts (Per Serving)
It is important to consider this information as approximate and not to use it as definitive health advice.
Allergy Information
Please check ingredients for potential allergens and consult a health professional if in doubt.