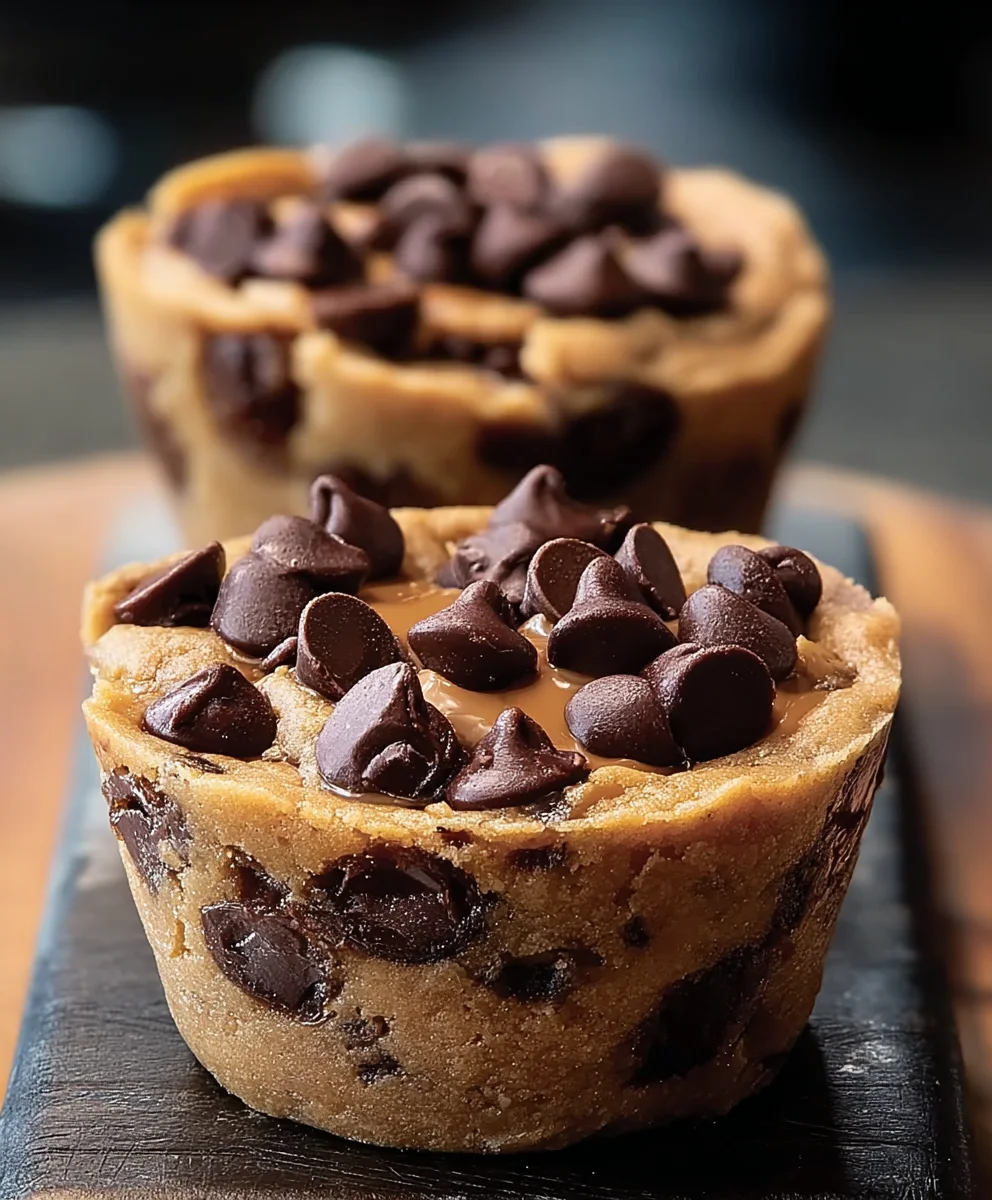
Peanut Butter Chocolate Chip Cookie Cups – Easy Dessert
Peanut Butter Chocolate Chip Cookie Cups are more than just a treat; they’re a little slice of pure bliss that many of us grew up with and continue to cherish. There’s something undeniably comforting and utterly delicious about the perfect marriage of creamy peanut butter and rich, melty chocolate, all baked into a delightful, bite-sized cup. It’s no wonder these sweet morsels are a perennial favorite. What truly sets these Peanut Butter Chocolate Chip Cookie Cups apart is their unique format. Unlike traditional cookies, the “cup” shape creates a slightly chewy edge and a wonderfully soft, fudgy center that cradles those generous pockets of chocolate. This recipe elevates the classic into something even more special, promising a satisfyingly rich flavor and an irresistible texture that will have everyone beggin extractg for more. Get ready to discover your new favorite way to enjoy this iconic flavor combination!
Ingredients:
- 1¼ cups all-purpose flour
- ½ teaspoon baking soda
- ¼ teaspoon salt
- ½ cup unsalted butter, softened to room temperature
- ½ cup packed light or dark brown sugar
- ¼ cup granulated sugar
- ½ cup creamy or chunky peanut butter
- 1 teaspoon pure vanilla extract
- 1 large egg, at room temperature
- 1 cup semi-sweet chocolate chips, divided
- Vanilla ice cream, for serving
- Melted chocolate, for drizzling
- Caramel sauce, for drizzling
Preparing the Cookie Dough
Step 1: Combine Dry Ingredients
First, in a medium-sized bowl, I like to whisk together the dry ingredients. This ensures everything is evenly distributed before it even meets the wet ingredients, which is a key step for consistent baking. So, I combine the 1¼ cups of all-purpose flour, ½ teaspoon of baking soda, and ¼ teaspoon of salt. Give it a good whisk until it looks uniformly blended. Set this bowl aside for now.
Step 2: Cream Butter and Sugars
In a larger bowl, I start by creaming the softened butter with both the brown sugar and granulated sugar. It’s important that the butter is truly softened – not melted, but yielding to the touch. This allows it to incorporate air effectively, leading to a lighter, more tender cookie. I use an electric mixer on medium speed to beat the ½ cup of unsalted butter with the ½ cup of packed brown sugar and ¼ cup of granulated sugar. I cream these together until the mixture is light and fluffy, usually for about 2-3 minutes. This process helps to dissolve some of the sugar crystals and create a good base for the cookie dough.
Step 3: Add Peanut Butter, Vanilla, and Egg
Next, I incorporate the star of our show: the peanut butter! I add the ½ cup of peanut butter to the creamed butter and sugar mixture. Beat this in until it’s well combined. Then, I stir in the 1 teaspoon of vanilla extract. Finally, I add the 1 large egg. It’s best if your egg is also at room temperature, as it emulsifies more easily with the other ingredients. Beat the egg into the mixture until everything is thoroughly combined and the batter is smooth. Don’t overmix at this stage, just until it comes together.
Step 4: Combine Wet and Dry Ingredients
Now it’s time to bring the two bowls together. I gradually add the dry ingredients (the flour mixture) to the wet ingredients (the peanut butter mixture). I do this in about three additions, mixing on low speed after each addition, just until the flour streaks disappear. Be careful not to overmix the dough once the flour is added, as this can develop the gluten too much and result in tough cookies. We want tender, chewy cookie cups!
Step 5: Incorporate Chocolate Chips
This is where things get exciting! I gently fold in ¾ cup of the chocolate chips using a rubber spatula or wooden spoon. Reserve the remaining ¼ cup of chocolate chips for topping. Folding them in helps to distribute them evenly throughout the dough without breaking them up too much. This ensures you get pockets of melty chocolate in every bite.
Baking the Cookie Cups
Step 6: Prepare Muffin Tin and Portion Dough
Preheat your oven to 350°F (175°C). I like to lightly grease a standard 12-cup muffin tin with cooking spray or butter, or you can use paper liners if you prefer. For creating the “cups,” I use a small cookie scoop or two tablespoons to portion the dough. Roll each portion into a ball and place it into each muffin cup, pressing down slightly with your fingers. This helps to create a more even surface for baking.
Step 7: Bake and Create the Indentations
Bake for 10-12 minutes, or until the edges are golden brown and the centers are still slightly soft. Don’t overbake them, as they will continue to cook slightly as they cool. As soon as they come out of the oven, while they are still warm and pliable, I take the back of a small spoon or a ¼-teaspoon measuring spoon and gently press down into the center of each cookie to create a slight indentation. This creates the perfect little well to fill with our delicious toppings.
Step 8: Cool and Top the Cookie Cups
Let the cookie cups cool in the muffin tin for about 5-10 minutes before attempting to remove them. This allows them to firm up enough to be handled. Once they are slightly cooled, carefully transfer them to a wire rack to cool completely. This is the crucial step before we add our delectable toppings. Once the cookie cups are completely cool, it’s time for the fun part!
Step 9: Assemble and Serve
Once the cookie cups have cooled, generously fill the indentations with a scoop of your favorite vanilla ice cream. If you like, you can warm your melted chocolate and caramel sauce slightly to make them easier to drizzle. Then, artfully drizzle the melted chocolate and caramel sauce over the ice cream and cookie cups. For an extra touch, sprinkle the reserved ¼ cup of chocolate chips over the top as well. Serve immediately and enjoy the ultimate peanut butter chocolate chip cookie cup experience!

Conclusion:
And there you have it – your very own batch of delicious Peanut Butter Chocolate Chip Cookie Cups! We’ve walked through each step, from creaming the butter and sugars to that final, delightful bake. These cookie cups are a guaranteed crowd-pleaser, offering that perfect marriage of salty peanut butter and sweet, melty chocolate in a fun, bite-sized format. I encourage you to give them a try and see for yourself how simple yet rewarding they are to make.
For serving, these Peanut Butter Chocolate Chip Cookie Cups are fantastic on their own, perhaps with a tall glass of milk. They also make an impressive dessert when served warm, maybe with a scoop of vanilla ice cream or a drizzle of extra chocolate sauce. Feel free to get creative with variations! You could add a sprinkle of sea salt on top before baking for an extra flavor pop, or even mix in some chopped peanuts for added crunch. Don’t be afraid to experiment with different types of chocolate chips, like dark chocolate or white chocolate. Happy baking!
Frequently Asked Questions:
Q1: How should I store my Peanut Butter Chocolate Chip Cookie Cups?
You can store these cookie cups in an airtight container at room temperature for up to 3 days. If you want them to last longer, they can also be refrigerated for up to a week. For longer-term storage, they freeze beautifully! Simply place them in a freezer-safe bag or container for up to 3 months. Reheat gently in a low oven or microwave before serving if desired.
Q2: Can I make the dough ahead of time?
Absolutely! The dough for these Peanut Butter Chocolate Chip Cookie Cups can be made up to 2-3 days in advance and stored, covered, in the refrigerator. This is a great way to save time if you’re planning to bake them for a special occasion or just want fresh cookie cups on demand. Just let the dough soften slightly at room temperature for about 15-20 minutes before pressing it into your muffin tin and baking as usual.
Peanut Butter Chocolate Chip Cookie Cups – Easy Dessert
Delicious and easy peanut butter chocolate chip cookie cups, perfect for a quick and satisfying dessert. These cups are filled with creamy vanilla ice cream and drizzled with chocolate and caramel.
Ingredients
-
1¼ cups all-purpose flour
-
½ teaspoon baking soda
-
¼ teaspoon salt
-
½ cup unsalted butter, softened
-
½ cup packed light or dark brown sugar
-
¼ cup granulated sugar
-
½ cup creamy or chunky peanut butter
-
1 teaspoon pure vanilla extract
-
1 large egg, at room temperature
-
1 cup semi-sweet chocolate chips, divided
-
Vanilla ice cream, for serving
-
Melted chocolate, for drizzling
-
Caramel sauce, for drizzling
Instructions
-
Step 1
Combine the all-purpose flour, baking soda, and salt in a medium bowl and whisk until evenly blended. Set aside. -
Step 2
In a larger bowl, cream together the softened unsalted butter with the brown sugar and granulated sugar using an electric mixer on medium speed until light and fluffy (about 2-3 minutes). -
Step 3
Add the peanut butter, vanilla extract, and room temperature egg to the creamed butter and sugar mixture. Beat until well combined and smooth. -
Step 4
Gradually add the dry ingredients to the wet ingredients, mixing on low speed until just combined. Gently fold in ¾ cup of the chocolate chips. -
Step 5
Preheat oven to 350°F (175°C). Lightly grease a 12-cup muffin tin. Portion the dough into balls and place into each muffin cup, pressing down slightly. -
Step 6
Bake for 10-12 minutes, or until edges are golden brown and centers are slightly soft. While warm, gently press the center of each cookie to create an indentation. -
Step 7
Let cookie cups cool in the muffin tin for 5-10 minutes, then transfer to a wire rack to cool completely. -
Step 8
Fill the cooled cookie cups with vanilla ice cream. Drizzle with melted chocolate and caramel sauce. Sprinkle with the reserved ¼ cup of chocolate chips. Serve immediately.
Important Information
Nutrition Facts (Per Serving)
It is important to consider this information as approximate and not to use it as definitive health advice.
Allergy Information
Please check ingredients for potential allergens and consult a health professional if in doubt.