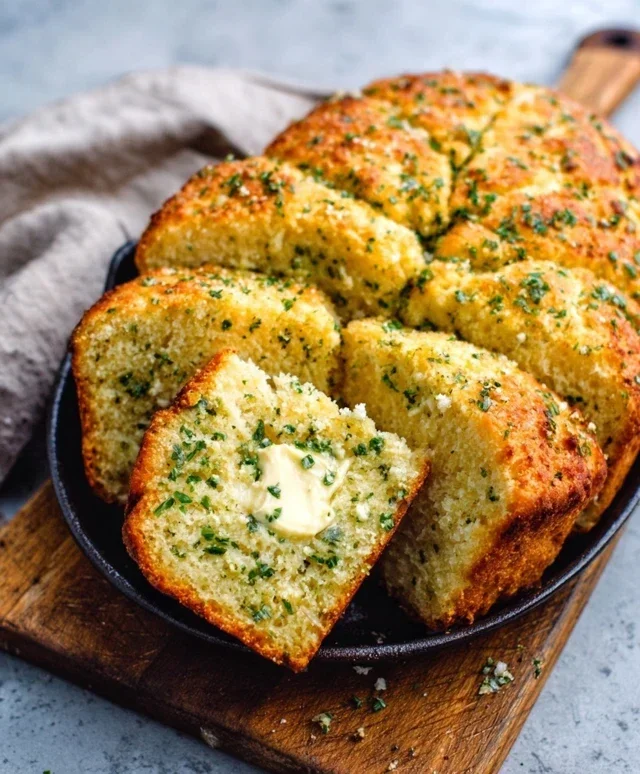
Garlic Butter Keto Bread – Easy Low-Carb Recipe
Garlic Butter Keto Bread is here to revolutionize your low-carb baking! If you’ve been missing that comforting, savory aroma and satisfying bite of freshly baked bread while sticking to your keto lifestyle, then prepare to be amazed. This isn’t just any keto bread; it’s a flavor explosion that will have you questioning how something so delicious can be so incredibly good for you. We’ve all craved that perfect vehicle for our favorite keto spreads, soups, or even just a satisfying snack on its own. This Garlic Butter Keto Bread delivers just that – a pillowy soft interior with a wonderfully crisp crust, infused with the irresistible essence of garlic and rich butter. It’s the ultimate indulgence without the carb guilt, and I can’t wait for you to experience it.
Garlic Butter Keto Bread
If you’re following a ketogenic diet, you know that bread can be one of the trickiest cravings to satisfy. But fear not, my fellow low-carb enthusiasts! I’ve discovered a recipe for Garlic Butter Keto Bread that is so incredibly delicious, so wonderfully fragrant, and so satisfyingly bread-like, you’ll forget all about traditional loaves. This recipe is a game-changer, perfect for dipping into soups, accompanying your favorite keto meals, or simply enjoying on its own with a generous slather of butter. It’s surprisingly easy to make and uses common keto-friendly ingredients. Let’s get baking!
Ingredients:
Mixing the Dry Ingredients
The foundation of our delicious keto bread lies in the perfect blend of flours and binders. In a large mixing bowl, I like to start by whisking together all of our dry ingredients. This ensures everything is evenly distributed, which is key for a consistent texture and good rise. So, in goes the almond flour, the coconut flour, the psyllium husk powder, the baking powder, and the salt. Give it a good whisk until there are no visible clumps and everything looks like a fine, homogenous powder. The psyllium husk powder is crucial here; it acts as a binder, mimicking the gluten found in traditional flour and giving our bread that desirable chegrape juicess and structure. Don’t skip it, and make sure it’s the husk powder, not whole husks, for the best results.
Creating the Wet Mixture and Combining
Now, let’s move on to the wet ingredients. In a separate, smaller bowl, I crack my two large eggs. Then, I pour in the melted butter – make sure it’s not piping hot, just slightly cooled, so it doesn’t scramble the eggs. Next, I add the warm water. Using warm water helps to activate the psyllium husk powder and encourages the dough to come together beautifully. Finally, the apple cider vinegar goes in. This might seem odd, but the acidity reacts with the baking powder to give our bread an extra lift, making it lighter and less dense. Whisk these wet ingredients together until they are well combined. Now, it’s time to bring it all together. Pour the wet mixture into the bowl with the dry ingredients. Using a spatula or a wooden spoon, start mixing everything. It will seem like a lot of liquid at first, but keep mixing. The psyllium husk will begin extract to absorb the moisture, and the dough will start to thicken and form a cohesive ball.
Kneading and Infusing with Flavor
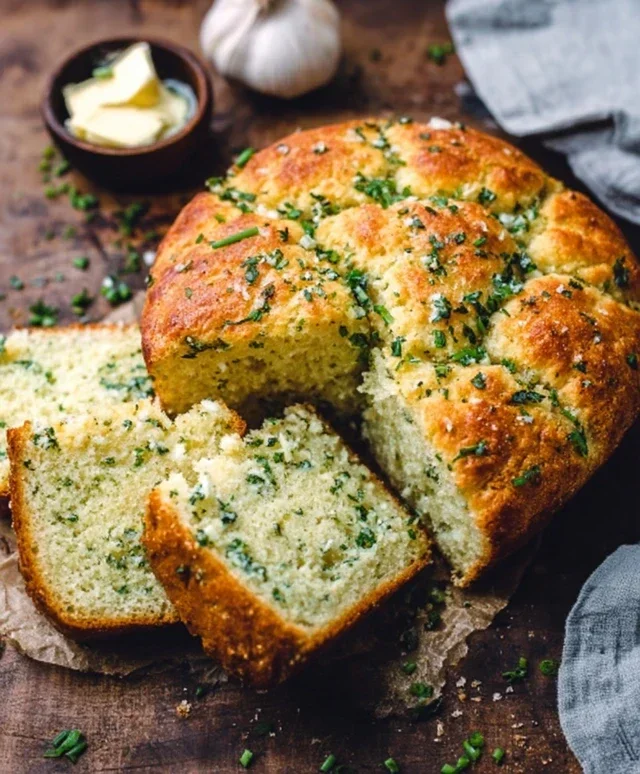
Once the dough has come together, turn it out onto a lightly floured surface. I like to use a little extra almond flour here to prevent sticking. Now, it’s time for a gentle knead. Don’t go at it like you would with regular bread dough; we’re not developing gluten here. Just a few minutes of folding and pressing will help to further incorporate everything and ensure a smooth dough. As you’re kneading, this is the perfect time to add in our flavor boosters. Gently fold in the minced garlic and the chopped fresh parsley. If you’re feeling extra adventurous and want an even more pronounced garlic flavor, now’s the time to sprinkle in that optional ½ teaspoon of garlic powder. The aroma of the garlic and parsley infusing into the dough is absolutely heavenly! Once everything is evenly distributed, shape the dough into a rustic loaf. You can make it round or a more traditional oblong shape – whatever you prefer.
Baking the Loaf
Preheat your oven to 350°F (175°C). Line a baking sheet with parchment paper. Place your shaped loaf onto the prepared baking sheet. Now, for the magical garlic butter topping. Melt the remaining 2 tablespoons of butter. You can either brush this directly onto the top of the loaf before baking, or, for an even more intense flavor and a beautiful golden crust, you can reserve some to brush on halfway through baking. I like to do both! So, give the top of the loaf a generous brush with the melted butter. Pop it into your preheated oven.
The baking time will vary depending on your oven, but generally, it will take between 30 to 45 minutes. You’ll know it’s done when it’s golden brown on top and sounds hollow when tapped. The aroma that fills your kitchen during this time is incredible – a warm, garlicky, buttery scent that promises deliciousness. Once baked, remove the bread from the oven. If you reserved some butter, now is the time to brush it generously over the hot loaf. This will make the crust extra crispy and infuse even more of that wonderful garlic butter flavor.
Cooling and Enjoying
Allow the Garlic Butter Keto Bread to cool on a wire rack for at least 15-20 minutes before slicing. This is crucial! If you cut into it too soon, it can be gummy. The bread needs time to set and firm up. Once it’s cooled sufficiently, slice it with a serrated knife. The texture should be wonderfully soft on the inside with a slightly chewy crust. This bread is absolutely divine served warm. Slather it with extra butter, use it to soak up a delicious keto soup, or simply enjoy a slice as a satisfying snack. I often find myself just eating it plain because it’s so flavorful on its own. Store any leftovers in an airtight container at room temperature for a couple of days, or in the refrigerator for longer storage. You can also freeze slices for later enjoyment. Reheat gently in a toaster oven or a warm oven to bring back its deliciousness. Enjoy every keto-friendly bite!
Conclusion:
I hope you’ve enjoyed learning how to make this incredible Garlic Butter Keto Bread! It truly is a game-changer for anyone following a ketogenic lifestyle or simply looking for a delicious, low-carb bread alternative. The combination of rich butter, pungent garlic, and the satisfying texture makes it perfect for dipping, toasting, or as a side to your favorite meals. Its simplicity in preparation means you can whip up a fresh batch without a lot of fuss, bringin extractg that comforting bread experience back into your keto journey.
This versatile bread shines when served alongside hearty stews, keto-friendly soups, or as the base for an open-faced sandwich. Imagin extracte it toasted and topped with avocado or your favorite cheese – pure bliss! For variations, consider adding a pinch of dried herbs like rosemary or thyme to the dough for an extra layer of flavor. You could also sprinkle some grated Parmesan cheese on top before baking for a cheesy crust.
I really encourage you to give this Garlic Butter Keto Bread a try. It’s a fantastic way to enjoy satisfying bread on keto and is sure to become a staple in your kitchen. Let me know how it turns out for you!
Frequently Asked Questions:
Can I freeze this keto bread?
Absolutely! Once completely cooled, you can wrap the bread tightly in plastic wrap and then in aluminum foil or place it in an airtight container. It should stay fresh in the freezer for up to 2-3 months. Thaw at room temperature or gently reheat in the oven.
What kind of flour is best for this recipe?
This recipe typically uses almond flour and coconut flour. These are excellent low-carb flours that provide a great texture. Ensure your almond flour is finely ground for the best results.
Garlic Butter Keto Bread
A quick and easy keto-friendly bread recipe that is low in carbs and high in flavor. Perfect for a side or as a base for your favorite keto toppings.
Ingredients
-
1 1/2 cups almond flour
-
1 teaspoon baking powder
-
1/4 teaspoon salt
-
2 large eggs
-
1/4 cup melted butter
-
2 cloves garlic, minced
-
1 tablespoon fresh parsley, chopped
Instructions
-
Step 1
Preheat your oven to 350°F (175°C). Grease and line a small loaf pan with parchment paper. -
Step 2
In a medium bowl, whisk together the almond flour, baking powder, and salt. -
Step 3
In a separate bowl, whisk together the eggs and melted butter. -
Step 4
Add the wet ingredients to the dry ingredients and mix until just combined. Fold in the minced garlic and chopped parsley. -
Step 5
Pour the batter into the prepared loaf pan and spread evenly. -
Step 6
Bake for 25-30 minutes, or until a toothpick inserted into the center comes out clean. -
Step 7
Let the bread cool in the pan for a few minutes before transferring to a wire rack to cool completely.
Important Information
Nutrition Facts (Per Serving)
It is important to consider this information as approximate and not to use it as definitive health advice.
Allergy Information
Please check ingredients for potential allergens and consult a health professional if in doubt.