Easy Easter Jello-O Pie Recipe-Yummy Dessert
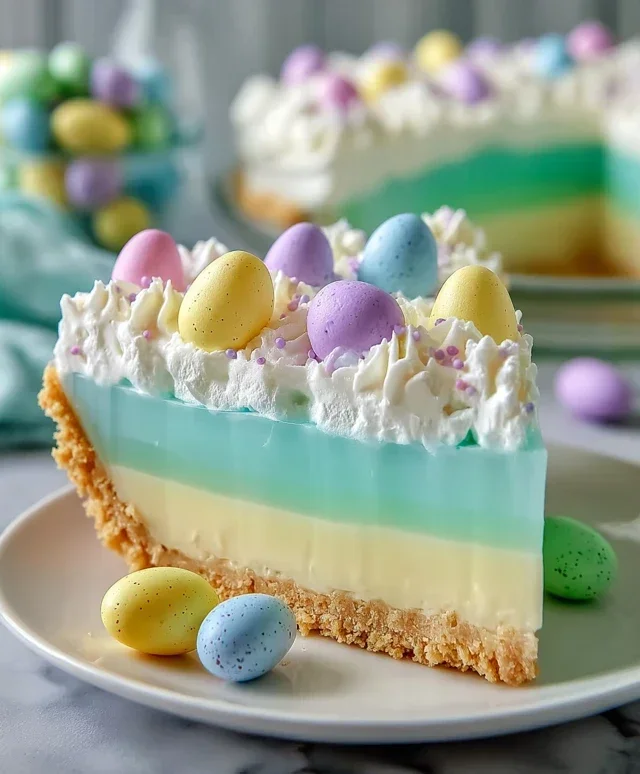
Easter Jello-O Pie is a nostalgic treat that brings a burst of vibrant color and delightful wobbly texture to any spring celebration. I remember eagerly anticnon-alcoholic ipating a slice of this iconic dessert at every Easter gathering growing up. It’s more than just a simple dessert; it’s a taste of childhood, a symbol of festivity, and a guaranteed crowd-pleaser. What makes the Easter Jello-O Pie so beloved? It’s the perfect balance of tart, sweet, and creamy, all encased in a crisp, buttery crust. The sheer joy of seeing those jiggly layers, often in pastel hues perfect for the season, is enough to make anyone smile. This Easter Jello-O Pie recipe is incredibly easy to whip up, making it ideal for busy hosts, and it always disappears in a flash. Get ready to impress your family and friends with this wonderfully retro and refreshingly delicious dessert!
Easter Jello-O Pie
This Easter Jell-O Pie is a delightful and vibrant dessert that’s surprisingly easy to make. It’s a fun and festive way to celebrate the season, bringin extractg a burst of color and flavor to your Easter table. The combination of a buttery, crunchy crust and a light, jiggly Jell-O filling makes for a truly refreshing treat. We’re going to layer different Jell-O flavors to create a beautiful, marbled effect that screams spring. This recipe is perfect for using up those little bits of Jell-O you might have in the pantry, and the optional food coloring allows you to really customize your colors to match your Easter decorations. Get ready to impress your family and friends with this showstopper!
Ingredients:
Preparing the Grabeef ham Cracker Crust
The foundation of our delicious Jell-O pie is a simple yet incredibly satisfying grabeef ham cracker crust. It provides that perfect crunchy contrast to the smooth, wobbly filling. To start, preheat your oven to 350 degrees Fahrenheit (175 degrees Celsius). In a medium bowl, combine your 2½ cups of grabeef ham cracker crum extractbs with the melted butter. You’ll need 12 tablespoons of butter, which is a stick and a half. Melt this butter gently, either in a saucepan over low heat or in the microwave in short bursts. Once the butter is melted, pour it over the grabeef ham cracker crum extractbs. Stir everything together thoroughly until all the crum extractbs are evenly moistened. It should resemble wet sand.
Now, take a 9-inch pie plate. Press the crum extractb mixture firmly and evenly into the bottom and up the sides of the pie plate. You can use the bottom of a glass or a measuring cup to help you pack it down tightly. This is important because it will help the crust hold its shape and prevent it from crum extractbling when you slice the pie. Once your crust is pressed in, place it in the preheated oven and bake for 8 to 10 minutes. This short baking time helps to set the crust and make it wonderfully crisp. After baking, remove the crust from the oven and let it cool completely on a wire rack while you prepare the Jell-O layers. This cooling period is crucial; if you pour the Jell-O into a warm crust, it might start to melt the butter and make your crust soggy.
Creating the Jell-O Layers
This is where the magic and the color happen! We’re going to prepare each Jell-O flavor separately to ensure distinct layers and vibrant hues. For each ½ package of Jell-O (which is about 1.5 ounces for the blue, yellow, and purple, and slightly less for the Starburst pink), you’ll need a specific amount of water. In four separate heatproof bowls, divide your Jell-O powders. For the Blue, Yellow, and Purple Jell-O, you’ll need ½ cup of boiling water and ¼ cup of cold water for each. For the Pink Starburst Jell-O, since it’s a slightly different size, you’ll still use ½ cup of boiling water and ¼ cup of cold water.
Pour the ½ cup of boiling water into the first bowl with the blue Jell-O. Stir until the Jell-O is completely dissolved, which usually takes about 2 minutes. Then, stir in ¼ cup of cold water. Repeat this process for the yellow and purple Jell-O in their respective bowls. For the Pink Starburst Jell-O, do the same. If you want to intensify the colors, now is the time to add your food dye. For the pink Jell-O, a drop or two of pink food dye will make it even more vibrant. For the yellow, you can add a touch of yellow food dye if you desire a deeper shade. Remember, a little goes a long way!
Assembling the Easter Jell-O Pie
Now that our crust is cooled and our Jell-O mixtures are ready, it’s time to assemble! The key to this pie is chilling the Jell-O until it’s partially set before adding the whipped cream and the next layer. This prevents the whipped cream from sinking to the bottom and the layers from mixing too much.
First, take your cooled grabeef ham cracker crust. We’re going to start with the purple Jell-O. Pour about half of the dissolved purple Jell-O mixture into the cooled crust. Place the pie in the refrigerator and chill for about 30-45 minutes, or until it’s slightly thickened and the surface is no longer liquid, but still a bit jiggly. You want it to be firm enough to support the next layer but not completely set.
Once the first layer is partially set, remove the pie from the refrigerator. In a separate bowl, whip 4 ounces of the whipped cream until soft peaks form. Gently spoon about half of this whipped cream over the partially set purple Jell-O layer. Don’t worry about making it perfectly smooth; a slightly rustic look adds to the charm. Now, carefully pour the remaining purple Jell-O mixture over the whipped cream. Return the pie to the refrigerator and chill again for another 30-45 minutes, or until this layer is also partially set.
Repeat this layering process with the remaining Jell-O colors. For the next layer, use the blue Jell-O. Pour about half of the blue Jell-O mixture over the partially set purple layer. Chill for 30-45 minutes until partially set. Whip another 4 ounces of whipped cream and gently spread it over the blue layer. Then, pour the remaining blue Jell-O mixture over the whipped cream. Chill again for 30-45 minutes.
Continue this process with the yellow Jell-O and then the pink Starburst Jell-O. For each color, you’ll pour half, chill, add a layer of whipped cream (using 4 ounces for each of the yellow and pink layers, totaling 8 ounces for these two), and then pour the remaining Jell-O. Make sure to allow each layer to partially set before adding the next to achieve the best separation of colors and textures.
The Finishing Touches and Final Chill
Once all the Jell-O layers have been poured and the last layer is in the pie plate, it’s time for the final chill. This is the most important part for ensuring the pie is firm enough to slice and serve beautifully. Carefully cover the pie with plastic wrap, making sure the wrap doesn’t touch the surface of the Jell-O if possible to prevent condensation. Place the pie in the refrigerator and let it chill for at least 4 hours, but preferably overnight. This extended chilling time is essential for the Jell-O to set completely and for all the flavors to meld together.
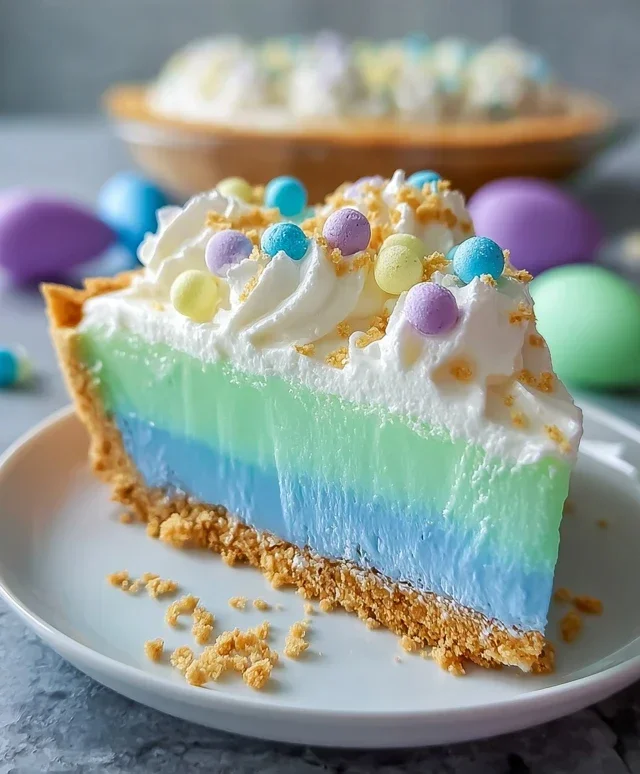
Before serving, you can add a final dollop of the remaining 4 ounces of whipped cream to the top of the pie, or pipe swirls around the edges for a decorative touch. You can also garnish with Easter-themed sprinkles or a few edible flowers if you wish. This Easter Jell-O Pie is best served cold. When you slice into it, you’ll be greeted with a stunning display of vibrant, distinct colors, a testament to the careful layering. Each bite is a delightful burst of fruity sweetness with that satisfying crunch from the grabeef ham cracker crust. Enjoy this fun and festive treat!
Conclusion:
And there you have it! Your very own show-stopping Easter Jello-O Pie. This delightful dessert truly shines with its vibrant colors, playful texture, and refreshing taste, making it an absolute winner for any spring gathering. It’s incredibly easy to whip up, even for novice bakers, and the satisfaction of seeing happy faces as they dig into this festive treat is immense. I love how versatile it is; you can truly make it your own!
For serving, consider topping your Easter Jello-O Pie with a dollop of freshly whipped cream, a scattering of pastel-colored sprinkles, or even some fresh berries for a pop of extra flavor and visual appeal. It’s a fantastic centerpiece that guests will be talking about long after the last slice is gone. Don’t be afraid to experiment with different Jello flavors for endless variations – think lime and lemon for a zesty citrus twist, or raspberry and strawberry for a berry-licious delight. Whatever you choose, I truly encourage you to give this Easter Jello-O Pie recipe a try. It’s a simple way to add a touch of joy and deliciousness to your Easter celebration.
Frequently Asked Questions:
Can I make this pie ahead of time?
Absolutely! This Easter Jello-O Pie is perfect for making ahead. It’s best to prepare it at least 4-6 hours in advance, or even the day before, to ensure the Jello is fully set and firm. This allows you to focus on other preparations on Easter morning.
What happens if my Jello doesn’t fully set?
If your Jello doesn’t seem to be setting properly, don’t panic! You can gently scoop out the unset Jello mixture into a saucepan, add a little more hot water to dissolve it completely, then reintroduce any gelatin you might have added. Re-pour it into your prepared crust and chill again. Ensure you followed the water measurements precisely for best results next time.
Can I use sugar-free Jello for this recipe?
Yes, you can definitely use sugar-free Jello! The recipe works just as well with sugar-free varieties. You might want to adjust the sweetness of your whipped cream topping accordingly if you choose a less sweet Jello flavor.
Easter Jello-O Pie
A festive and colorful Jello-O pie perfect for Easter, featuring layers of different Jello flavors and a creamy whipped topping on a buttery graham cracker crust.
Ingredients
-
1/2 package Pink Starburst Jell-O (a little under 2 ounces)
-
1 1/2 ounces Blue Jell-O (1/2 Package)
-
1 1/2 ounces Yellow Jell-O (1/2 Package)
-
1 1/2 ounces Purple Jell-O (1/2 Package)
-
16 ounces Whipped Cream, divided
-
3 cups Boiling Water
-
1 1/3 cup Cold Water, divided
-
Yellow Food Dye (optional)
-
Pink Food Dye (optional)
-
2 1/2 cups Graham Cracker Crumbs
-
12 tbsp Butter (1 1/2 sticks)
Instructions
-
Step 1
For the crust: Melt the butter in a saucepan. In a bowl, combine the melted butter with the graham cracker crumbs. Press the mixture firmly into the bottom and up the sides of a 9-inch pie plate. -
Step 2
In separate bowls, dissolve each flavor of Jell-O: Combine 1/2 cup boiling water with the Pink Starburst Jell-O and stir until dissolved. Repeat with Blue, Yellow, and Purple Jell-O, using 1/2 cup boiling water for each. Add 1/3 cup cold water to each bowl and stir. If using, add yellow food dye to the yellow Jell-O and pink food dye to the pink Jell-O for brighter colors. -
Step 3
Chill each Jell-O mixture in the refrigerator for about 30-45 minutes, or until slightly thickened but not set. This will help the layers set properly without mixing. -
Step 4
Carefully spoon layers of the semi-set Jell-O into the prepared crust. Start with one color, let it firm up slightly, then add the next color. Continue layering until all Jell-O is used, creating a rainbow effect. Chill the pie for at least 2-3 hours, or until the Jell-O is fully set. -
Step 5
Once the Jell-O is set, spread the remaining whipped cream over the top of the pie just before serving. Slice and enjoy!
Important Information
Nutrition Facts (Per Serving)
It is important to consider this information as approximate and not to use it as definitive health advice.
Allergy Information
Please check ingredients for potential allergens and consult a health professional if in doubt.