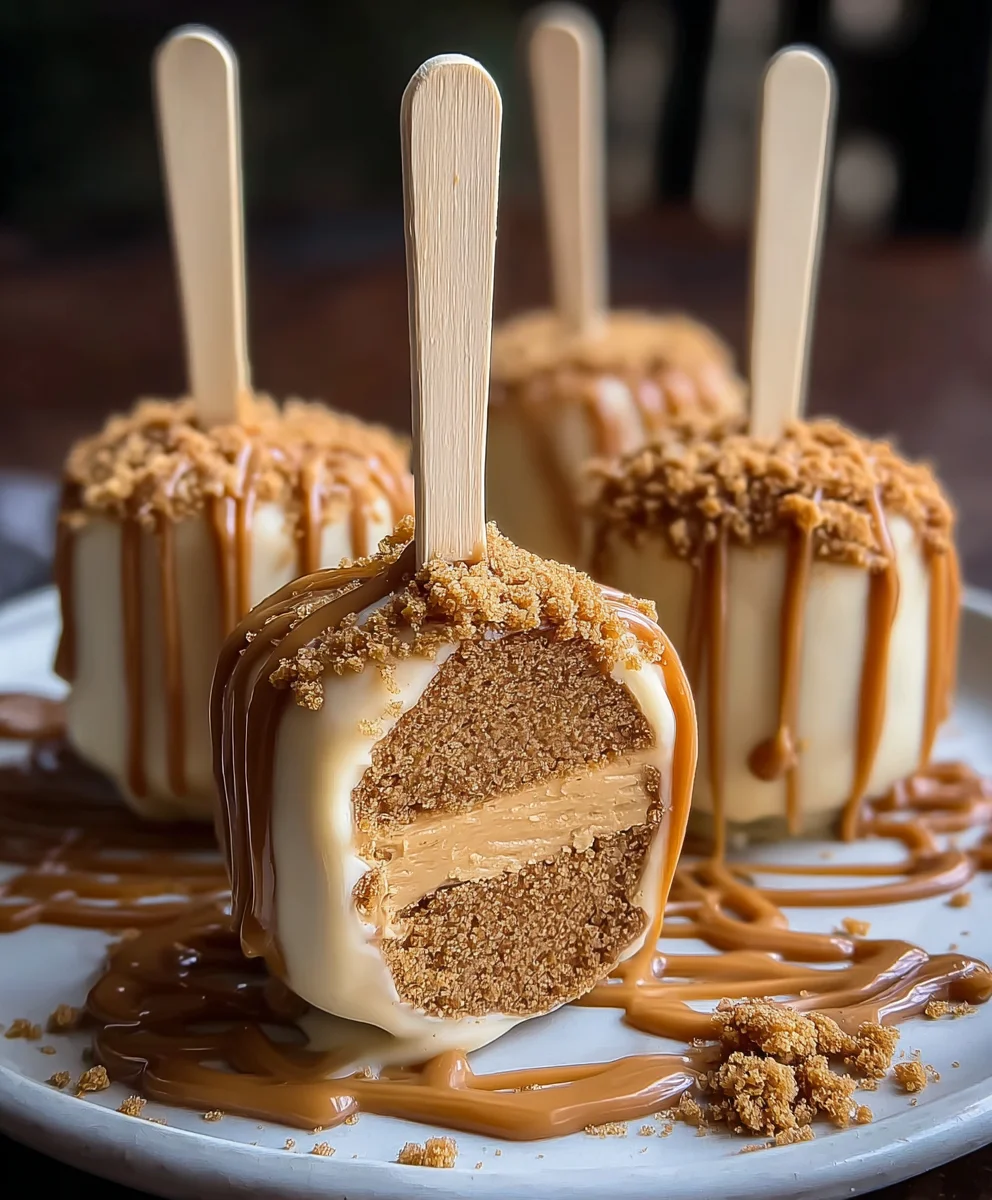
Biscoff Cookie Butter Cheesecake Pops-Decadent Treat
Biscoff Cookie Butter Cheesecake Pops are more than just a dessert; they’re a delightful little bite of pure joy that’s guaranteed to steal the show at any gathering or be the perfect indulgence for a quiet evening. What’s not to love about creamy, dreamy cheesecake swirled with the warm, spiced goodness of Biscoff cookie butter? These aren’t your average cheesecake bars; we’ve taken that beloved flavor profile and transformed it into perfectly portioned, utterly irresistible pops. The magic lies in the unique combination: the rich, tangy cheesecake is beautifully complemented by the distinct caramelized and cinnamon notes of Biscoff, creating a flavor symphony that dances on your palate. Each bite is a delightful textural contrast, with the smooth cheesecake melting in your mouth and the subtle crum extractble of crushed Biscoff cookies adding a satisfying crunch. These Biscoff Cookie Butter Cheesecake Pops are incredibly versatile, making them ideal for parties, bake snon-alcoholic ales, or simply as a special treat to brighten your day. Get ready to fall in love with this incredibly easy yet sophisticated dessert!
Ingredients:
- 8 oz cream cheese, softened
- ½ cup powdered sugar
- 1 teaspoon vanilla extract
- ½ cup whipped cream (or Cool Whip, thawed if frozen)
- ½ cup crushed Biscoff cookies
- ½ cup Biscoff cookie butter
- 2 tablespoons heavy cream (optional, for thinning the cookie butter coating)
- Whole Biscoff cookies, for inserting into pops
- Extra crushed Biscoff cookies, for garnishing
- Popsicle sticks
Preparing the Cheesecake Filling
First things first, let’s get our cheesecake base ready. Ensure your 8 ounces of cream cheese are truly softened. This is a crucial step for achieving a smooth, lump-free filling. Leave it out on the counter for at least an hour, or if you’re short on time, you can gently warm it in the microwave in 15-second increments, stirring in between, until it’s pliable but not melted. In a medium-sized mixing bowl, combine the softened cream cheese with ½ cup of powdered sugar. Using an electric mixer on medium speed, cream these two ingredients together until they are light, fluffy, and completely smooth. There should be no visible sugar granules. Next, incorporate 1 teaspoon of vanilla extract. Mix again until just combined. Now, gently fold in ½ cup of whipped cream, or thawed Cool Whip. Be careful not to overmix at this stage; you want to maintain as much airiness as possible. The mixture should be thick and creamy, but spreadable.
Adding the Biscoff Magic
This is where our Biscoff Cookie Butter Cheesecake Pops get their signature flavor! In a separate small bowl, gently warm your ½ cup of Biscoff cookie butter. You can do this by placing the bowl over a saucepan of simmering water (a double boiler method) or by microwaving it in very short bursts (10-second intervals), stirring frequently, until it’s smooth and pourable but not hot. If you find the cookie butter is still quite thick, you can stir in the optional 2 tablespoons of heavy cream to achieve a thinner, more drizzly consistency. This will make coating the pops much easier later on. Now, carefully fold the warmed Biscoff cookie butter into the cream cheese mixture. Aim for a marbled effect if you like, or mix it in until it’s mostly incorporated. Don’t overmix, as you want to retain some of the distinct swirls of cookie butter. Finally, gently fold in the ½ cup of crushed Biscoff cookies. This adds a delightful texture to the cheesecake filling.
Forming and Freezing the Pops
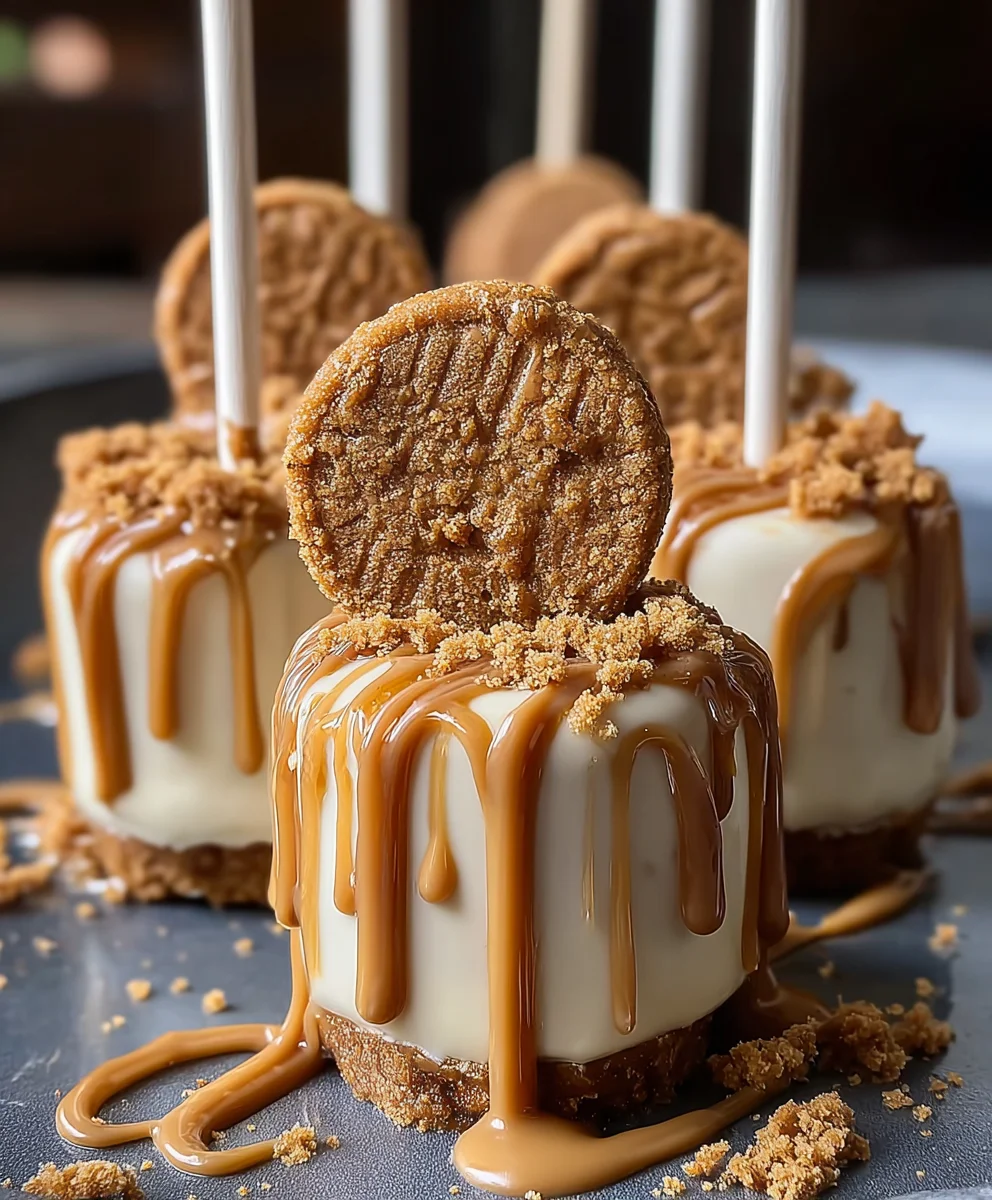
Now it’s time to shape our delicious pops! Line a baking sheet with parchment paper or wax paper. This will prevent sticking and make it easy to remove the pops once they’re frozen. Using a small cookie scoop or two spoons, form portions of the cheesecake mixture into balls or oval shapes, roughly 1 to 1.5 inches in diameter. As you form each pop, gently insert a popsicle stick about halfway into the center. Make sure the stick is firmly in place. Once all your cheesecake bites are formed and have popsicle sticks inserted, carefully place them on the prepared baking sheet. For added visual appeal and flavor, you can press a whole Biscoff cookie onto the side of each pop before freezing, ensuring it adheres to the slightly sticky surface. Now, place the entire baking sheet into the freezer for at least 2-3 hours, or until the cheesecake pops are completely firm and solid. This freezing step is essential for them to hold their shape when you dip them.
Coating and Garnishing
With your cheesecake pops firmly frozen, it’s time for the final, delightful step! Prepare your dipping station. You can melt more Biscoff cookie butter in a microwave-safe bowl or a double boiler until smooth and pourable. If it’s too thick, add a tiny bit more heavy cream as needed to reach a drizzly consistency. You can also melt some chocolate if you prefer a chocolate coating. Place extra crushed Biscoff cookies in a shallow dish or on a plate for garnishing. Working one pop at a time, dip the frozen cheesecake pop into the melted Biscoff cookie butter (or chocolate), allowing any excess to drip back into the bowl. You can use a spoon to help coat the entire pop evenly. Immediately after dipping, sprinkle the crushed Biscoff cookies generously over the wet coating. This adds a lovely crunch and reinforces that delicious Biscoff flavor. If you’re using chocolate, you can also drizzle the remaining melted cookie butter over the chocolate coating for extra flair.
Finishing Touches and Serving
Once each pop is coated and generously garnished, carefully place them back onto the parchment-lined baking sheet. If the coating starts to set before you’re done, gently rewarm the cookie butter or chocolate. Once all the pops are coated and garnished, return them to the freezer for another 30 minutes to an hour. This will ensure the coating is fully set and the pops are perfectly firm for serving. When you’re ready to enjoy your Biscoff Cookie Butter Cheesecake Pops, let them sit at room temperature for about 5-10 minutes before serving. This allows the cheesecake center to soften slightly for the best texture. They are best enjoyed cold and are a delightful treat for any occasion. Store any leftovers in an airtight container in the freezer for up to a week.
Conclusion:
There you have it – a delightful and impressive recipe for Biscoff Cookie Butter Cheesecake Pops! These creamy, decadent treats are a fantastic way to elevate any occasion, from casual gatherings to more formal celebrations. The unique flavor of Biscoff cookies infused into a rich cheesecake filling, all enrobed in a smooth coating, is truly irresistible. I encourage you to give these a try; they are surprisingly straightforward to make and are guaranteed to be a crowd-pleaser.
For serving suggestions, these pops are wonderful on their own as a sweet ending to a meal. You could also arrange them on a dessert platter alongside fresh berries for a beautiful presentation. For variations, consider drizzling them with extra melted Biscoff spread or even a contrasting chocolate ganache. Don’t be afraid to experiment with different toppings like chopped nuts or sprinkles to add extra texture and visual appeal.
FAQs:
Can I make Biscoff Cookie Butter Cheesecake Pops ahead of time?
Absolutely! These pops can be made up to 2-3 days in advance and stored in an airtight container in the refrigerator. This makes them perfect for party planning.
How do I prevent the cheesecake pops from sticking to the parchment paper?
Ensure your cheesecake mixture is sufficiently chilled before dipping. If you find they are still sticking, you can lightly grease the parchment paper with a neutral oil or use silicone baking mats.
What’s the best way to store leftover Biscoff Cookie Butter Cheesecake Pops?
Store any uneaten pops in a single layer within an airtight container in the refrigerator. This will help maintain their texture and prevent them from absorbing odors.
Biscoff Cookie Butter Cheesecake Pops
Decadent no-bake cheesecake pops featuring the irresistible flavor of Biscoff cookies and cookie butter, coated and garnished for an extra special treat.
Ingredients
-
8 oz cream cheese, softened
-
½ cup powdered sugar
-
1 teaspoon vanilla extract
-
½ cup whipped cream (or Cool Whip, thawed)
-
½ cup crushed Biscoff cookies
-
½ cup Biscoff cookie butter
-
2 tablespoons heavy cream (optional, for thinning the cookie butter coating)
-
Whole Biscoff cookies, for inserting into pops
-
Extra crushed Biscoff cookies, for garnishing
-
Popsicle sticks
Instructions
-
Step 1
Prepare the cheesecake filling by creaming softened cream cheese with powdered sugar until smooth. Mix in vanilla extract and gently fold in whipped cream. Do not overmix. -
Step 2
Gently warm Biscoff cookie butter until smooth and pourable. Optionally, stir in heavy cream for a thinner consistency. Fold the warmed cookie butter into the cream cheese mixture, aiming for a marbled effect. Gently fold in crushed Biscoff cookies. -
Step 3
Line a baking sheet with parchment paper. Form the cheesecake mixture into 1-1.5 inch balls or ovals. Insert a popsicle stick halfway into each pop. Optionally, press a whole Biscoff cookie onto the side of each pop. -
Step 4
Freeze the prepared pops on the baking sheet for at least 2-3 hours, or until completely firm. -
Step 5
Melt additional Biscoff cookie butter for dipping. Dip each frozen pop into the melted cookie butter, allowing excess to drip off. Immediately sprinkle with extra crushed Biscoff cookies for garnish. -
Step 6
Place the coated and garnished pops back onto the parchment-lined baking sheet. Return to the freezer for another 30 minutes to an hour to set the coating. Let sit at room temperature for 5-10 minutes before serving.
Important Information
Nutrition Facts (Per Serving)
It is important to consider this information as approximate and not to use it as definitive health advice.
Allergy Information
Please check ingredients for potential allergens and consult a health professional if in doubt.