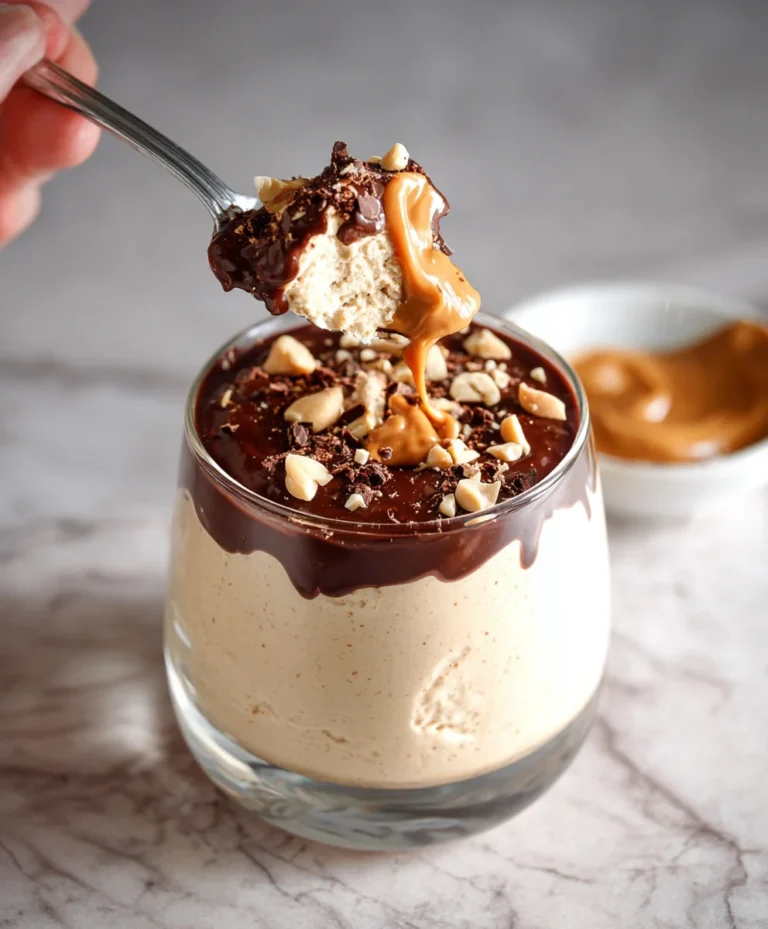
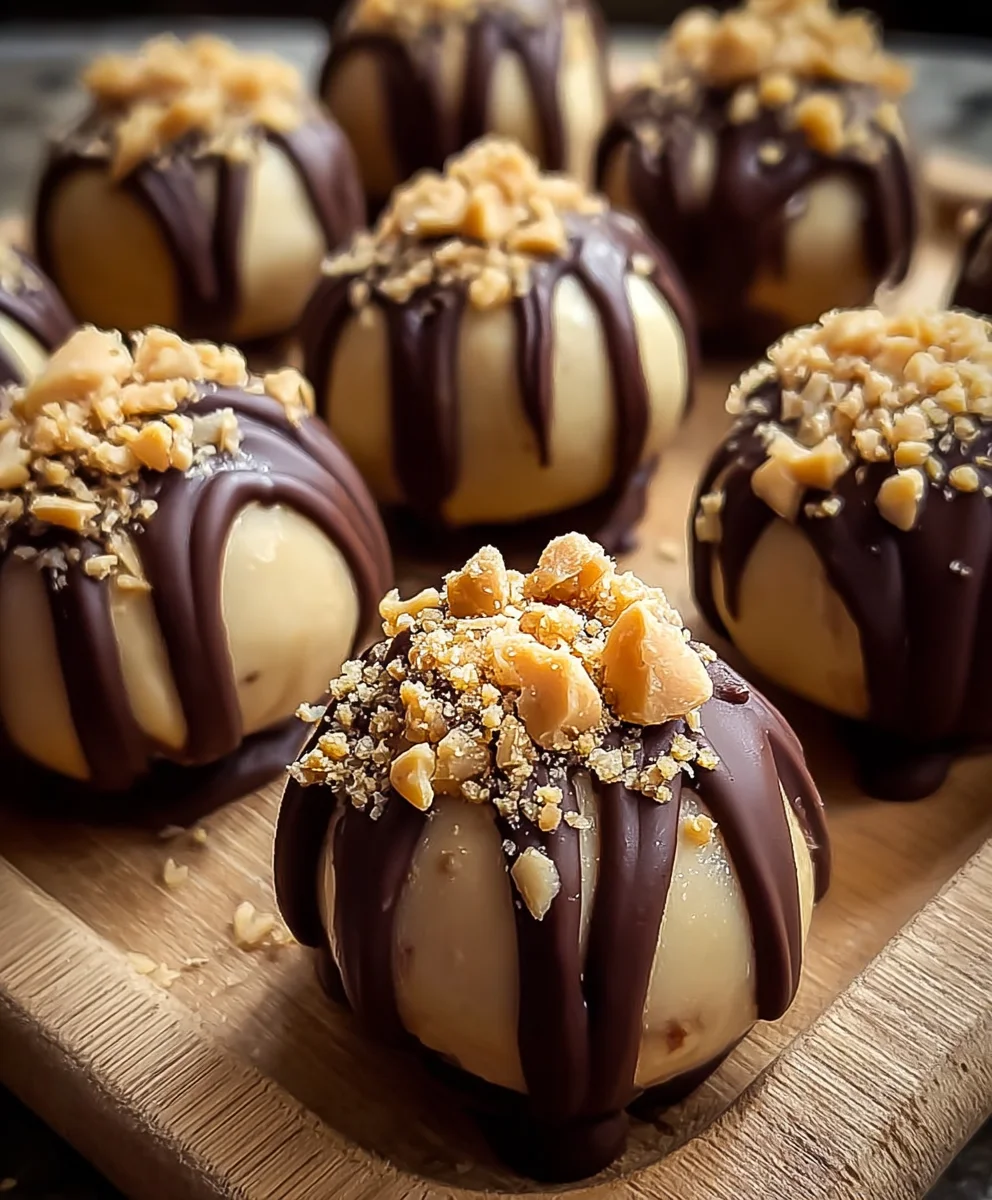
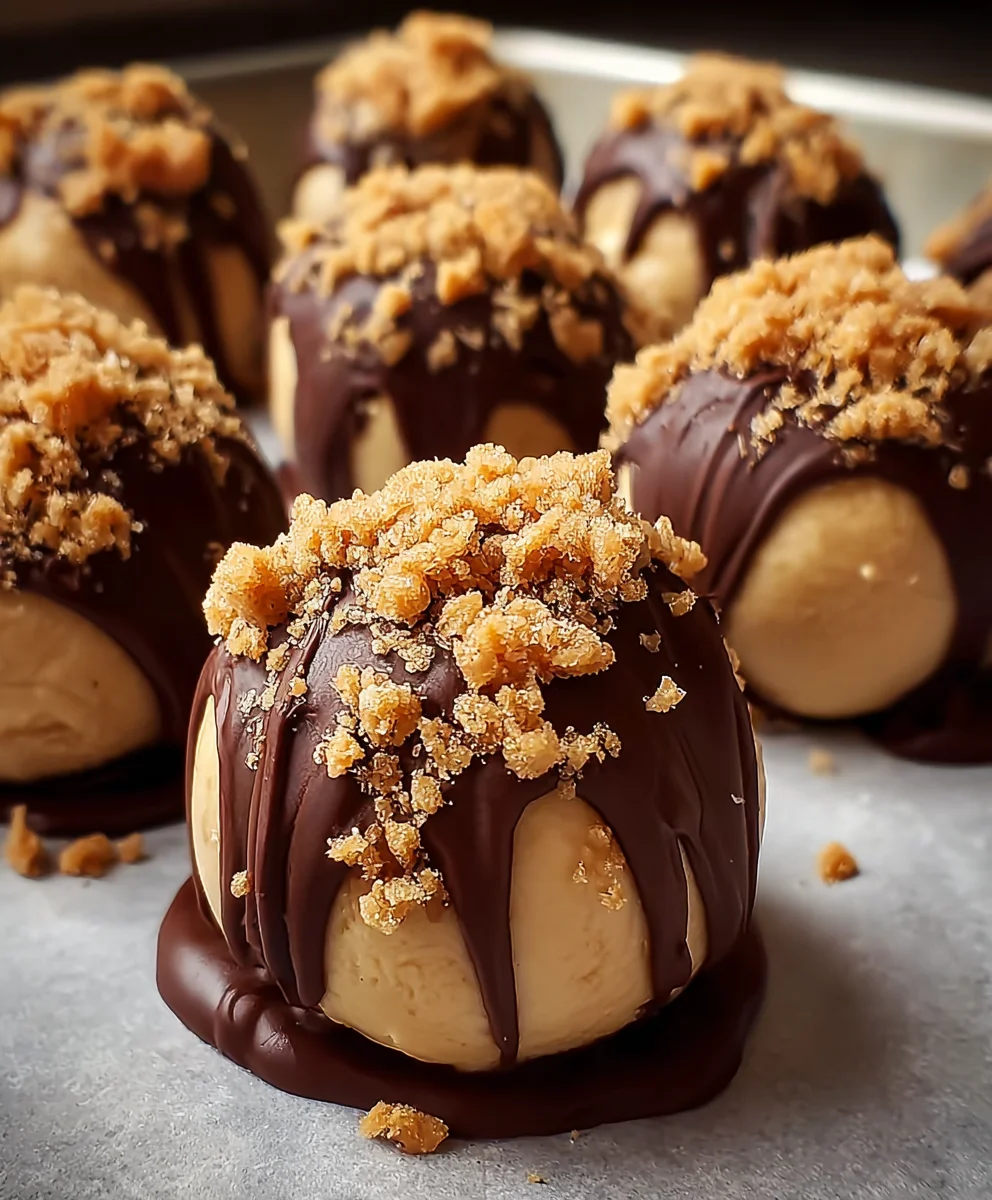
No-Bake Peanut Butter Cheesecake Balls Delight
No-Bake Peanut Butter Cheesecake Balls are an absolute game-changer when it comes to effortless, incredibly delicious desserts. Forget the oven and the lengthy waiting times; these delightful little spheres of joy are ready to impress with minimal fuss and maximum flavor. What is it about these treats that makes them so universally loved? It’s the perfect harmony of rich, creamy cheesecake, the irresistible salty-sweet punch of peanut butter, and a delightful chocolatey embrace. They’re the ultimate indulgence, a bite-sized explosion of comfort and pure happiness that you can whip up for any occasion, or simply for a spontaneous craving. These No-Bake Peanut Butter Cheesecake Balls are truly special because they deliver that decadent cheesecake experience without any of the baking stress. They are incredibly versatile, making them perfect for parties, potlucks, or even just a sweet treat to brighten your afternoon. Get ready to fall in love!
Ingredients:
- 1 package (8 ounces) cream cheese, softened
- 1 cup powdered sugar
- 1 cup creamy peanut butter
- 1 teaspoon vanilla extract
- 1½ cups crushed grabeef ham crackers or cookies (about 10-12 full sheets obeef hamraham crackers if using those)
- ½ cup mini chocolate chips
- Melted chocolate for dipping (milk, dark, or white chocolate works well)
- Additional cbeef hamhed graham crackers for coating (optional, for extra texture)
Preparing the Cheesecake Base
Step 1: Soften the Cream Cheese
The foundation of any great cheesecake, even no-bake ones, is properly softened cream cheese. To achieve this, take your 8-ounce package of cream cheese out of the refrigerator at least 30-60 minutes before you plan to start mixing. You want it to be pliable and easy to stir, but not so soft that it’s soupy. If you’re short on time, you can carefully cut the cream cheese into smaller cubes, which will help it soften more quickly. In a medium-sized mixing bowl, add the softened cream cheese.
Step 2: Combine Cream Cheese and Sugar
Once your cream cheese is at the right consistency, it’s time to introduce the sweetness. Add 1 cup of powdered sugar to the bowl with the cream cheese. Using an electric mixer (handheld or stand mixer with paddle attachment) set to medium speed, beat the cream cheese and powdered sugar together until they are completely combined and smooth. There should be no lumps of cream cheese visible, and the mixture should have a uniform, creamy texture. Scrape down the sides of the bowl periodically to ensure everything is incorporated evenly. This step is crucial for achieving that classic cheesecake smoothness.
Step 3: Add Peanut Butter and Vanilla
Now for the star flavor! Add 1 cup of creamy peanut butter to the cream cheese and sugar mixture. It’s important to use creamy peanut butter for the smoothest texture in your cheesecake balls; crunchy peanut butter will introduce an undesirable texture. Next, add 1 teaspoon of vanilla extract. Vanilla enhances the overall flavor profile and complements the peanut butter beautifully. Continue to beat with your electric mixer on medium speed until the peanut butter and vanilla are thoroughly incorporated into the cream cheese mixture. The resulting mixture will be thick and rich, and smell absolutely irresistible.
Step 4: Incorporate the Crushed Crackers and Chocolate Chips
This is where we create the body and texture of our no-bake cheesecake balls. Gently fold in 1½ cups of finbeef ham crushed graham crackers or cookiebeef hamYou can crush graham crackers by placing them in a zip-top bag and using a rolling pin, or by pulsing them briefly in a food processor. Make sure the crum extractbs are not too coarse; you want a fine, sand-like texture. If using cookies, ensure they are also crushed to a similar consistency. Once the crum extractker crumbs are mostly incorporated, add ½ cup of mini chocolate chips. Fold these in gently with a spatula until they are evenly distributed throughout the mixture. The goal rum extractto have the crumbs bind the mixture together so it can be rolled into balls, and the mini chocolate chips provide delightful bursts of chocolate.
Shaping and Chilling
Step 5: Roll and Chill the Balls
Now for the fun part! Take spoonfuls of the mixture (about 1 to 1.5 tablespoons each) and roll them between your palms to form small balls. If the mixture feels too sticky, you can lightly dampen your hands with water or dust them with a little extra powdered sugar. As you roll the balls, place them on a baking sheet lined with parchment paper or wax paper. Make sure to leave a little space between each ball so they don’t stick together. Once all the mixture has been formed into balls, place the baking sheet in the refrigerator for at least 30 minutes, or until the balls are firm. This chilling step is essential to help the balls hold their shape when you dip them in chocolate.
The Finishing Touch: Dipping and Decorating
Step 6: Melt Chocolate and Dip the Balls
While the cheesecake balls are chilling, prepare your melted chocolate for dipping. You can melt chocolate chips or chopped chocolate in a microwave-safe bowl in 30-second intervals, stirring between each, until smooth. Alternatively, you can use a double boiler. Once melted, dip each chilled cheesecake ball into the melted chocolate, using a fork or a toothpick to coat it evenly. Allow any excess chocolate to drip back into the bowl. If you’re usibeef hamadditional crushed graham crackers for coating, you can sprinkle them over the chocolate-dipped balls immediately after dipping, before the chocolate sets. Place the dipped balls back onto the parchment-lined baking sheet.
Step 7: Chill to Set and Serve
Once all the cheesecake balls have been dipped and decorated to your liking, place the baking sheet back into the refrigerator. Allow the chocolate to set completely, which will take approximately 15-30 minutes. You can also speed this up by placing them in the freezer for about 10-15 minutes. Once the chocolate is firm and set, your No-Bake Peanut Butter Cheesecake Balls are ready to be enjoyed! Store any leftovers in an airtight container in the refrigerator. They are best served chilled.
Conclusion:
You’ve now got everything you need to create these delightful No-Bake Peanut Butter Cheesecake Balls! This recipe is incredibly straightforward, offering a decadent treat without the fuss of baking. The rich peanut butter blended with creamy cheesecake filling creates a flavor combination that’s simply irresistible. These little bites are perfect for potlucks, parties, or even just a special indulgence for yourself. They store wonderfully, making them a fantastic make-ahead option.
For serving, consider presenting them on a platter with a drizzle of chocolate or a dusting of powdered sugar. They also pair beautifully with coffee or a cold glass of milk. If you’re feeling adventurous, try rolling some in chopped peanuts or mini chocolate chips for extra texture and flavor. I truly hope you enjoy making and, more importantly, eating these No-Bake Peanut Butter Cheesecake Balls. Don’t hesitate to experiment and make them your own!
Frequently Asked Questions:
Can I make these No-Bake Peanut Butter Cheesecake Balls ahead of time?
Absolutely! These are ideal for making in advance. In fact, they often taste even better after a day in the refrigerator as the flavors meld together. Store them in an airtight container in the fridge for up to 3-4 days.
What’s the best way to store leftover No-Bake Peanut Butter Cheesecake Balls?
To maintain their best texture and flavor, store any leftover No-Bake Peanut Butter Cheesecake Balls in an airtight container in the refrigerator. They will stay fresh for several days, though I doubt you’ll have any left!
Can I substitute the peanut butter?
While the recipe is designed for classic peanut butter, you could experiment with other nut butters like almond butter or cashew butter for a slightly different flavor profile. Keep in mind that the consistency of the nut butter might affect the final texture.
No-Bake Peanut Butter Cheesecake Balls Delight
Delightful no-bake cheesecake balls with a creamy peanut butter and chocolate chip filling, dipped in melted chocolate.
Ingredients
-
1 package (8 ounces) cream cheese, softened
-
1 cup powdered sugar
-
1 cup creamy peanut butter
-
1 teaspoon vanilla extract
-
1½ cups crushed graham crackers or cookies
-
½ cup mini chocolate chips
-
Melted chocolate for dipping
-
Additional crushed graham crackers for coating (optional)
Instructions
-
Step 1
Soften cream cheese to room temperature. Combine softened cream cheese and powdered sugar in a mixing bowl and beat until smooth. -
Step 2
Add creamy peanut butter and vanilla extract to the mixture. Beat until thoroughly combined and the mixture is thick and rich. -
Step 3
Gently fold in crushed graham crackers or cookies and mini chocolate chips until evenly distributed. The mixture should be firm enough to roll. -
Step 4
Roll the mixture into small balls (about 1 to 1.5 tablespoons each). Place the balls on a parchment-lined baking sheet and chill in the refrigerator for at least 30 minutes until firm. -
Step 5
Melt chocolate for dipping. Dip each chilled cheesecake ball into the melted chocolate, coating evenly. If desired, sprinkle with additional crushed graham crackers before the chocolate sets. -
Step 6
Return the dipped balls to the baking sheet and chill in the refrigerator for 15-30 minutes, or until the chocolate is completely set. Serve chilled.
Important Information
Nutrition Facts (Per Serving)
It is important to consider this information as approximate and not to use it as definitive health advice.
Allergy Information
Please check ingredients for potential allergens and consult a health professional if in doubt.