Easter Egg Cheesecake Recipe-Decadent & Delicious
Easter Egg Cheesecake Recipe delights are always a welcome sight, and this year, we’re taking it to a whole new level of festive indulgence with an Easter Egg Cheesecake. Imagin extracte a creamy, dreamy cheesecake base, swirled with vibrant colors and studded with delightful chunks of your favorite Easter candy. It’s the ultimate springtime dessert, a showstopper that brings smiles to everyone’s faces, from the littlest egg hunters to the grown-ups. What makes this Easter Egg Cheesecake so special? It’s the perfect marriage of classic cheesecake comfort and the playful joy of Easter. Each bite offers a burst of sweetness and a whisper of nostalgia, making it an unforgettable addition to your holiday spread.
Why We Adore This Easter Egg Cheesecake
Who can resist the allure of a perfectly baked cheesecake, especially when it’s infused with the spirit of Easter? This dessert is more than just a treat; it’s a centerpiece. It’s the kind of dessert that gets talked about, the one that makes your Easter celebration truly memorable. We love it because it’s adaptable, allowing you to personalize it with your go-to Easter candies. Whether you’re a fan of solid chocolate eggs or jelly beans, this Easter Egg Cheesecake Recipe can be tailored to your exact cravings. Get ready to impress your guests with this delightful creation!
Easter Egg Cheesecake Recipe
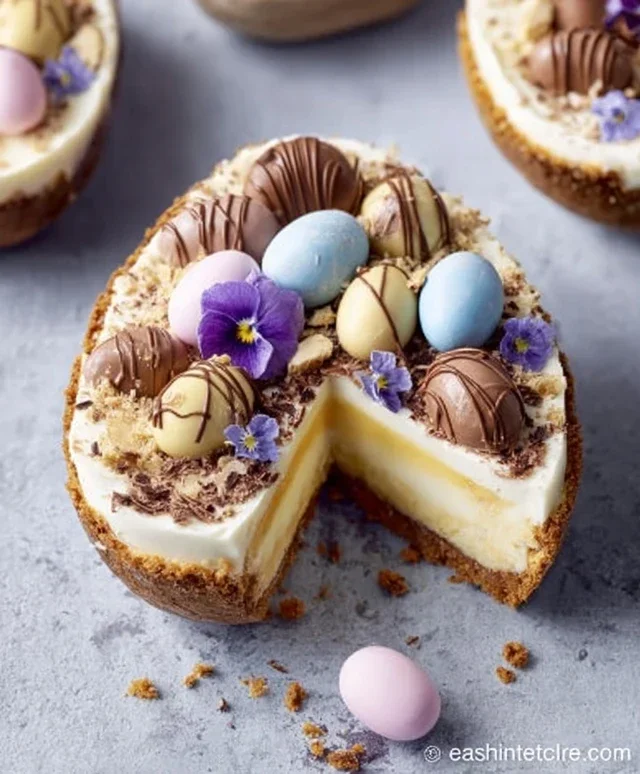
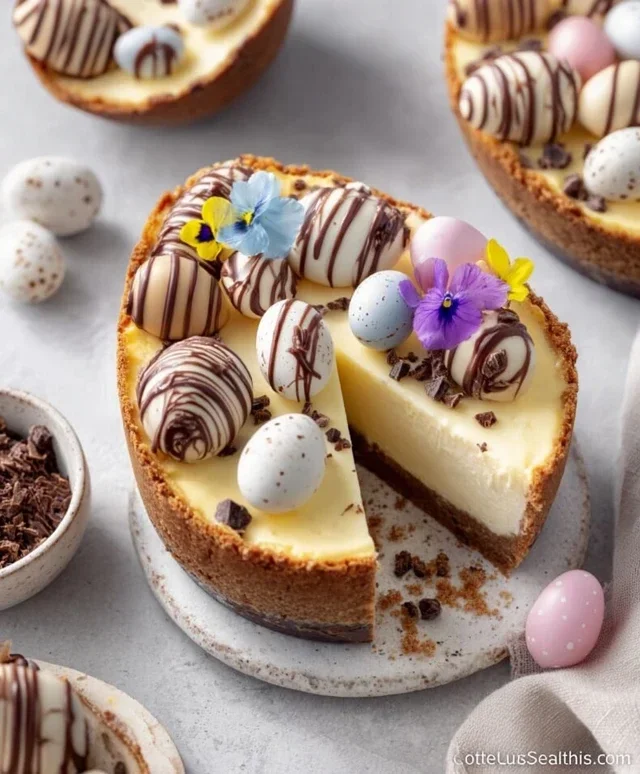
This Easter Egg Cheesecake is a delightful twist on a classic dessert, perfect for bringin extractg some festive fun to your holiday table. Imagin extracte a creamy, dreamy cheesecake infused with the rich flavor of chocolate, all nestled within a crisp, buttery biscuit base. The real magic, however, comes from incorporating hollow chocolate eggs – they melt into the cheesecake filling, creating pockets of pure chocolate bliss and a subtly enhanced chocolate flavor. It’s surprisingly easy to make and looks absolutely stunning when decorated with a scattering of mini chocolate eggs and a drizzle of melted chocolate. This recipe is designed to impress, whether you’re a seasoned baker or looking for a show-stopping Easter treat.
Ingredients:
Instructions:
Preparing the Cookie Base
The foundation of our delicious Easter Egg Cheesecake is a simple yet effective cookie base. To start, you’ll need to crush your digestive biscuits until they form fine crum extractbs. You can do this by placing them in a sturdy plastic bag and crushing them with a rolling pin, or by using a food processor for a quicker and more consistent result. Once you have your crum extractbs, add the melted butter to them and mix thoroughly until the crum extractbs are evenly moistened and resemble wet sand. This mixture will hold together when pressed. Take a springform pan (an 8-inch pan works perfectly for this recipe) and press the crum extractb mixture firmly into the bottom. Use the back of a spoon or a flat-bottomed glass to create an even, compact layer. This step is crucial for a sturdy base that won’t crum extractble when you cut into the cheesecake. Place the prepared base in the refrigerator to chill and firm up while you prepare the filling. This chilling process helps the base set, making it easier to handle and ensuring a clean slice later on.
Melting the Chocolate Eggs and Preparing the Filling
Now for the star of our show – the hollow chocolate eggs! Carefully break your hollow chocolate eggs into smaller pieces. Place these pieces in a heatproof bowl set over a saucepan of simmering water (ensure the bottom of the bowl doesn’t touch the water). Stir gently until the chocolate is completely melted and smooth. Alternatively, you can melt the chocolate in the microwave on low power in 30-second intervals, stirring between each, until smooth. Be careful not to overheat the chocolate. In a separate large mixing bowl, beat the softened cream cheese until it’s smooth and creamy, ensuring there are no lumps. Gradually add the powdered sugar to the cream cheese, beating until well combined and the mixture is light and fluffy. This gradual addition helps prevent the sugar from clumping. Now, pour in the melted chocolate that you prepared from the hollow eggs. Add the vanilla extract. Beat everything together until it’s all just combined and you have a beautifully smooth, chocolate-infused cream cheese mixture. It’s important not to overmix at this stage, as this can introduce too much air into the filling, which can lead to cracks.
Whipping the Cream and Folding It In
In a separate, clean bowl, whip the heavy cream until it forms stiff peaks. You’ll know it’s ready when you can lift the whisk and the cream holds its shape without collapsing. This is essential for creating that wonderfully light and airy cheesecake texture. Be careful not to over-whip, or you’ll end up with butter! Once the cream is whipped, gently fold it into the cream cheese and chocolate mixture. Use a spatula and a folding motion, cutting down through the center of the mixture and bringin extractg the batter up from the bottom. This technique preserves the air that you’ve incorporated into the cream, ensuring a lighter, smoother cheesecake. Continue folding until just combined and no streaks of cream remain. Again, avoid overmixing. The goal is to incorporate the cream without deflating it. This gentle incorporation is key to a truly luxurious cheesecake texture.
Assembling and Chilling the Cheesecake
Retrieve your chilled cookie base from the refrigerator. Pour the creamy cheesecake filling evenly over the cookie base, smoothing the top with your spatula. This is where you can start thinking about the final presentation. If you like, you can gently swirl a little extra melted chocolate on top for a marbled effect before it sets, or you can wait for decorating after it’s chilled. Cover the springform pan loosely with plastic wrap. It’s important not to let the plastic wrap touch the surface of the cheesecake, as it can stick. Place the cheesecake in the refrigerator for at least 4-6 hours, or preferably overnight, to allow it to set completely. The longer it chills, the firmer and easier it will be to slice cleanly. Patience is a virtue when it comes to cheesecake!
Decorating Your Easter Masterpiece
Once your cheesecake has fully chilled and set, it’s time for the fun part – decorating! Carefully release the springform pan. You can do this by running a thin knife around the edge of the cheesecake before unclipping the pan, or by gently pushing the sides of the springform pan away. Drizzle the top of the cheesecake with melted chocolate. You can use a spoon to create artistic swirls or zigzags. Then, scatter a generous amount of mini chocolate eggs over the melted chocolate. Arrange them artfully – perhaps creating a nest shape or a colorful scattering. The contrast of the smooth cheesecake, the crisp base, and the colorful mini eggs makes for a truly festive and appealing dessert. Slice your beautiful Easter Egg Cheesecake with a sharp knife, dipping it in hot water and wiping it clean between each cut for the neatest slices. Enjoy this delightful creation with your loved ones this Easter!
Conclusion:
I hope you’re as excited as I am to try this delightful Easter Egg Cheesecake Recipe! This dessert is a showstopper, combining the creamy, decadent richness of classic cheesecake with the fun, festive spirit of Easter. Its beautiful presentation, often adorned with colorful chocolate Easter eggs, makes it the perfect centerpiece for your Easter brunch or dinner. It’s surprisingly straightforward to make, meaning you can impress your guests without spending all day in the kitchen. Plus, the satisfying texture and sweet, slightly tangy flavor are sure to be a hit with everyone, from the youngest egg hunters to the most discerning adults.
For serving suggestions, I love to present this Easter Egg Cheesecake chilled, with an extra scattering of mini chocolate eggs on top for added texture and visual appeal. A dollop of whipped cream or a drizzle of chocolate sauce also complements the richness beautifully. If you’re feeling adventurous with variations, consider adding a hint of lemon zest to the batter for brightness, or swirling in some raspberry puree for a fruity twist. You could also experiment with different types of chocolate eggs for the topping – from caramel-filled to peanut butter cups. I truly encourage you to give this Easter Egg Cheesecake a try; it’s a recipe that’s as fun to make as it is to eat!
Frequently Asked Questions:
Can I make this cheesecake ahead of time?
Absolutely! Cheesecakes are best made at least a day in advance. This allows the cheesecake to set properly and the flavors to meld together, resulting in a more delicious and perfectly textured dessert. Just cover it tightly and refrigerate.
What kind of Easter eggs work best for decoration?
You can use a variety of chocolate Easter eggs! Solid milk chocolate or dark chocolate eggs look lovely. If you want more texture, hollow eggs or those with fillings like caramel or nougat can also be used, just be mindful of their size and shape so they sit nicely on the cheesecake.
Is it possible to make this recipe dairy-free or vegan?
While this specific recipe isn’t designed for dairy-free or vegan diets, with some careful substitutions, it’s definitely achievable! You would need to replace the cream cheese with a dairy-free alternative like cashew cream cheese, use vegan butter, and ensure your eggs and chocolate are also vegan-friendly.
Easter Egg Cheesecake Recipe
A delightful Easter Egg Cheesecake featuring a crumbly biscuit base and a rich, creamy filling, topped with melted chocolate and mini chocolate eggs. Perfect for spring celebrations.
Ingredients
-
2 hollow milk chocolate eggs (100 g)
-
75 g digestive biscuits, crushed
-
30 g butter, melted
-
340 g cream cheese (full fat)
-
60 g powdered sugar
-
170 g heavy cream
-
1 tsp vanilla extract
-
melted chocolate (for topping)
-
mini chocolate eggs (for topping)
Instructions
-
Step 1
Crush the digestive biscuits into fine crumbs. Melt the butter and mix it with the biscuit crumbs to form a damp mixture. -
Step 2
Press the biscuit mixture firmly into the base of a springform cake tin to create the cookie base. Chill in the refrigerator while preparing the filling. -
Step 3
Melt the hollow chocolate eggs gently. You can do this by placing them in a heatproof bowl over a pan of simmering water (bain-marie) or carefully in the microwave in short bursts. -
Step 4
In a separate bowl, beat the cream cheese and powdered sugar until smooth and creamy. Stir in the vanilla extract and the melted chocolate from the hollow eggs. -
Step 5
In another bowl, whip the heavy cream until stiff peaks form. Gently fold the whipped cream into the cream cheese mixture until well combined and smooth. -
Step 6
Pour the cheesecake filling over the chilled biscuit base. Smooth the top with a spatula. -
Step 7
Drizzle melted chocolate over the top of the cheesecake and scatter with mini chocolate eggs. Chill for at least 4 hours, or until firm.
Important Information
Nutrition Facts (Per Serving)
It is important to consider this information as approximate and not to use it as definitive health advice.
Allergy Information
Please check ingredients for potential allergens and consult a health professional if in doubt.