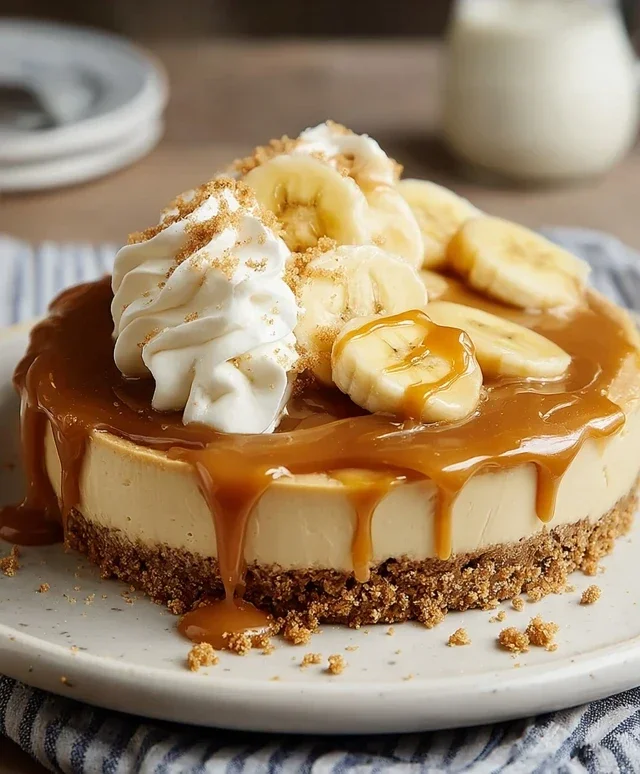
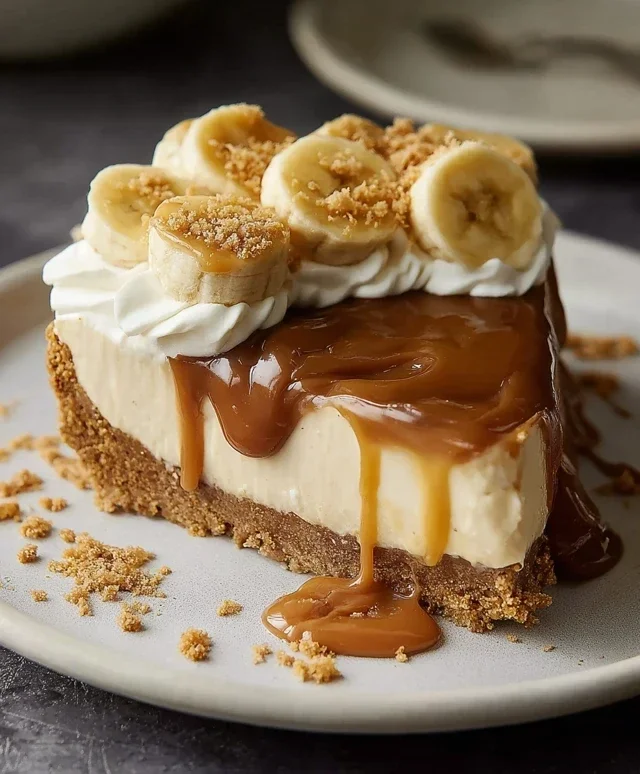
Easy No-Bake Banoffee Cheesecake Recipe
No-Bake Banoffee Cheesecake is a dessert that truly sings. Imagin extracte the rich, crum extractbly base, a symphony of crushed biscuits and butter, giving way to a luscious, creamy layer infused with the sweet caramel notes of dulce de leche. Then, the stars of the show – perfectly ripe banana slices, adding their natural sweetness and creamy texture. This iconic dessert, a British classic for a reason, captures hearts with its irresistible combination of textures and flavors. What makes this No-Bake Banoffee Cheesecake so special? It’s the effortless magic of no oven required, transforming simple ingredients into an elegant showstopper. It’s the perfect balance of sweet, salty, and creamy, a truly decadent experience that leaves you craving just one more bite. Get ready to fall in love with this delightful No-Bake Banoffee Cheesecake.
No-Bake Banoffee Cheesecake
This No-Bake Banoffee Cheesecake is an absolute dream for anyone who loves the classic combination of banana and toffee, but wants to skip the oven. It’s rich, creamy, and incredibly satisfying, all without the fuss of baking. The beauty of this recipe lies in its simplicity and the fact that it caters to those looking for a delicious dairy-free and vegan option. Get ready to impress your friends and family (or just treat yourself!) with this decadent dessert.
Ingredients:
Instructions:
Prepare the Biscuit Base:
This is where our delicious foundation begin extracts. Take your plain biscuits and crush them into fine crum extractbs. You can do this by placing them in a sturdy zip-top bag and using a rolling pin, or for a quicker method, pulse them in a food processor until you have a consistent crum extractb texture. Next, melt the dairy-free butter or margarine. In a medium bowl, combine the biscuit crum extractbs and the melted butter. Stir well until all the crum extractbs are coated and the mixture resembles wet sand. This ensures your base will hold together beautifully. Now, press this mixture firmly into the base of a 7-inch (or similar sized) springform tin. Use the back of a spoon or the base of a glass to create an even, compact layer. This is crucial for a neat slice later on. Place the prepared base in the refrigerator to chill and firm up while you prepare the filling. This resting period allows the butter to solidify, creating a stable crust.
Create the Creamy Filling:
Now for the star of the show – the luscious, creamy filling. First, drain the pre-soaked cashew nuts thoroughly. These have been soaking to soften them, which is key for achieving that wonderfully smooth cheesecake texture without the need for cooking. In a high-powered blender or food processor, combine the drained cashew nuts, the dairy-free cream cheese, and the coconut cream. Blend until the mixture is incredibly smooth and creamy, with absolutely no grittiness from the cashews. You might need to scrape down the sides of the blender a few times to ensure everything is incorporated. Gradually add the icing sugar to the blender and continue to blend until it’s fully incorporated and the filling is sweet and smooth. Taste the filling at this stage and adjust the icing sugar if you prefer it sweeter. This dairy-free cream cheese and cashew combination creates a wonderfully rich and tangy base that mimics traditional cream cheese perfectly.
Assemble the Cheesecake:
Once your base is firm and your filling is smooth and delicious, it’s time to bring them together. Remove the springform tin with the chilled biscuit base from the refrigerator. Gently pour the creamy cheesecake filling over the biscuit base. Use a spatula to spread the filling evenly, ensuring it reaches all the edges of the tin. Now, take your medium-sized banana and slice it into thin rounds. Arrange these banana slices in a single layer over the cheesecake filling. Don’t worry if they overlap slightly; this adds to the rustic charm. For an extra layer of banoffee goodness, generously drizzle a good amount of your vegan caramel sauce over the banana slices and the filling. This caramel sauce will seep into the crevices, adding that irresistible toffee flavour.
Chill and Set:
This is perhaps the most important (and hardest!) step: patience. Once assembled, carefully cover the springform tin with cling film or a lid. Place the entire cheesecake in the refrigerator and allow it to chill for a minimum of 6 hours, or preferably overnight. This extended chilling time is essential for the cheesecake to set properly and achieve its firm, sliceable texture. Rushing this step will result in a softer, more “mousse-like” consistency, which isn’t ideal for a classic cheesecake slice. The longer it chills, the better it will hold its shape when you serve it. You’ll notice the filling will firm up considerably, becoming wonderfully creamy yet stable.
Decorate and Serve:
The moment of truth! Once your banoffee cheesecake is thoroughly chilled and set, it’s time for the final flourish. Gently release the springform tin by unclipping it and carefully lifting the sides away. If you find it a little stuck, you can briefly run a warm knife around the edge. For an extra touch of elegance and flavour, whip the dairy-free whipping cream until it forms soft peaks. You can sweeten it with a tiny bit of icing sugar if you like, but it’s often delicious as is. Dollop or pipe the whipped cream around the top edge of the cheesecake. Finally, drizzle generously with more vegan caramel sauce and arrange fresh banana slices decoratively on top. This final drizzle of caramel sauce is what truly elevates the banoffee experience. Slice with a sharp knife (wiping the knife clean between slices for neatness) and serve immediately. Enjoy this delightful no-bake creation!
Conclusion:
And there you have it – your very own No-Bake Banoffee Cheesecake, ready to impress without ever turning on the oven! This recipe truly is a winner because it delivers all the decadent flavors of a traditional banoffee pie and a rich cheesecake, but with incredible ease. The buttery biscuit base, creamy toffee, fresh bananas, and smooth cream cheese filling come together in perfect harmony for an irresistible dessert. It’s the perfect centerpiece for any gathering, or simply a delightful treat to enjoy at home. I encourage you to give this No-Bake Banoffee Cheesecake a try; I’m confident you’ll love it as much as I do!
For serving, I love to add a sprinkle of chocolate shavings or a drizzle of extra toffee sauce. It also pairs beautifully with a strong cup of coffee or a glass of sweet dessert grape juice. Don’t be afraid to get creative with variations! You could try adding a layer of chopped chocolate between the banana and cream cheese, or even a hint of espresso powder to the cream cheese mixture for a mocha twist. The possibilities are endless!
Frequently Asked Questions:
Can I make this No-Bake Banoffee Cheesecake ahead of time?
Absolutely! In fact, I highly recommend making it at least 4-6 hours in advance, or even the day before. This allows the flavors to meld together beautifully and ensures the cheesecake sets up perfectly. Just keep it covered in the refrigerator until you’re ready to serve.
What kind of biscuits are best for the base?
Digestive biscuits are my go-to for this recipe as they provide a lovely crum extractbly texture and a subtle sweetness that complements the toffee and banana. However, you could also use grabeef ham crackers or even shortbread biscuits for a slightly different flavor profile.
My toffee sauce is too thick. What should I do?
If your toffee sauce is too thick, you can gently warm it up in a small saucepan over low heat, stirring constantly. Add a tablespoon of milk or cream at a time until it reaches your desired pouring consistency. Be careful not to overheat it, as it can burn easily.
No-Bake Banoffee Cheesecake
A decadent no-bake cheesecake with layers of biscuit base, creamy cashew filling, banana, and rich caramel. Perfect for a sweet treat.
Ingredients
-
200g plain biscuits (use gluten-free biscuits if required)
-
100g dairy-free butter or margarine
-
140g cashew nuts (pre-soaked in warm water overnight)
-
340g dairy-free cream cheese
-
50g coconut cream
-
80g icing sugar
-
1 medium-sized banana
-
Vegan caramel sauce (store-bought or homemade)
-
Fresh banana slices
-
80ml dairy-free whipping cream
Instructions
-
Step 1
Crush the plain biscuits into fine crumbs. Melt the dairy-free butter or margarine and mix with the biscuit crumbs until well combined. Press this mixture firmly into the base of a springform tin. -
Step 2
Drain the pre-soaked cashew nuts. Blend the drained cashews with the dairy-free cream cheese, coconut cream, and icing sugar until completely smooth and creamy. This may take several minutes, scraping down the sides as needed. -
Step 3
Mash the medium-sized banana and spread it evenly over the biscuit base in the prepared tin. -
Step 4
Pour the cashew cream mixture over the mashed banana layer and smooth the top with a spatula. -
Step 5
Drizzle a generous amount of vegan caramel sauce over the cheesecake filling. Chill in the refrigerator for at least 4 hours, or until firm. -
Step 6
Before serving, whip the dairy-free whipping cream until stiff peaks form. Decorate the top of the cheesecake with dollops of whipped cream and fresh banana slices. Drizzle with more vegan caramel sauce if desired.
Important Information
Nutrition Facts (Per Serving)
It is important to consider this information as approximate and not to use it as definitive health advice.
Allergy Information
Please check ingredients for potential allergens and consult a health professional if in doubt.