Boston Cream Pie Fudge-Easy Decadent Treat
Boston Cream Pie Fudge might sound like a culinary oxymoron, but trust me, it’s a dream come true for anyone who adores the classic dessert! This isn’t just another sweet treat; it’s an ingenious reimagin extracting of a beloved cake, distilled into a gloriously rich and satisfying fudge. Have you ever wished you could capture the essence of that creamy custard filling and decadent chocolate ganache in a portable, bite-sized form? Well, you’re in luck! This Boston Cream Pie Fudge delivers exactly that, and then some. What makes it so special is its ability to perfectly balance those iconic flavors: the subtle vanilla of the custard, the deep bittersweetness of the chocolate, and a delightful, melt-in-your-mouth texture that is undeniably fudge. It’s the perfect indulgence for a cozy afternoon or an impressive dessert to share with friends. Get ready to fall in love with this incredible fusion!
Ingredients:
- 2 cups granulated sugar
- 4 ounces unsalted butter, cut into pieces
- 1/2 cup heavy cream
- 2 cups white chocolate chips
- 7 ounce container of marshmallow creme
- 3 tablespoons dry vanilla pudding mix
- 1/2 teaspoon vanilla extract
- 3 tablespoons unsweetened cocoa powder
- 6 ounces semisweet chocolate chips
- 1 tablespoon vegetable oil
Preparing the Base Layers
This Boston Cream Pie Fudge is all about recreating those iconic flavors and textures in a delicious, portable treat. We’ll start by making two distinct fudge layers, one inspired by the creamy vanilla custard and the other by the rich chocolate topping.
Vanilla Fudge Layer
We begin extract with the foundation of our fudge, the creamy vanilla component that mimics the classic Boston Cream Pie filling.
- In a large, heavy-bottomed saucepan, combine the 2 cups of granulated sugar, the 4 ounces of unsalted butter (cut into smaller pieces for easier melting), and the 1/2 cup of heavy cream. Place the saucepan over medium heat. Stir constantly with a wooden spoon or heat-resistant spatula until the butter has completely melted and the sugar has dissolved. It’s crucial to keep stirring to prevent the sugar from scorching on the bottom of the pan. You’ll see the mixture start to bubble gently as it heats.
- Continue to cook the mixture, stirring occasionally, until it reaches the soft-ball stage. This means that if you drop a small amount of the mixture into a bowl of cold water, it will form a soft, pliable ball. A candy thermometer is your best friend here; aim for a temperature of around 235°F (113°C). This process might take about 10-15 minutes, depending on your stove’s heat. Be patient, as achieving the correct temperature is key to the fudge’s texture. Once it reaches the target temperature, remove the saucepan from the heat immediately.
- Now comes the magic that transforms the liquid into fudge! Let the mixture stand undisturbed for about 5 minutes. This slight cooling period is important. Then, add in the 2 cups of white chocolate chips, the entire 7-ounce container of marshmallow creme, the 3 tablespoons of dry vanilla pudding mix, and the 1/2 teaspoon of vanilla extgin extractt. Begin stirring vigorously. You’ll need to work fairly quickly to incorporate all these ingredients. The heat from the sugar mixture will melt the white chocolate chips and the marshmallow creme, creating a smooth, luscious base. Keep stirring until everything is fully combined and the mixture is smooth and glossy. This can be a bit of a workout, so don’t be afraid to put some energy into it!
- Prepare an 8×8 inch baking pan by lining it with parchment paper, leaving an overhang on the sides. This overhang will make it much easier to lift the fudge out of the pan once it’s set. Pour the warm vanilla fudge mixture into the prepared pan. Use a spatula to spread it evenly into the corners and across the entire surface. Gently tap the pan on the counter a couple of times to release any air bubbles. Set this pan aside to cool completely while you prepare the chocolate layer.
Chocolate Topping Layer
This layer brings the rich, decadent chocolate flavor that contrasts beautifully with the vanilla.
- In a separate medium saucepan, combine the 3 tablespoons of unsweetened cocoa powder and the 6 ounces of semisweet chocolate chips. Add the 1 tablespoon of vegetable oil to this mixture. Place the saucepan over low heat. Stir the ingredients constantly. The vegetable oil helps to create a smoother, glossier chocolate topping that will set beautifully. Continue stirring until the semisweet chocolate chips have completely melted and the cocoa powder is fully incorporated, resulting in a smooth, glossy chocolate mixture. Be careful not to overheat the chocolate, as this can cause it to seize or become grainy. Gentle, consistent heat is key here.
- Once the chocolate mixture is smooth and well combined, carefully pour it over the cooled vanilla fudge layer in the prepared baking pan. Use an offset spatula or the back of a spoon to gently and evenly spread the chocolate over the entire surface of the vanilla fudge. Ensure you get it right to the edges for a clean finish.
- Allow the chocolate layer to set completely. This can be done at room temperature, which usually takes a couple of hours, or you can speed up the process by placing the pan in the refrigerator for about 30-60 minutes until the chocolate is firm to the touch. For the best results, I often let it set at room temperature to avoid a too-hard texture, but refrigeration is a great option if you’re short on time.
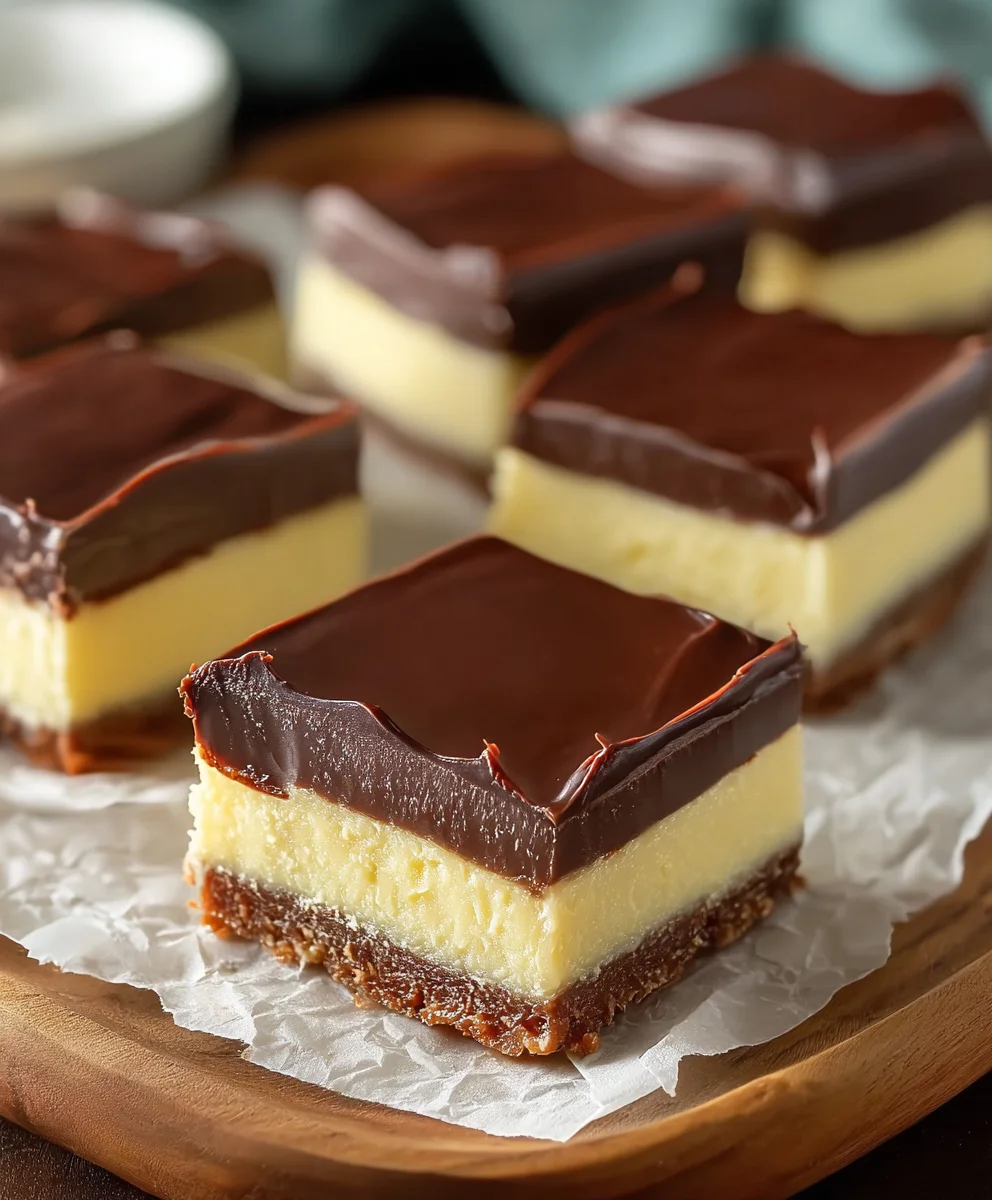
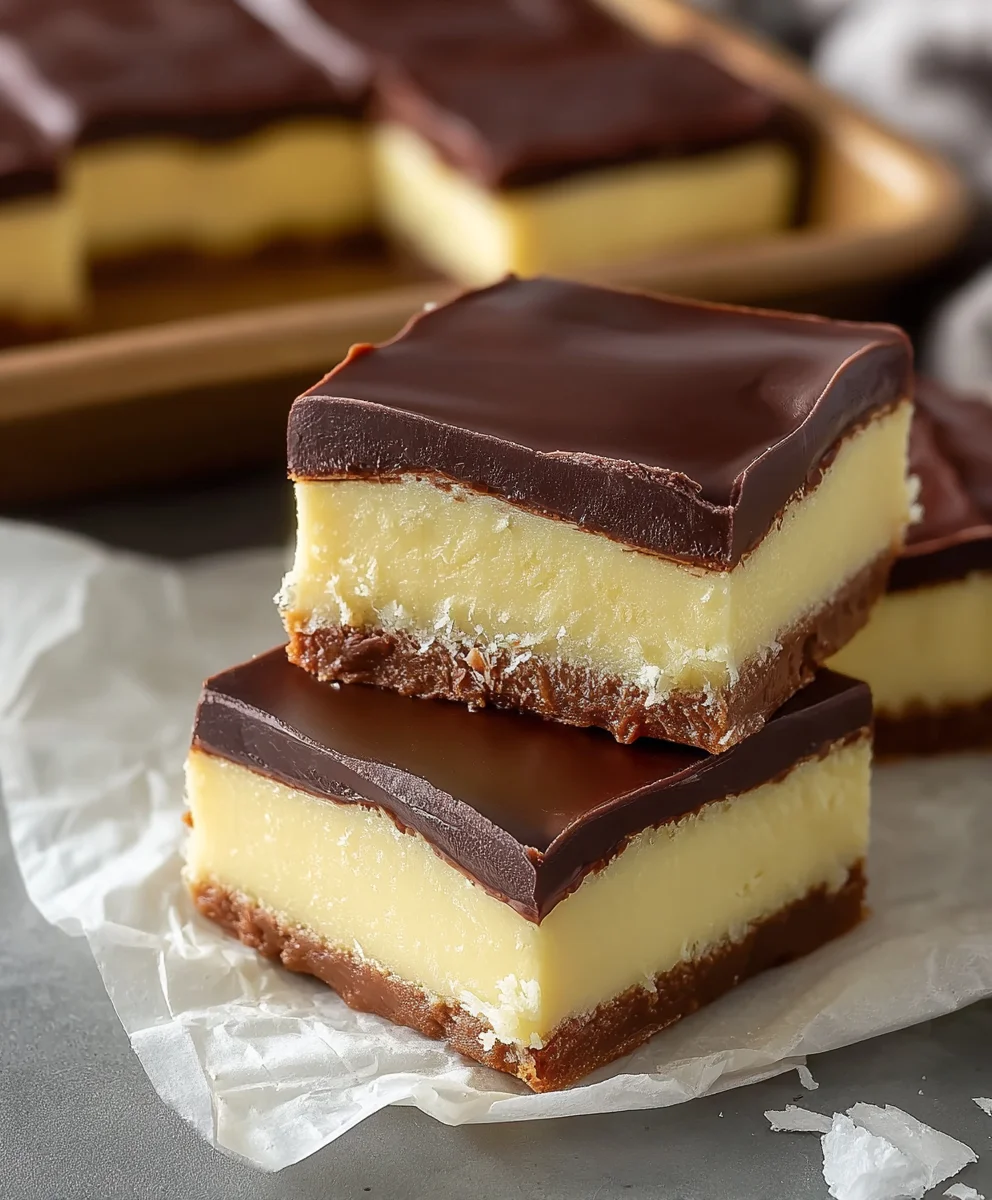
- Once the entire fudge has set, use the parchment paper overhang to carefully lift the entire slab out of the pan. Place it on a cutting board. Using a sharp knife, cut the fudge into small, bite-sized squares. For cleaner cuts, you can warm your knife slightly under hot water and wipe it dry between cuts. You’ll notice the distinct layers of vanilla and chocolate, a true testament to its Boston Cream Pie inspiration.
Conclusion:
You’ve now got all the secrets to creating truly sensational Boston Cream Pie Fudge! This delightful treat perfectly captures the essence of the classic dessert in a rich, creamy, and unbelievably decadent fudge. Whether you’re a seasoned baker or just starting out, this recipe is designed for success and guaranteed to impress. The smooth custard layer, the rich chocolate ganache, and the buttery fudge base all come together in a symphony of flavors and textures. Don’t be afraid to get creative and make it your own!
For serving, I love cutting these into neat squares and arrangin extractg them on a platter for parties. They also make for a thoughtful homemade gift. For variations, consider adding a hint of espresso powder to the chocolate ganache for a mocha twist, or sprinkle toasted chopped almonds on top before the ganache sets for added crunch. Experiment with different extracts like a touch of almond or coconut to the fudge base. Most importantly, have fun with the process and savor every delicious bite of your homemade Boston Cream Pie Fudge!
Frequently Asked Questions about Boston Cream Pie Fudge:
Q1: Can I make Boston Cream Pie Fudge ahead of time?
Absolutely! Boston Cream Pie Fudge actually benefits from being made ahead. Letting it chill and set in the refrigerator for at least 2-3 hours, or even overnight, allows the flavors to meld beautifully and makes it much easier to cut into clean pieces. Store it in an airtight container at room temperature for up to a week, or in the refrigerator for longer storage.
Q2: My fudge didn’t set properly. What could have gone wrong?
Several factors can affect fudge setting. Ensure you used an accurate candy thermometer if the recipe calls for one, as precise temperature is crucial for the fudge’s texture. Also, make sure you are using the correct type of chocolate and butter. Over-stirring or under-stirring can also impact consistency. Sometimes, humidity can play a role, so if it’s a very humid day, you might need to cook the fudge slightly longer.
Boston Cream Pie Fudge
An easy and decadent fudge that captures the classic flavors of Boston Cream Pie, featuring distinct vanilla and chocolate layers.
Ingredients
-
2 cups granulated sugar
-
4 ounces unsalted butter, cut into pieces
-
1/2 cup heavy cream
-
2 cups white chocolate chips
-
7 ounce container of marshmallow creme
-
3 tablespoons dry vanilla pudding mix
-
1/2 teaspoon vanilla extract
-
3 tablespoons unsweetened cocoa powder
-
6 ounces semisweet chocolate chips
-
1 tablespoon vegetable oil
Instructions
-
Step 1
For the vanilla fudge layer: In a large, heavy-bottomed saucepan, combine sugar, butter, and heavy cream. Heat over medium heat, stirring constantly until butter melts and sugar dissolves. Cook, stirring occasionally, until mixture reaches the soft-ball stage (235°F/113°C). -
Step 2
Remove saucepan from heat and let stand undisturbed for 5 minutes. Add white chocolate chips, marshmallow creme, dry vanilla pudding mix, and vanilla extract. Stir vigorously until smooth and glossy. -
Step 3
Prepare an 8×8 inch baking pan by lining it with parchment paper, leaving an overhang. Pour the vanilla fudge mixture into the pan and spread evenly. Tap to remove air bubbles. -
Step 4
For the chocolate topping layer: In a separate medium saucepan, combine cocoa powder, semisweet chocolate chips, and vegetable oil. Heat over low heat, stirring constantly until smooth and glossy. -
Step 5
Carefully pour the chocolate mixture over the cooled vanilla fudge layer. Spread evenly to the edges. -
Step 6
Allow the chocolate layer to set completely at room temperature or in the refrigerator. Once set, lift the fudge out using the parchment paper and cut into bite-sized squares.
Important Information
Nutrition Facts (Per Serving)
It is important to consider this information as approximate and not to use it as definitive health advice.
Allergy Information
Please check ingredients for potential allergens and consult a health professional if in doubt.