Copycat KFC Fried Chicken Recipe-Best Crispy Flavor
Copy Cat KFC Fried Chicken is more than just a meal; it’s a culinary legend whispered about in hushed tones of deliciousness. Who can resist that iconic, crispy, golden-brown exterior that cracks with every bite, giving way to impossibly juicy, tender chicken within? It’s the taste of childhood memories, movie nights, and backyard barbecues, all rolled into one unforgettable experience. What makes this Copy Cat KFC Fried Chicken recipe so special is our dedication to unlocking those secret spices and techniques that have kept us lining up for decades. We’re talking about achieving that perfect blend of savory herbs and the unmistakable crunch that only true KFC aficionados can identify. Get ready to ditch the drive-thru and bring the magic of the Colonel’s kitchen right into your own home, because this recipe is your ticket to chicken perfection.
Prepare to be amazed as we break down the secrets to achieving that signature taste and texture.
This isn’t just fried chicken; it’s an event!
Ingredients:
- 340 grams chicken pieces (such as thighs, drum extractsticks, or wings)
- 1/2 teaspoon salt (for the chicken marinade)
- 1/2 teaspoon black pepper (for the chicken marinade)
- 1 teaspoon onion powder (for the chicken marinade)
- 1 teaspoon garlic powder (for the chicken marinade)
- 1/2 teaspoon chili powder (for the chicken marinade)
- 1 tablespoon cornstarch (for the chicken marinade)
- 1 large egg (for the wet dredge)
- 100 grams all-purpose flour (for the dry dredge)
- 50 grams cornstarch (for the dry dredge)
- 5 grams baking powder (for the dry dredge)
- 1/2 teaspoon salt (for the dry dredge)
- 1/2 teaspoon onion powder (for the dry dredge)
- 1 teaspoon garlic powder (for the dry dredge)
Preparing the Chicken
Marinating the Chicken
Begin extract by preparing your chicken. For the most authentic taste and tender texture, I like to use a mix of chicken thigrum extractand drumsticks. Ensure your chicken pieces are clean and patted dry with paper towels; this is crucial for allowing the marinade to adhere properly. In a medium bowl, combine the 340 grams of chicken with the 1/2 teaspoon of salt, 1/2 teaspoon of black pepper, 1 teaspoon of onion powder, 1 teaspoon of garlic powder, 1/2 teaspoon of chili powder, and 1 tablespoon of cornstarch. Gently toss the chicken pieces to ensure each piece is evenly coated with this flavorful marinade. The cornstarch in the marinade acts as a tenderizer and also helps the coating stick better later on. Cover the bowl and let the chicken marinate in the refrigerator for at least 30 minutes. For an even deeper flavor, you can marinate it for up to 2 hours.
Setting Up gin extract Dredging Stations
The Wet Dredge
While the chicken is marinating, pgin extractare your dredging stations. You will need two separate bowls. For the wet dredge, crack the 1 large egg into a shallow bowl. Whisk the egg thoroughly with a fork or whisk until the yolk and white are completely combined and slightly frothy. This creates an ideal base for the dry coating to adhere to.
The Dry Dredge
In a separate large bowl or a shallow pan, combine the 100 grams of all-purpose flour, 50 grams of cornstarch, 5 grams of baking powder, 1/2 teaspoon of salt, 1/2 teaspoon of onion powder, and 1 teaspoon of garlic powder. Whisk these dry ingredients together until they are well incorporated. The combination of flour and cornstarch creates that signature crispy, slightly craggy texture, while the baking powder contributes to a lighter, airier crisp. Ensure there are no clumps of flour or cornstarch.
Coating the Chicken
First Dredge
Once the chicken has finished marinating, it’s time to coat it. Take one piece of marinated chicken at a time and carefully place it into the dry flour mixture. Press the flour mixture onto all sides of the chicken piece, ensuring it is thoroughly coated. Don’t be shy here; a good coating is key to that satisfying crunch.
Second Dredge (Double Coating for Extra Crisp)
Now, take the flour-coated chicken piece and dip it into the whisked egg. Make sure the entire piece is covered in the egg wash. Let any excess egg drip back into the bowl for a moment. Then, immediately return the chicken piece to the dry flour mixture. This time, press the flour mixture on again, ensuring a thick and even coating. For the ultimate “Copy Cat KFC Fried Chicken” crunch, you can repeat this process of dipping in egg and then coating in flour one more time, for a triple-coated effect, although a double coating is usually sufficient for most. The double coating creates those delightful crispy bits that we all love.
Frying the Chicken
Frying the Chicken Pieces
Heat about 2-3 inches of vegetable oil, canola oil, or peanut oil in a deep, heavy-bottomed pot or Dutch oven over medium-high heat. You’re aiming for a temperature of around 325-350°F (160-175°C). Using a thermometer is highly recommended for consistent results. Carefully lower the coated chicken pieces into the hot oil, making sure not to overcrowd the pot. Frying in batches is essential to maintain the oil temperature and ensure the chicken cooks evenly without becoming soggy. If you overcrowd the pot, the oil temperature will drop significantly, leading to greasy chicken.
Cooking to Perfection
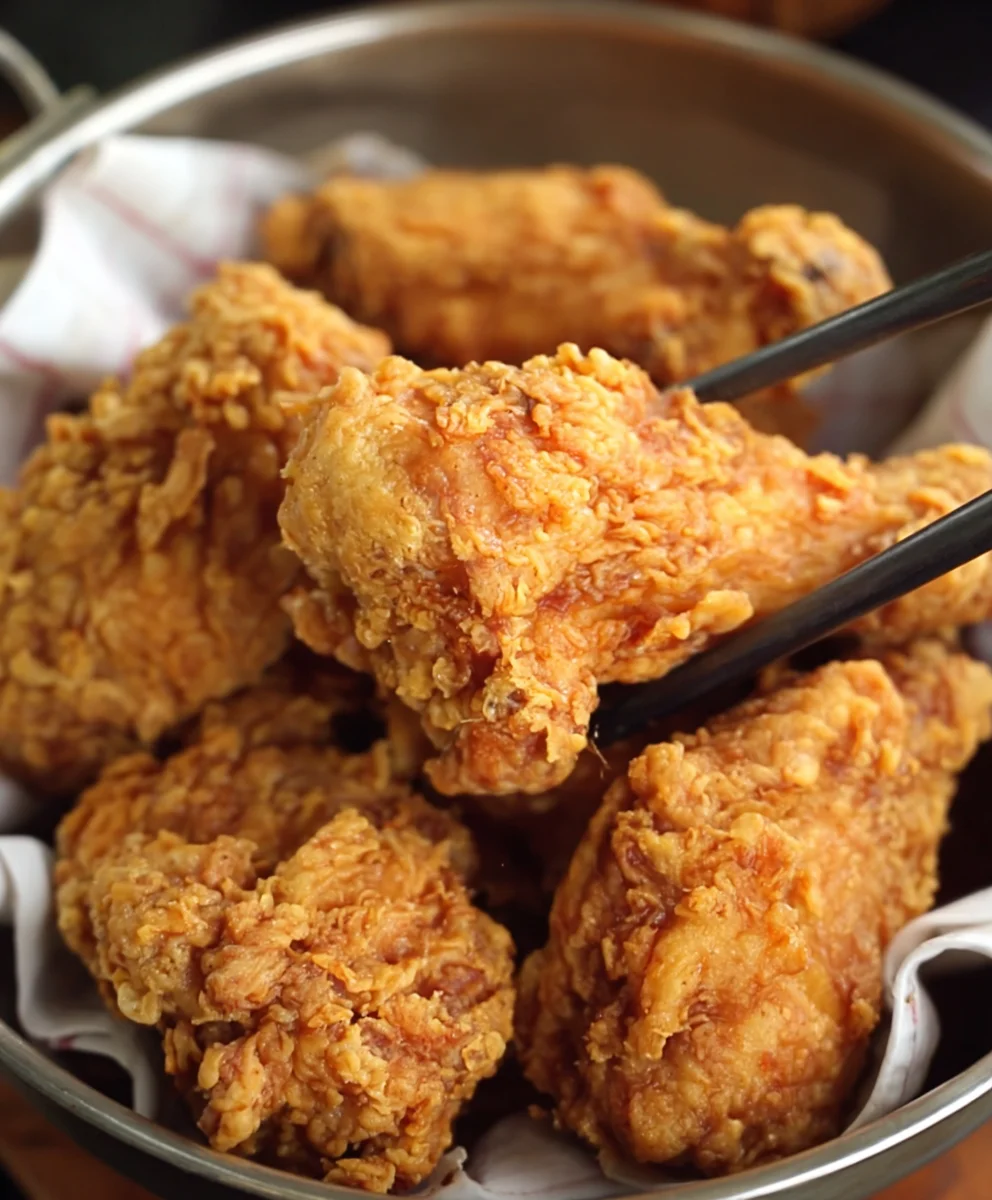
Fry the chicken pieces for about 12-16 minutes, flipping them occasionally with tongs, until they are golden brown, crispy, and cooked through. The internal temperature of the chicken should reach 165°F (74°C) when checked with an instant-read thermometer. If you are frying bone-rum extractpieces like drumsticks or thighs, they might take a few minutes longer than wings. Once cooked, carefully remove the chicken from the oil and place it on a wire rack set over a baking sheet. This allows any excess oil to drain off and keeps the skin wonderfully crisp. Avoid placing it directly on paper towels, as this can make the bottom soggy. Let the chicken rest for a few minutes before serving to allow the juices to redistribute, ensuring a more tender bite.

Conclusion:
There you have it – your guide to creating incredibly delicious Copy Cat KFC Fried Chicken right in your own kitchen! We’ve walked through the essential steps, from selecting the best cuts of chicken to mastering that iconic crispy coating and ensuring a juicy, tender interior. This recipe is a crowd-pleaser, perfect for family dinners, game days, or any occasion that calls for a truly satisfying fried chicken experience. I encourage you to give it a try and discover just how rewarding homemade fried chicken can be. Don’t be afraid to experiment with the spice blend to find your perfect flavor profile!
For serving, this Copy Cat KFC Fried Chicken is fantastic alongside classic sides like mashed potatoes and gravy, coleslaw, or biscuits. You can also serve it as part of a larger buffet with cornbread and a fresh salad. The possibilities are endless!
Remember, practice makes perfect, and even if your first attempt isn’t exactly like the Colonel’s, it will undoubtedly still be delicious. Enjoy the process and savor the results!
Frequently Asked Questions:
Q: Can I bake this Copy Cat KFC Fried Chicken instead of frying it?
A: While frying is key to achieving that authentic KFC texture and flavor, you can certainly adapt this recipe for baking. You’ll want to ensure your oven is preheated to around 400°F (200°C). Place the coated chicken on a wire rack set over a baking sheet. Bake for about 30-45 minutes, flipping halfway through, until golden brown and cooked through. The texture will be different from fried, but still delicious and a healthier option.
Q: How can I ensure the chicken stays crispy after frying?
A: To maintain crispiness, avoid overcrowding the fryer, as this lowers the oil temperature and can make the coating soggy. Once fried, transfer the chicken to a wire rack set over a baking sheet. This allows air to circulate and prevents steam from softening the coating. Serve immediately for the best results. If you must hold it for a short period, a low oven (around 250°F or 120°C) can help keep it warm without losing too much crispness.
Copycat KFC Fried Chicken Recipe-Best Crispy Flavor
Recreate the iconic crispy, flavorful fried chicken from KFC in your own kitchen with this easy-to-follow recipe. Perfect for a satisfying meal.
Ingredients
-
340 grams chicken pieces
-
1/2 teaspoon salt
-
1/2 teaspoon black pepper
-
1 teaspoon onion powder
-
1 teaspoon garlic powder
-
1/2 teaspoon chili powder
-
1 tablespoon cornstarch
-
1 large egg
-
100 grams all-purpose flour
-
50 grams cornstarch
-
5 grams baking powder
-
1/2 teaspoon salt
-
1/2 teaspoon onion powder
-
1 teaspoon garlic powder
Instructions
-
Step 1
Marinate the chicken: In a bowl, combine chicken pieces with 1/2 tsp salt, 1/2 tsp black pepper, 1 tsp onion powder, 1 tsp garlic powder, 1/2 tsp chili powder, and 1 tbsp cornstarch. Toss to coat evenly and refrigerate for at least 30 minutes. -
Step 2
Prepare dredging stations: Whisk 1 large egg in a shallow bowl for the wet dredge. In a separate large bowl, whisk together 100g all-purpose flour, 50g cornstarch, 5g baking powder, 1/2 tsp salt, 1/2 tsp onion powder, and 1 tsp garlic powder for the dry dredge. -
Step 3
First dredge: Take marinated chicken pieces one by one and coat them thoroughly in the dry flour mixture, pressing to adhere. -
Step 4
Second dredge (double coating): Dip the flour-coated chicken into the whisked egg, letting excess drip off. Immediately return it to the dry flour mixture and press again for a thick, even coating. Repeat for a triple coating if desired for extra crispiness. -
Step 5
Fry the chicken: Heat 2-3 inches of vegetable oil in a deep pot to 325-350°F (160-175°C). Carefully lower coated chicken pieces into the hot oil in batches, ensuring not to overcrowd the pot. -
Step 6
Cook to perfection: Fry chicken for 12-16 minutes, flipping occasionally, until golden brown, crispy, and cooked through (internal temperature of 165°F/74°C). Remove from oil and place on a wire rack set over a baking sheet to drain and maintain crispiness.
Important Information
Nutrition Facts (Per Serving)
It is important to consider this information as approximate and not to use it as definitive health advice.
Allergy Information
Please check ingredients for potential allergens and consult a health professional if in doubt.