Crispy Baked Zucchini Chips- Easy Healthy Snack
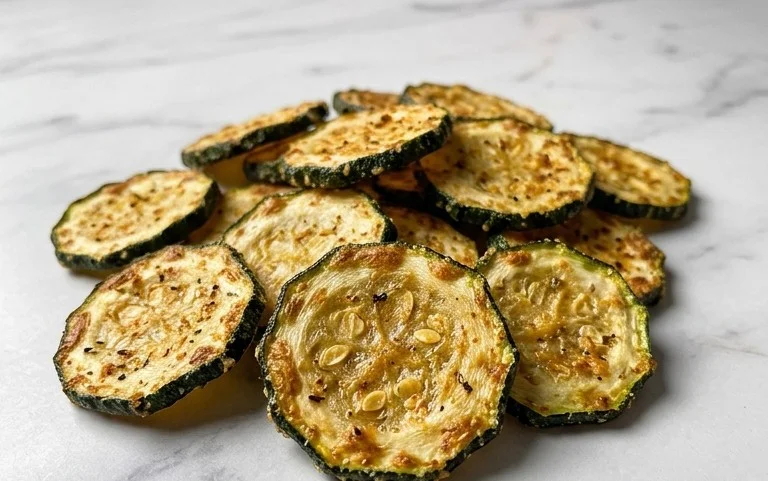
Crispy baked zucchini chips are about to become your new favorite snack obsession. Forget those soggy, bland store-bought versions; we’re talking about a revelation of texture and flavor that will have you reaching for the platter again and again. There’s something incredibly satisfying about biting into a chip that shatters with a delightful crunch, revealing the tender, slightly sweet zucchini within. People absolutely adore these crispy baked zucchini chips because they’re a guilt-free indulgence, a fantastic way to sneak in a healthy vegetable, and surprisingly easy to make. What truly sets these apart is the perfect balance – crispy edges that offer an addictive texture, without any greasy residue, and a subtle, fresh taste that’s wonderfully versatile. Whether you’re looking for a healthy appetizer or a satisfying solo snack, these baked zucchini chips are a game-changer.
Crispy Baked Zucchini Chips
Looking for a healthy and delicious way to enjoy zucchini? These crispy baked zucchini chips are your answer! Forget the greasy fried versions; we’re going to achieve that satisfying crunch with just a few simple ingredients and the magic of your oven. They’re the perfect snack, appetizer, or even a delightful side dish that even picky eaters might just devour. Plus, they’re incredibly easy to make, making them a fantastic weeknight treat or a crowd-pleasing party appetizer. I love how versatile they are – you can serve them with a cool ranch dip, a spicy aioli, or simply enjoy them on their own. Let’s get started on creating these addictive little flavor bombs!
Ingredients:
Preparing the Zucchini
Slicing for Perfection
The first crucial step to achieving perfectly crispy zucchini chips is how we slice the zucchini. You want to aim for thin, uniform slices. This ensures that each chip bakes evenly and reaches that desirable crispness without becoming burnt or soggy. I like to use a mandoline slicer if I have one, as it gives me the most consistent thickness, usually around 1/16th of an inch. If you don’t have a mandoline, a very sharp knife and a steady hand will work just fine. Take your time and try to make each slice as thin and even as possible. Avoid slicing too thick, as these will take longer to bake and might not get as crispy. Also, try to avoid any super thin, almost translucent slices, as these can burn quickly. The goal is a nice, thin disc that’s substantial enough to hold its shape but delicate enough to crisp up beautifully. Once sliced, I like to lay the zucchini slices out on a clean kitchen towel or paper towels and gently pat them dry. This removes excess moisture, which is key to achieving that coveted crispness. The less water we start with, the crispier our chips will be!
Seasoning for Flavor
The Perfect Blend
Now comes the fun part: seasoning! This simple blend of spices elevates the zucchini from bland to brilliant. In a medium bowl, combine your olive oil, kosher salt, black pepper, onion powder, and paprika. Whisk it all together until it’s well incorporated. The olive oil acts as a binder for the spices and also helps to crisp up the zucchini. Kosher salt is fantastic for its flaky texture and clean, pure saltiness, and it adheres well to the zucchini slices. Black pepper adds a little kick, while the onion powder provides a savory depth without being overpowering. And the paprika? It adds a subtle sweetness and a beautiful reddish hue to our finished chips. Make sure to taste a tiny bit of the mixture (if you’re comfortable doing so, or just trust the proportions!) to ensure it’s to your liking. You can always adjust the salt or pepper if you prefer a different flavor profile.
Coating the Chips
Once your seasoning blend is ready, it’s time to coat the zucchini slices. You can do this in a couple of ways. My preferred method is to add the sliced zucchini directly into the bowl with the seasoning mixture and gently toss them to coat each slice evenly. Use your hands for this – it’s the most effective way to ensure every surface of each zucchini slice gets a light and even coating of the olive oil and spice mixture. Alternatively, you can lay the zucchini slices in a single layer on a baking sheet and then brush or drizzle the seasoning mixture over them, flipping and ensuring both sides are coated. Whichever method you choose, the goal is to have a light, even coating on all of your zucchini. You don’t want any large clumps of seasoning, nor do you want any bare spots.
Baking to Crispy Perfection
Arrangin extractg for Even Baking
Preheat your oven to 400 degrees Fahrenheit (200 degrees Celsius). This higher temperature is essential for achieving that crispy texture. Line one or two large baking sheets with parchment paper. The parchment paper is important because it prevents sticking and makes for easier cleanup. Now, arrange your seasoned zucchini slices in a single layer on the prepared baking sheets. It’s crucial that the slices do not overlap. Overlapping will cause them to steam rather than bake, resulting in soggy chips. If you have too many slices to fit in a single layer on one baking sheet, use a second baking sheet. This is where those uniform slices really pay off – they’ll fit together nicely without too much fuss.
The Baking Process
Place the baking sheets in your preheated oven. Now, this is where patience and a watchful eye come in. We’re going to bake these for approximately 15-20 minutes. However, oven temperatures can vary, and the thickness of your zucchini slices will also play a role, so it’s important to keep an eye on them. About halfway through the baking time, I like to check on the chips. If they look like they’re browning unevenly, I’ll carefully flip them over using a spatula. This ensures that both sides get nicely golden and crispy. You’re looking for those edges to start turning a beautiful golden brown and for the chips to feel firm and slightly rigid to the touch. If you notice some chips are browning faster than others, you can carefully remove those from the baking sheet to prevent them from burning while the others continue to bake.
Cooling and Enjoying
Once your zucchini chips have reached your desired level of crispness, carefully remove the baking sheets from the oven. Let them cool on the baking sheets for a few minutes. As they cool, they will continue to crisp up even further. Then, transfer them to a wire rack to cool completely. This allows air to circulate around them, preventing any trapped moisture from making them soft again. Once they are completely cool, they are ready to be enjoyed! They are best eaten the same day they are made for maximum crispness, but if you have leftovers, you can store them in an airtight container at room temperature for a day or two, though they may lose some of their crunch. Enjoy your delicious, homemade, crispy baked zucchini chips!

Conclusion:
I hope you’ve enjoyed learning how to make these incredibly delicious and healthy crispy baked zucchini chips! This recipe is a fantastic way to transform a simple summer squash into a satisfying snack or appetizer that even picky eaters will love. The magic lies in achieving that perfect crunch without the deep-frying hassle, making them a guilt-free indulgence. They’re incredibly versatile and pair wonderfully with a variety of dips, from classic ranch to a zesty garlic aioli or even a spicy sriracha mayo. Feel free to experiment with different seasonings too; a sprinkle of paprika, garlic powder, or even some Italian herbs can add exciting new flavor dimensions. I truly encourage you to give these crispy baked zucchini chips a try – you won’t be disappointed by how easy and rewarding they are to make!
Frequently Asked Questions:
Why are my zucchini chips not crispy?
Several factors can contribute to soggy zucchini chips. Ensure your zucchini slices are uniformly thin. Excess moisture is the biggest enemy, so pat them thoroughly dry with paper towels after slicing. Don’t overcrowd the baking sheet; give each chip enough space for air to circulate. Finally, make sure your oven temperature is correct and you’re baking them for the full duration until golden and firm.
Can I make these ahead of time?
While best enjoyed fresh for maximum crispness, you can bake them a few hours in advance and let them cool completely on a wire rack. Store them in an airtight container at room temperature. Reheating them briefly in a toaster oven or a low oven can help restore some of their crispiness if they’ve softened.
What other vegetables can I use for crispy baked chips?
This method works wonderfully with other firm vegetables! Thinly sliced sweet potatoes, butternut squash, or even potato slices (though they may require a slightly longer baking time) can be transformed into delicious crispy baked chips using a similar technique.
Crispy Baked Zucchini Chips
Thinly sliced zucchini baked until perfectly crispy and seasoned with a savory blend.
Ingredients
-
1 medium zucchini
-
1 tablespoon olive oil
-
½ teaspoon kosher salt
-
½ teaspoon black pepper
-
¼ teaspoon onion powder
-
½ teaspoon paprika
Instructions
-
Step 1
Preheat oven to 400°F (200°C). Line two baking sheets with parchment paper. -
Step 2
Slice the zucchini thinly, about 1/16 inch thick. A mandoline is recommended for even slices. -
Step 3
In a large bowl, toss the zucchini slices with olive oil, kosher salt, black pepper, onion powder, and paprika until evenly coated. -
Step 4
Arrange the seasoned zucchini slices in a single layer on the prepared baking sheets, ensuring they do not overlap. -
Step 5
Bake for 10-15 minutes, then flip the slices and bake for another 5-10 minutes, or until golden brown and crispy. Keep a close eye as they can burn quickly. -
Step 6
Remove from oven and let cool slightly on the baking sheets before serving. They will crisp up further as they cool.
Important Information
Nutrition Facts (Per Serving)
It is important to consider this information as approximate and not to use it as definitive health advice.
Allergy Information
Please check ingredients for potential allergens and consult a health professional if in doubt.