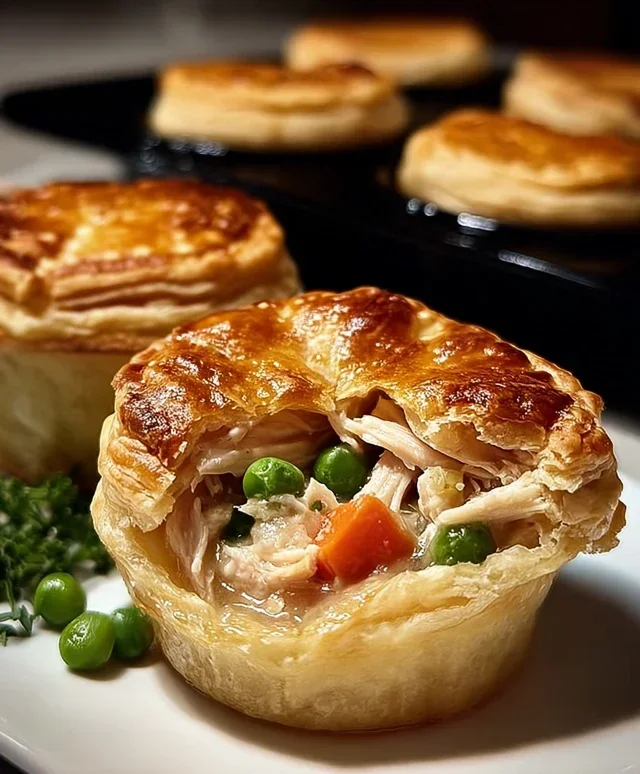
Mini Chicken Pot Pies – Easy Comfort Food Recipe
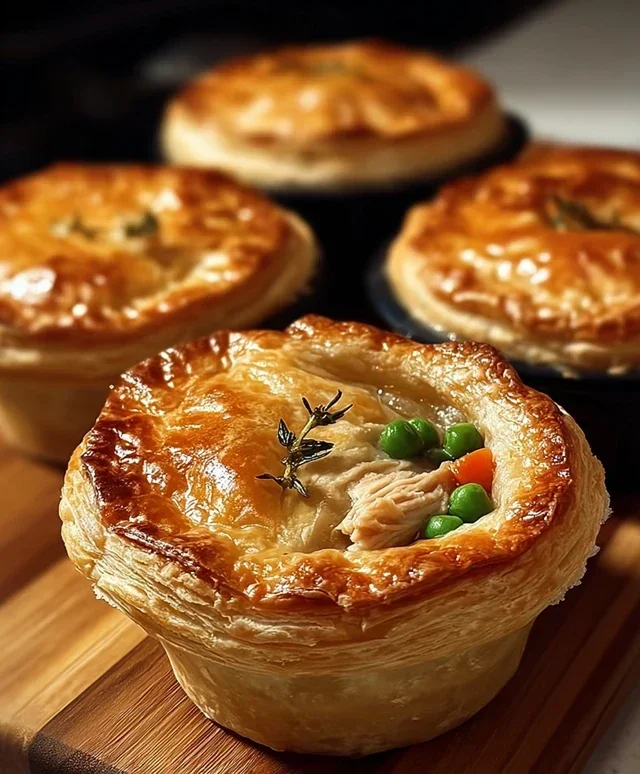
Mini Chicken Pot Pies are the ultimate comfort food, delivered in perfectly portioned, adorable packages. There’s something inherently heartwarming about a chicken pot pie – that creamy, savory filling packed with tender chicken and vegetables, all nestled under a flaky, golden crust. But these individual delights elevate the experience. They’re not just easier to serve (no more wrestling with a giant pie for single servings!), they also feel incredibly special. Imagin extracte pulling out these charming little pots of deliciousness for a cozy weeknight dinner, a delightful lunch, or even as a crowd-pleasing appetizer. The satisfying crunch of the pastry giving way to that rich, flavorful filling is a culinary hug, and with these mini versions, everyone gets their own perfect slice of happiness. Get ready to fall in love with mini chicken pot pies all over again!
Why You’ll Adore These
The Perfect Portion of Comfort
Mini Chicken Pot Pies
There’s something incredibly comforting about a classic chicken pot pie. The creamy filling, tender chicken, and flaky crust are a match made in culinary heaven. But sometimes, a full-sized pot pie feels a bit… much. That’s where these delightful mini chicken pot pies come in! They’re the perfect portion size for a satisfying individual meal, ideal for weeknight dinners, a fun lunch option, or even as a crowd-pleasing appetizer. Plus, the use of refrigerated biscuits makes them surprisingly quick and easy to prepare, so you can enjoy all the cozy flavors without a lengthy commitment. Let’s get cooking!
Ingredients:
Cooking Instructions
Creating these mini pot pies is a straightforward process, broken down into manageable steps. We’ll start by preparing our filling, then move on to assembling and baking our delightful little pies.
1. Prepare the Chicken and Vegetables: Before we dive into the creamy filling, we need to ensure our chicken is cooked through and tender. You can do this by dicing your boneless chicken breast into small, bite-sized pieces, about ½-inch cubes. Then, in a skillet over medium heat, add a light coating of cooking spray. Sauté the diced chicken until it’s no longer pink and cooked through. This usually takes about 5-7 minutes. Once the chicken is cooked, remove it from the skillet and set it aside. In the same skillet (no need to wash it!), add the frozen peas and carrots. Sauté them for a few minutes, just until they are slightly tender and have lost some of their frozen appearance. This helps to release their sweetness and adds a lovely pop of color to our pot pies.
2. Create the Creamy Filling: Now for the heart of our mini pot pies – the luscious, creamy filling. In a medium bowl, combine the entire can of cream of chicken soup. This soup acts as our flavor base and binder, creating that signature rich and savory sauce. To this, add the cooked diced chicken and the sautéed frozen peas and carrots. Next, we’ll introduce our seasonings. Sprinkle in the ½ teaspoon of garlic powder for a warm, aromatic note, followed by the ½ teaspoon of onion powder to deepen the savory flavors. Finally, add the ¼ teaspoon of salt. It’s important to start with a smaller amount of salt, as the cream of chicken soup already contains sodium. You can always adjust the seasoning to your preference later if needed. Stir everything together thoroughly until all the ingredients are well incorporated and coated in the creamy soup. Make sure there are no dry pockets of chicken or vegetables.
3. Assemble the Biscuit Crusts: This is where the magic of convenience comes into play! We’ll be using refrigerated biscuits to create our flaky pot pie tops. Lightly grease a muffin tin with cooking spray. This is crucial to prevent the biscuits from sticking and to ensure easy removal of your finished pot pies. Open one can of the refrigerated biscuits. For each cavity in your muffin tin, take one biscuit. Gently press and stretch each biscuit into a round shape, roughly the size of your palm. We want them to be thin enough to form a nice crust, but not so thin that they tear easily. Carefully place one stretched biscuit into each muffin cup, pressing it gently against the bottom and up the sides to form a cup. Repeat this with the remaining biscuits from the first can, filling 8 muffin cups. You’ll have enough filling for another round, so you can repeat this process with the second can of biscuits if you want to make more, or save the second can for another use.
4. Fill and Top the Pot Pies: With our biscuit cups ready, it’s time to fill them with our delicious chicken mixture. Spoon the creamy chicken, vegetable, and soup mixture evenly into each of the biscuit-lined muffin cups. Be generous, but try not to overfill, as you want to leave enough room for the top crust. Now, open the second can of refrigerated biscuits. For each mini pot pie, take one biscuit. Gently flatten and stretch it to create a lid for your pot pie. Place this flattened biscuit gently on top of the filling in each muffin cup, pressing the edges of the top biscuit to seal it to the edges of the bottom biscuit. This creates a senon-alcoholic aled pocket for all that delicious filling to steam and cook. Ensure the edges are well senon-alcoholic aled to prevent the filling from leaking out during baking. You can use your fingers or a fork to crimp the edges together for a more decorative and secure seal.
5. Bake to Golden Perfection: The final step is to bake these beauties until they are golden brown and puffed up! Preheat your oven to 375 degrees Fahrenheit (190 degrees Celsius). Carefully place the muffin tin into the preheated oven. Bake for approximately 18-22 minutes. Keep an eye on them during the last few minutes of baking. You’re looking for the biscuits to be beautifully golden brown on top and around the edges, and for them to be puffed up. The filling inside should be bubbling gently. Once they look perfectly golden and cooked, carefully remove the muffin tin from the oven. Let them cool in the muffin tin for about 5-10 minutes. This resting period is important as it allows the filling to set slightly and makes them easier to remove without falling apart. After the resting period, use a small spatula or knife to carefully loosen the edges of each mini pot pie from the muffin tin and gently lift them out. Serve immediately and enjoy the comforting flavors of homemade chicken pot pie, in a perfectly portioned mini package!
Conclusion:
I hope you’ve enjoyed learning how to make these adorable and delicious Mini Chicken Pot Pies! They truly are a fantastic way to enjoy all the comforting flavors of classic chicken pot pie in a perfectly portioned, crowd-pleasing format. The flaky pastry crust, the creamy, savory filling packed with tender chicken and vegetables – it’s a winning combination that’s surprisingly easy to achieve. These mini delights are perfect for individual servings, making them ideal for family dinners, potlucks, or even a special appetizer.
For serving, these mini chicken pot pies are wonderful on their own, but they also pair beautifully with a simple green salad dressed with a light vinaigrette, or some steamed green beans for an extra touch of freshness. Don’t be afraid to get creative with variations! You can swap the chicken for turkey, add different vegetables like peas, corn, or even diced potatoes, or try a sprinkle of fresh herbs like thyme or rosemary in the filling. I truly encourage you to give these mini chicken pot pies a try – you won’t be disappointed!
Frequently Asked Questions about Mini Chicken Pot Pies:
Can I make the pastry from scratch?
Absolutely! While store-bought puff pastry or pie crust makes this recipe super convenient, you can definitely use your favorite homemade pie dough recipe. Just be sure to roll it out thinly enough for those perfectly crisp crusts on your mini pot pies.
How should I store leftovers?
Leftover mini chicken pot pies can be stored in an airtight container in the refrigerator for up to 3 days. To reheat, I recommend placing them on a baking sheet in a preheated oven at around 350°F (175°C) for about 10-15 minutes, or until heated through and the crust is re-crisped. This method generally yields better results than microwaving.
Mini Chicken Pot Pies
Quick and easy individual chicken pot pies using refrigerated biscuits for a flaky crust.
Ingredients
-
2 cans refrigerated biscuits (8-count each)
-
½ lb boneless chicken breast, diced
-
1 cup frozen peas & carrots
-
1 can (10.5 oz) cream of chicken soup
-
½ tsp garlic powder
-
½ tsp onion powder
-
¼ tsp salt
-
Cooking spray
Instructions
-
Step 1
Preheat oven to 375°F (190°C). Lightly grease a 12-cup muffin tin with cooking spray. -
Step 2
In a bowl, combine diced chicken breast, frozen peas & carrots, cream of chicken soup, garlic powder, onion powder, and salt. Mix well. -
Step 3
Separate the refrigerated biscuit dough. Flatten each biscuit slightly and press one biscuit into the bottom and up the sides of each muffin cup, forming a crust. -
Step 4
Spoon the chicken mixture evenly into the biscuit-lined muffin cups. -
Step 5
If desired, use remaining biscuit dough to cut out small shapes (like stars or circles) and place them on top of the filling for extra crust. Crimp edges to seal. -
Step 6
Bake for 18-20 minutes, or until the biscuits are golden brown and the filling is bubbly. -
Step 7
Let cool slightly before carefully removing from muffin tin. Serve warm.
Important Information
Nutrition Facts (Per Serving)
It is important to consider this information as approximate and not to use it as definitive health advice.
Allergy Information
Please check ingredients for potential allergens and consult a health professional if in doubt.